Advertisement
Quick Links
Advertisement

Subscribe to Our Youtube Channel
Related Manuals for Fisher-Price GHP43


Summary of Contents for Fisher-Price GHP43
- Page 1 GHP43 OWNER’S MANUAL | MANUAL DEL USUARIO...
- Page 2 UNITED STATES ARGENTINA 1-800-432-5437. Fisher-Price, Inc., Mattel Argentina, S.A., Av. Libertador 1000, 636 Girard Avenue, East Aurora, NY 14052. Piso 11 – Oficinas 109 y 111, Vicente López – Prov. Buenos Aires. Tel.: 0800-666-3373. MÉXICO Importado y distribuido por Mattel de COLOMBIA México, S.A.
- Page 3 BEFORE YOU BEGIN | ANTES DE EMPEZAR IMPORTANT! Please keep these instructions for future reference. Please read these instructions before assembly and use of this product. IMPORTANT! Before assembly and each use, inspect this product for damaged hardware, loose joints, missing parts or sharp edges. Do not use the product if any parts are missing, damaged or broken.
- Page 4 CONSUMER INFORMATION INFORMACIÓN AL CONSUMIDOR WARNING FALL HAZARD: Infants have suffered skull fractures falling while in and from floor seats: • Use ONLY on the floor. • NEVER use on an elevated surface. • NEVER lift or carry child in product. •...
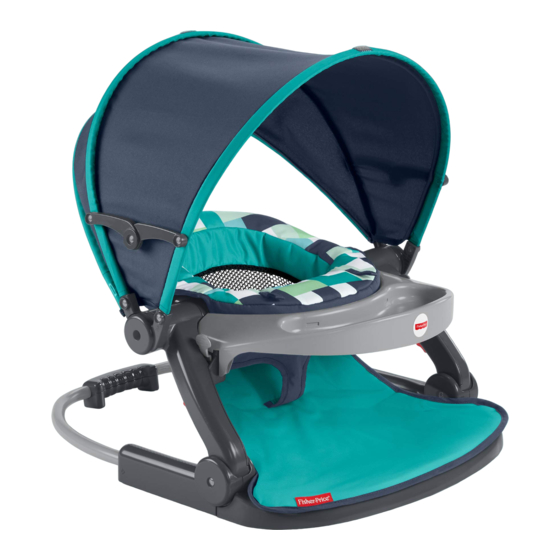
- Page 5 ASSEMBLED PARTS | PIEZAS ENSAMBLADAS...
- Page 6 ASSEMBLY | MONTAJE The frames and the front base are designed to fit one way. If these parts do not “snap” together, try fitting each frame into the opposite socket in the front base. Los armazones y base delantera están diseñados para ajustarse de una sola manera.
- Page 7 ASSEMBLY | MONTAJE If you cannot “snap” the parts into place, you may have assembled the seat ring backwards. Remove the seat ring from the frames and turn it around so that the wider, flat side is toward the front base. Then, repeat this assembly step.
- Page 8 ASSEMBLY | MONTAJE Fit the end of the pad with the pegs down through the seat ring. Introducir el extremo del colchón con las clavijas en el aro del asiento. Fit the eight buttons holes on the pad to the eight pegs under the seat ring.
- Page 9 ASSEMBLY | MONTAJE The canopy hubs are keyed to the frame sockets. Locate the tab on each canopy hub and match it to the notch on the outside of each frame socket. You may need to turn a hub on the canopy to assemble it to the frame socket in the next step.
- Page 10 FABRIC SEAT HELPS BABY SIT UP! ¡LA SILLA DE TELA AYUDA AL BEBÉ A SENTARSE! Placing and Removing Baby Place the assembled product on the floor. Kneel or stand behind the seat and fit or remove baby’s legs into or from the leg openings in the seat pad.
- Page 11 OPENING THE FRAME | ABRIR EL ARMAZÓN Lift the frames until each “snaps” into place. Push down on the seat ring to be sure the frame is open. Subir los armazones hasta que cada uno se ajuste en su lugar. Presionar hacia abajo el aro del asiento para asegurarse que los armazones se abren.
- Page 12 CLOSING THE FRAME | DOBLAR EL ARMAZÓN While lifting the latches on the back of the seat, lower the seat. Mientras levantas los seguros de la parte trasera del asiento, debes bajar el asiento. Lit and lower the canopy. Sube y baja la cubierta.
Need help?
Do you have a question about the GHP43 and is the answer not in the manual?
Questions and answers