Advertisement
Quick Links
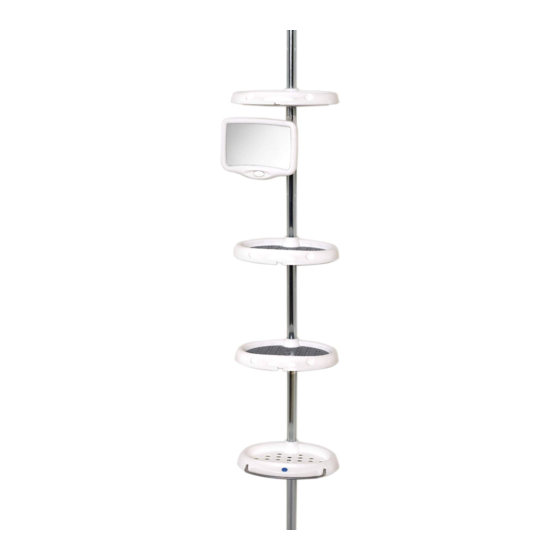
Assembly Instructions - Model 5804B (White)
Instrucciones de Ensamblado - Modelo 5804B (Blanco)
Instructions de montage - Modèle 5804B (Blanc)
Before You Begin:
Thank you for purchasing this product. Please identify all parts and hardware pieces before you begin.
When laying out parts, place them on a soft surface to prevent scratching.
If any pieces are missing, call our Toll Free Number 1-800-892-3986 between 8:00AM-5:00PM EST Monday
through Friday or contact our website at www.zennahome.com for more information.
Antes de que empiece:
Muchas gracias por comprar este producto. Identifique todas las piezas y las piezas de ferretería antes de
comenzar. Al distribuir las piezas, colóquelas sobre una superficie suave para evitar que se rayen.
Si faltaran piezas, llame a nuestro número gratuito 1-800-892-3986 entre las 8:00 a.m.- 5:00 p.m., hora
del este, de lunes a viernes o contáctenos a través de nuestro sitio web en www.zennahome.com para
solicitar mas información.
Avant de commencer :
Merci d'avoir acheté ce produit. Veuillez identifier toutes les pièces et les accessoires de montage avant de
commencer. Lorsque vous déballez les pièces, placez-les sur une surface non rugueuse afin d'éviter les
éraflures.
S'il venait à vous manquer des pièces, appelez notre numéro sans frais 1.800.892.3986 entre 8 h et 17 h
(heure de l'Est des États-Unis), du lundi au vendredi, ou contactez notre site Web à www.zennahome.com
pour de plus amples informations.
Pg 1 of 9
©2016 Zenith Home Corp.
MCS 4/15/2016
www.zennahome.com
IS5842
Advertisement

Subscribe to Our Youtube Channel
Summary of Contents for Zenna Home 5804B
- Page 1 Assembly Instructions - Model 5804B (White) Instrucciones de Ensamblado - Modelo 5804B (Blanco) Instructions de montage - Modèle 5804B (Blanc) Before You Begin: Thank you for purchasing this product. Please identify all parts and hardware pieces before you begin. When laying out parts, place them on a soft surface to prevent scratching.
- Page 2 List of Parts: Lista de Partes: Liste des pièces : (A) 1 Straight tube (B) 2 Long tapered tubes (with spring packed inside) 2 Tubos largos con ahusamiento 1 Tubo recto 2 tubes coniques longs (resorte empacado dentro del tubo) 1 tube droit (ressort à...
- Page 3 (K) 2 Plastic T-caps (L) 1 Plastic end cap with hole (M) 1 Soft vinyl end cap 2 Cubiertas en forma de "T" 1 Cubierta terminal con orificio 1 Cubierta terminal de de plástico de plástico vinilo suave 2 embouts en T en plastique 1 embout en plastique perforé...
- Page 4 NOTE: No matter the distance NOTA: Cualquiera sea la REMARQUE : quelle que soit la tubes (A) and (C), are ALWAYS distancia, SIEMPRE se usan distance, les tubes (A) et (C) used. los tubos (A) y (C). sont TOUJOURS utilisés. Measure the distance between the Mida la distancia entre el reborde Mesurez la distance entre le rebord...
- Page 5 Place all plastic inserts (F) into plastic Coloque todos los separadores de Insérez toutes les tablettes en plastique (F) trays (E) by pressing insert into tray. See plástico (F) en las bandejas de plástico (E) dans les supports (E) en appuyant fermement. Figure 1.
- Page 6 NOTE: Assembly shown for NOTA: Ensamble mostrado REMARQUE : assemblage 92 - 97 in. installation. para instalación de 92 a 97 correspondant à une pulgadas. installation avec une distance au plafond de Place a wedge (N) (tapered or rounded end up) on one of the long tapered Coloque una cuña (N) (ahusada o con 234 à...
- Page 7 Place the tapered end of the tube with the two shelves on it into the untapered end of the other tube with the shelves on it. Attach the mirror arm to the back of the mirror. Figure 1. Attach the mirror assembly (J) in desired location on tubes, using the clamp on the mirror assembly.
- Page 8 Slide the plastic end cap with hole (L) on the 1/2” tube (C). Place a T-cap (K) on each end of the 1/2” tube (C). Deslice la cubierta terminal de plástico con orificio (L) en el tubo de ½" (C). Coloque una cubierta en forma de "T" (K) en cada extremo del tubo de ½"...
- Page 9 1. Slip the tapered end of the short 1. Deslice el extremo ahusado del 1. Enfilez l’extrémité conique du tube tapered tube (D) into the untapered tubo ahusado más corto (D) dentro conique court (D) dans l’extrémité end of the bottom tube of the del extremo que no está...
Need help?
Do you have a question about the 5804B and is the answer not in the manual?
Questions and answers