Table of Contents
Advertisement
Quick Links
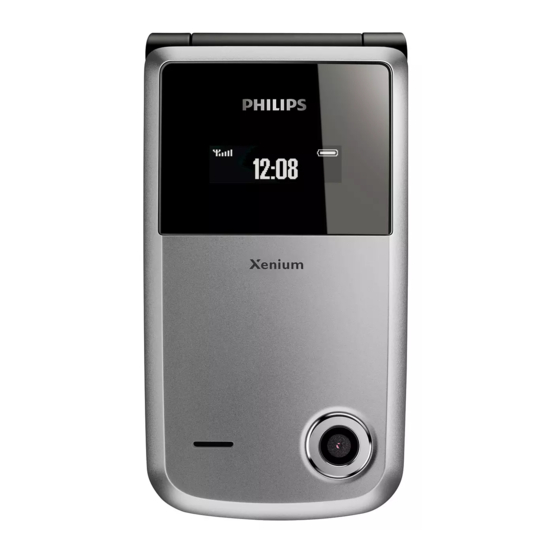
Discover Your Phone
Back of phone:
Camera lens
Side volume
keys
Left softkey
Navigation
keys
Pick up key
Micro SD
card slot
Microphone
Philips continuously strives to improve its
products.Therefore, Philips reserves the rights to
revise this user guide or withdraw it at any time
without prior notice. Philips provides this user
guide "as is" and does not accept, except as
required by applicable law, liability for any error,
omission or discrepancy between this user guide
and the product described. The device is meant
to be connected to GSM/GPRS networks.
262K colour
How to ...
TFT LCD
Switch the
Right softkey
phone On/Off
Enter your
Hang up and
PIN code
on/off key
Alphanumeric
Lock/unlock
keypad
the keypad
Make a call
Headset,
charger, and
data cable
End a call
Answer a call
Long press and release ).
Enter your PIN code using the
keypad and press , or L to
confirm.
Long press *.
Enter the phone number using
the keypad and press (.
Press ).
When the phone rings, press (.
Advertisement
Table of Contents

Related Manuals for xenium CTX600

Summary of Contents for xenium CTX600
- Page 1 Discover Your Phone and the product described. The device is meant to be connected to GSM/GPRS networks. 262K colour How to ... Back of phone: TFT LCD Camera lens Long press and release ). Switch the Side volume Right softkey phone On/Off keys Enter your...
- Page 2 Press ( in idle mode. Activate/ In idle mode, enter the phone Access all deactivate number using the keypad or calls list handsfree select contact Press + in idle mode. Access mode phonebook. Shortcuts During a call, pressR to Press - in idle mode. Access activate the handsfree mode.
- Page 3 Settings key to answer the call; long press to reject the call. Main Menu page 67 You can access the different features of your Xenium page 65 page 71 X600 phone from the main menu. The following table Press , in idle mode to access the main menu and summarises the structure of the main menu, what the press +, -, <...
- Page 4 the options and functions directly. You can also press L to set the browse style as List or Grid. When navigating through a list, the scrolling bar on the right of the screen will indicate your current position in the list. Press , Select to access the corresponding options of the selected item in the list.
-
Page 5: Table Of Contents
Table of contents 1. Getting Started IP Dial ............... 15 ........... 7 Answer a call ........... 15 Inserting the SIM card ........7 Reject a call ............. 15 Switching on the phone ........9 Answer a second call (Network Charging the battery ........9 dependent) ............ - Page 6 6. Media Player 10. Business ..........28 ............53 Music player ............ 29 Calendar ............53 7. Camera Alarm ..............54 ............31 Calculator ............54 Camera ............. 28 Voice recorder ..........55 Video recorder ..........33 Secretary OTG ..........55 8.
- Page 7 Call options ............. 67 Clear history ........... 70 15. Settings ............71 General ............. 71 Display .............. 73 Sounds .............. 73 Connectivity ............ 74 Icons & Symbols ..........76 Precautions ............78 Troubleshooting ..........83 Philips Authentic Accessories ....85 Trademark Declaration ......
-
Page 8: Getting Started
1. Getting Started Please read the safety instructions in the "Precautions" section before use. Before you start using your phone, you must insert a valid SIM card supplied by your GSM operator or retailer. The SIM card contains your subscription Remove the battery information, your mobile telephone number, and a Put your finger at the top of the battery and lift the... -
Page 9: Switching On The Phone
Insert the SIM card Make sure that the clipped corner of the SIM card is facing the correct direction (clipped corner at upper left) and the metallic contacts are facing downwards. Slide the SIM card into the card slot until it stops. When you remove your SIM card the first time, make sure that you smoothen the edges, otherwise you may have difficulty sliding in the Replace the back cover... -
Page 10: Charging The Battery
For more information on PIN code, see “Security” on page 72. If you enter an incorrect PIN code 3 times in succession, your SIM card will be blocked. To unblock it, you must obtain the PUK code from your network operator. Charging the battery Your phone is powered by a rechargeable battery. -
Page 11: Insert A Micro Sd Card
the charger is to unplug it, so it is advisable to use an easily accessible power socket. If you do not intend to use your phone for several days, we recommend that you remove the battery. You can use the phone while it is charging. If the battery is completely flat, the battery icon To remove the micro SD card, push down the will only reappear after a few minutes of... - Page 12 associated with the numeric key from the following list: • Alarm • Bluetooth • Calculator • Calendar • View calls • Camera • Contacts • Create message • Firewall • Flight mode • Games • Homepage • Inbox • Languages •...
-
Page 13: Calling
2. Calling anymore. If this happens, please contact your network operator. This chapter describes the features and options related to making and receiving calls. Switch off the phone At all times, you can long press ) to switch off the Switch on the phone phone. -
Page 14: Options During A Call
Options during a call When the volume has been set, the call volume will take effect immediately and the settings will be During a call, you can press , to activate/cancel applied to your subsequent calls. or press L Handsfree Options to carry out the following operations:... -
Page 15: Make An Emergency Call
Make an emergency call Make a Conference Call (Network dependent) You can make an emergency call anytime, irrespective of whether the mobile phone has been Your phone supports multi-party call of up to five registered on the network. members. The screen will display Conference call 1. -
Page 16: Switch Calls (Network Dependent)
Switch calls (Network dependent) Reject a call Press ) to reject a call. When you have one active call and one call on hold, you can press L Options, then select Swap to switch Answer a second call (Network between the 2 calls. dependent) Call Handsfree During a call, press L... - Page 17 Camera function, or a picture you have downloaded via WAP or data cable. During a call, if the other party's name card is linked to a picture, the incoming call background will display the corresponding picture. This feature is referred to Contact picture.
-
Page 18: Text And Number Entry
*During text editing, you can press * to switch 3. Text and number entry input mode; the status bar on the screen will Input method display your current input mode. represents Simplified Chinese Pinyin input mode; Your mobile phone supports several input represents Simplified Chinese stroke input methods, which include: mode;... -
Page 19: Entering Symbols
® # to enter punctuations or long press it to select English input input language. What is it? Entering symbols ® predictive Text Input is an intelligent editing In any input mode, press # to open/close symbols mode messages, which includes comprehensive dictionary. -
Page 20: Basic Text Input
To enter the word «Home» in basic text input Short press to clear a letter, long press Clear mode, you should therefore key 4, 4 (GHI) 6, to clear all entries. 6, 6 (MNO), 6 (MNO), 3, 3 (DEF). Shift case, select input mode. Long Letters, numbers and symbols are located on each press to turn on/off T9 feature. -
Page 21: Pinyin Input
Pinyin Input The general steps of using Pinyin input method are as follows: Press * and select Pinyin input mode. Each Pinyin letter is represented by one of the numeric keys as 1. Enter Pinyin letters shown below: (Note that Pinyin input mode is Clear to clear solely meant for the input of Simplified Chinese... -
Page 22: Stroke Input
Enter the pinyin letters accordingly. Press once on Horizontal the key corresponding to the pinyin letter without Vertical Left-falling having to consider its position on the key. Pinyin input method will automatically select and list all Over- Special Right-falling possible combinations for you to select. down 『王』... - Page 23 The basic steps of Stroke input are as follows: desired character. The stroke input method in this phone classifies a chinese character into 5 basic 1. Enter strokes strokes: (horizontal, vertical, left falling stroke, right falling stroke and over-down) as well as a (excluding special stroke.
- Page 24 Generally, you will be able to find a desired character before you finished entering all the strokes. After you have entered the name of the phonebook or SMS, pressR Back to exit from the association character list and press , to confirm completion of text editing.
-
Page 25: Entertainment
4. Entertainment applications via WAP or USB and run them in the Java environment. This section describes the games and additional tools installed on your mobile phone. Some of the features described here are dependent on the configuration of your mobile phone, the country in which you purchased your mobile phone, and/or your service provider. -
Page 26: Browser
5. Browser changes of configuration made by you or by the network operator. Please check with your network operator for the most updated information. Homepage Select this menu to access the homepage directly. Your phone comes with a WAP browser. You can You can also set the homepage address in the obtain news, sports and weather information, as settings menu. - Page 27 History To add a new bookmark: This menu allows you to quickly access the last web Press , to enter the Go to Bookmark menu page you have visited. main menu from idle When you enter this menu, the web pages you mode select have previously visited will be listed.
-
Page 28: Push Inbox
you or by the network operator, or changes in WAP address or contents made by the internet content provider. Please check with your network operator and your internet content provider for the most updated information. The following options are available: WAP profiles Allows you to configure the profiles. -
Page 29: Media Player
6. Media player Details View detailed information of the selected track. Playlists The stored playlists are displayed on the screen. To create a new playlist, select playlist. Enter the Music Player playlist name and press ,. Then use +/- to select a playlist, press ,. - Page 30 Artists The available options include: A list of singer names is displayed on the screen. Options Description You can press +/- to select a certain artist and press L or , to display all tracks of the selected artist. Play in Allows you to listen to the music From the listed tracks, use +/- to select the music background...
- Page 31 , key Short press to Start/Pause/resume Play mode Select between Repeat one, Repeat music playback. all, Shuffle and repeat, Shuffle or Off. < or > Short press to select the previous Refresh all lists All tracks stored in the phone song/next song.
-
Page 32: Camera
7. Camera Press side key +/-. Zoom in/out Only available for picture resolution of 640*480 or below. Camera Adjust Press +/- side keys. Your mobile phone features a 2.0 mega pixel digital brightness camera that allows you to take pictures and record Brightness level is -3 to +3. - Page 33 Options Description Camera Color effects: (default), B&W, Mode Sepia, Blue or Red. Picture Select image size: 1600*1200, resolution 1280*1024, 1024*768, 640*480 The selected color effect will be and 176*220. displayed on the screen in real time. Picture Select image quality: Super fine, Fine...
-
Page 34: Video Recorder
MMS, or L Send the picture via Bluetooth When there is not enough memory space, you Options to carry out the following operations: will not be able to save the picture and you will Options Description be prompted with a warning message. You have to delete existing pictures before you can store Delete Delete the current picture. - Page 35 Press , key once. Press again to Record a DV mode Color effect: (default), B & video stop recording. Sepia, Blue, or The video will be automatically The selected color efffect will saved and stored in My Files > be displayed on the screen. Videos.
- Page 36 or pause the playback, or press L Options to carry Video length: (default) or out the following operations: Unlimited. Options Description If you select MMS, the size of the recorded video will be Send Send the recorded video: smaller than the currently Via Bluetooth MMS.
-
Page 37: Messages
8. Messages 3. Enter the SMS content in the SMS editor and press L Options to carry out the following operations: Clear text Delete the text on the editing screen. Create message Save as Save as draft: save the SMS as draft. Save as template: save the SMS as template. - Page 38 SMS editor, the message will be displayed on 3. Enter the MMS content in the MMS editor and press ,. Then press L the screen. Options to carry out the following operations: MMS (network dependent) Continue Enter details for the MMS: Your phone allows you to send and receive To: Select L to enter the phone...
-
Page 39: Inbox
4. Press , Send to access the next option menu: Edit subject Edit the subject of the MMS Contacts Select the contact from the Contacts Exit editor Exit from the MMS editor. list. Spell word Select Chinese pinyin input method. Groups Select the group from the Groups... - Page 40 messages or press L Options to carry out the Details View information of the message following operations: such as date, time and sender. Reply The sender's number will be used as Dial Extract the sender's number from destination number the message and dial the number. automatically and the message Smart Search Search the messages by sender's...
-
Page 41: Sent
If there are messages in the Sent box, they will Extract Opens list numbers be listed on the screen. numbers available in the message. In this list, 4. Press +/- to select a message. When a message is the L option opens a pop-up selected, its contents will be displayed on the window showing the following screen. -
Page 42: Outbox
5. Press , to enter the next screen whereby the mesage, or press L Options to carry out the message details will be displayed. Press , following operations: Forward to forward the selected mesage, or Forward When you select Forward, the press L Options to carry out the following... -
Page 43: Drafts
messages or press L Drafts Options to carry out the following operations: List the messages that were created and saved but Details View information of the message were sent, messages that were such as date, time and sender. automatically saved before you were able to save Reply The sender's number will be used as or send them when you exit from the message... -
Page 44: Spam Box
Select You can select several messages one Restore Move the message to the original by one or all at once. You can press , multiple location location where the message is sent or to select/cancel the operations on received. multiple messages. Checkboxes will be Dial Extract the sender's number from marked on the left of the selected... -
Page 45: Templates
email service provider. In some cases, your mobile Add to When you add the contact to the phone service provider may also provide an e-mail blacklist blacklist, you will not receive call/ service. message from this contact anymore. Create e-mail Move to my Move the selected message to To write an e-mail, select... -
Page 46: Advanced
Outbox Number of To define the number of mails The menu lists all the e-mails you have sent. Press mails received received at a time. L to: Edit, View, Delete, Delete all. at a time Check mail Incoming To set the POP information used The menu allows you to connect to your mailbox server to receive e-mails. -
Page 47: Voice Mail
channel numbers. It gives you access to the options set message sending options. You can set the date listed below. and time to send the message. When you select a message from the list of text Options Description messages configured for sending at specific times, Reception Select to turn on/off the reception of you can press ,... -
Page 48: Settings
Call voice mail Validity period Allows you to select the duration by which your When you receive a voice mail, the phone will send messages will be stored in the service center. You you an alert. You can then call your voice mailbox can select from: hour, hours,... - Page 49 Storage location Expiry time You can press , Change to change the preferred Allows you to select the duration by which your storage location of your messages: card MMS will be stored in the MMS center. You can (Default) or Mobile phone.
-
Page 50: My Files
9. My files Send Send the selected file: Via bluetooth MMS. Modify Modify or edit the selected picture. Advanced Cut: Similar to copy, but the original This menu allows you to store the files in different file will be deleted. folders (Pictures, Videos, Sounds, Others) to facilitate Copy: Copy the selected file to more efficient management of files in your phone... -
Page 51: Sounds
3. The folder options include: wallpaper: If the selected photo is 176*220 or smaller, it will be Rename Modify the name of the selected displayed as wallpaper in its original folder. size. If it is larger than 176*220, it will be re-sized accordingly. Details Display detailed information of the Delete... -
Page 52: Videos
3. The folder options and their operations are the Send The available options are: same as Pictures menu. bluetooth MMS. Videos Advanced Cut: Similar to copy, but the original file will be deleted. When you enter this menu, the videos which you Copy: Copy the selected file to have recorded using the phone's camera as well as another folder... -
Page 53: Others
> Details Display detailed information of the Long press to fast forward. selected video, such as last modified Exit/return to an upper menu level. date, file size, etc. Return to idle screen. Delete Delete the selected video. Others Change view You can select to view the video files in List... -
Page 54: Business
10. Business information of the event, such as subject, location, start date, start time, end date, end time, reminder and repeat method. If the memory space for events is full, the phone will prompt you that there is no more space. Calendar When editing date and time, the phone will This menu displays the calendar. -
Page 55: Alarm
switch on the phone. For repeated events, only If you have downloaded your own ring tones the latest one will be alerted. and have selected such a ring tone to be the alarm alert, then after you set the alarm and Alarm switched off the phone, the alert tone will be changed back to the original factory settings. -
Page 56: Voice Recorder
Options Add a percentage symbol. Make another recording. > episode Options Calculate a remainders of a Delete Delete the selected file. > Modular division. Send Send the selected file. Add a decimal point. Rename Change the name of the selected file. -
Page 57: Stopwatch
time, and the phone will emit an alarm at the end of Send Send the selected file. the count-down. The alarm tone is the same as Rename Change the name of the selected your alarm clock. file. The minimum time is 1 minute. The format of the time is hh:mm:ss, and the maximum time input is 23 Edit Edit the... -
Page 58: Firewall
You can press +/- to select a particular number in Firewall the black list, then press L Options to carry out the This function provides a simple and quick method following operations: for you to avoid nuisance calls and SMS. Blacklist Change Open the phone number editor, to contains a list of phone numbers from which you... -
Page 59: Lunar Calendar (If Available)
LOption Call) or press to access the following Call number Enter the phone number directly, options: or press , (Available Select for: only in Phone • Contacts: Display the list of Mark as Mark a tick on the task as done or call) contacts for calling. -
Page 60: Contacts
11. Contacts New contacts To create a new SIM/phone contact: Press , and select Enter new contact Contacts Your phone features two phonebooks. The SIM phonebook is located on your SIM card and the Enter contact Enter the following for SIM number of entries you can store depends on the details card contacts. -
Page 61: View Contacts
information on text entry, see “Text and number Send Send the selected record: via SMS entry” on page 17). Contact Bluetooth. View contacts Copy to Copy the SIM entry to phone. phone In the phonebook, you can display the details of a contact by selecting it. -
Page 62: Special Numbers
Advanced Reset Restore group default settings. This menu provides you with advanced features so that you can view and edit your contacts: Special numbers Options Description This menu allows you to keep a list of useful Choose contact list numbers such as your own numbers, service •... -
Page 63: Profiles
12. Profiles Ring volume Level 8 Ringtones Default Alert type Vibrate and ring Your mobile phone has been preconfigured with the following modes: Key sound High • Personal (default) • Car • Flight Backlight level Level 4 • Home • Meeting •... - Page 64 Profile selection Meeting Ring volume Silence To select a different profile: Ringtones Default Go to Profiles Press , to enter the main menu menu from idle mode and select Alert type Vibrate Profiles. Key sound Select the Press + or -. desired Backlight level Level 4...
- Page 65 Key sound Set the key sound or Off. Backlight level Select a backlight level from level 1 to level 4. Profiles...
-
Page 66: Connectivity
appears, press L to select the device you wish to 13. Connectivity establish a connection with. If you do not intend to use the Bluetooth feature for some time, you should deactivate it This menu provides you with more features to set in order to conserve battery power. -
Page 67: Usb Function
via the USB cable, and the size of file transfer is Settings Select to display more features: unlimited until your memory is full. • name: edit the name of the Besides, your phone can perform PC connections device with the Mobile Phone Tools. From main menu, •... -
Page 68: Calls
14. Calls Save to Save the number in the current the existing contacts list. Send Send a message to the selected Most options described in this chapter are messages number. You can send by operator and/or subscription dependent and MMS. require either a PIN2 code or a phone code. - Page 69 Auto Turn Auto answer on/off. When this Call The available options include: answer function is on, the incoming call will services • Call time: Display the duration of be answered automatically after 10 your calls and their charges: Total seconds. incoming calls, Total outgoing calls...
- Page 70 Call This menu allows you to limit the • Cost settings: This option is barring use of your phone to specific calls by available only when the charge preventing the reception or making information is included in your of different types of calls. To activate card.
-
Page 71: Clear History
Clear history This menu allows you to clear the call history in: Delete all/Missed calls/Answered calls/Outgoing calls/ calls. Press , Rejected Select to confirm deletion and Back to cancel deletion. Calls... -
Page 72: Settings
Select or Off. date When you select On, the time You can configure your Xenium X600 mobile information will be displayed in phone to best suit your usage preference. You can idle screen. configure the following settings: General, Display, •... - Page 73 Security Shortcuts Displays a list of shortcut features. • protection: Select or Off. You can set a new shortcut key by When you select On, you need establishing a link between a certain to enter the PIN code when you feature and a numeric or navigation switch on the phone.
-
Page 74: Display
Display You can set your phone to operate with different sound profiles. For details, see “Sounds” on You may configure your phone with different page 73. display settings: Options Description Options Description Alert type You can select Ring only, Vibrate only, Wallpaper Turn wallpaper display... -
Page 75: Connectivity
the ring tone you have chosen is one that comes as Preferred Networks default with your phone. Preferred network list is stored in the SIM card. It specifies the priority by which your phone will register to the available network during automatic Connectivity registration. - Page 76 Profile name To name the current profile To enter GPRS APN. Login To enter a login name. Password To enter the password. Authentication activate/deactivate feature. GPRS info This feature allows you to monitor the amount of data transferred during GPRS connection. Settings...
-
Page 77: Icons & Symbols
Icons & Symbols International roaming - Displayed when your phone is registered to a network In idle mode, several icons and symbols can be other than your own. displayed on the main screen. The status, network Whether to log on GPRS - There are 2 and battery icons are displayed all the time. - Page 78 New event - You have a new event. Miss call - Indicates there is a miss call. Call Divert - Indicates that the call divert function is activated. Silence - Indicates that silent mode is activated. Auto answer - Indicates that Auto answer is on.
-
Page 79: Precautions
Precautions borrowing your phone.Furthermore to prevent unauthorized use of your phone: Radio Waves Keep your phone in a safe place and keep it out of small children's reach. Your cellular mobile phone is a low Avoid writing down your PIN code. Try power radio transmitter... - Page 80 Your cellular telephone complies with all liquefied petroleum gas (LPG), check first that the applicable safety standards and the Radio vehicle complies with the applicable safety rules. Equipment Telecommunications Terminal In areas where you are requested to turn off radio Equipment Directive 1999/5/EC.
- Page 81 Improved performance period of time as well as avoiding unnecessary navigating in the menus will also help to save the In order to improve the performance of your battery's energy for longer phoning and stand-by phone, reduce radio energy emission, reduce performances.
- Page 82 Do not use your phone while driving phone and also avoid using it with an ambient temperature over 40°C. For your phone, the socket-outlet shall be installed Speaking on the telephone while driving near the phone and shall be accessible. lowers your concentration, which can be dangerous.
- Page 83 WEEE Marking in the DFU: against harmful interference in a residential installation. This equipment generates, uses and can “Information to the Consumer” radiate radio frequency energy and, if not installed and used in accordance with the instructions, may Disposal of your old product cause harmful interference...
-
Page 84: Troubleshooting
Troubleshooting warmer place and try again. In other cases, please contact your phone supplier. The phone does not switch on Your battery seems to over heat Remove/reinstall the battery. Then charge the You might be using a charger that was not intended phone until the battery icon stops scrolling. - Page 85 The display shows INSERT SIM Check that the SIM card has been inserted correctly. If the problem remains, your SIM card may be damaged. Contact your operator. When attempting to use a feature in the menu, the mobile displays NOT ALLOWED Some features are network dependent.
-
Page 86: Philips Authentic Accessories
Philips Authentic Data connect kit Accessories Provides easy data connection to your Philips mobile phone. The USB cable enables high-speed Some accessories, such as a standard battery and a communication between your phone and your charger, are included as standard accessories in computer. -
Page 87: Trademark Declaration
Trademark Declaration ® is a trademark of Tegic Tegic Euro. Pat. Communications Inc. App. 0842463 Bluetooth™ is a trade- mark owned telefonaktiebolaget L M Ericsson, Sweden and licensed to Philips. PHILIPS and PHILIPS’ Shield Emblem are registered trademarks of Koninklijke Philips Electronics N.V. -
Page 88: Specific Absorption Rate Information
While there may be differences between the SAR levels of various phones and at various positions, they all meet the international protection standards for exposure to radio waves. The highest SAR value for this Xenium X600 model phone when tested for compliance against the standard was 0,391 W/kg for ICNIRP recommendation and 0,361 W/kg for IEEE Std 1528. -
Page 89: Limited Warranty
Limited warranty Workmanship During The Limited Warranty Period? What Does This Limited Warranty Cover? During the limited warranty period, Philips or its authorized service representative will, at its Philips warrants to the original retail purchaser option either repair or replace, without charge (“Consumer”... - Page 90 inundation, fire, water or other liquid a) Return the Product to an authorized intrusion; or service center of Philips. You may contact b) Product that has been damaged due to the local Philips office for the location of repair, alteration, or modification by the nearest authorized service center.
- Page 91 AGREEMENT, PHILIPS PROVIDES CLAIMS BY THIRD PARTIES) RESULTING OTHER WARRANTY WHETHER EXPRESS FROM PURCHASE OR USE OF THE OR IMPLIED (WHETHER BY STATUTE, PRODUCT, TO THE FULLEST EXTENT UNDER THE OPERATION OF LAW OR ALLOWED BY LAW, WHETHER OR NOT OTHERWISE) AND SPECIALLY DISCLAIMS PHILIPS HAS BEEN ADVISED OF THE ANY WARRANTY OF SATISFACTORY...
-
Page 92: Declaration Of Conformity
China Germany. Identification mark: 0682 declare under our sole responsibility that the product June 12, 2008 Xenium X600 Cellular Mobile Radio GSM 900/1800/1900 TAC: 35520202 Quality Manager to which this declaration relates, is in conformity with the following Standards: SAFETY : EN 60950-1: 2001+A11:2004 HEALTH: EN50360: 2001 EMC: ETSI EN301 489-7 v 1.2.1;...