Table of Contents
Advertisement
Quick Links
HD25Bi
High Output
Insert Boiler Stove
Please fix label with serial number and stove
type here before putting manual into stove
Installation and Operating
Instructions
Please hand these instructions to the stove user when the installation is complete. Leave the stove ready for
operation and instruct the user in the correct use of the appliance and operation of controls.
Important: – This product must be installed by a suitably qualified installer.
Heat Design Ltd.
30-60 Hawthorn Road
Western Industrial Estate,
Naas Road,
Dublin 12
www.heatdesign.ie
PLEASE READ ALL THESE INSTRUCTIONS CAREFULLY!
For safety reasons it is essential that your stove is correctly installed and operated. Heat Design
cannot accept responsibility for any fault or consequential problems arising through incorrect
installation or operation.
Advertisement
Table of Contents

Summary of Contents for Heat Design HD25Bi
- Page 1 Dublin 12 www.heatdesign.ie PLEASE READ ALL THESE INSTRUCTIONS CAREFULLY! For safety reasons it is essential that your stove is correctly installed and operated. Heat Design cannot accept responsibility for any fault or consequential problems arising through incorrect installation or operation.
-
Page 2: Table Of Contents
Re-fuelling Refuelling onto a Low Firebed Fuel Overloading Shutting down Maintenance Seasonal Use Replacing Door Rope and Glass 7. Safety Notes for your Guidance 8. Stove Dimensions 9. Frequently Asked Questions 10. HD25Bi Spare Parts List & Codes HD25Bi 22/09/15... -
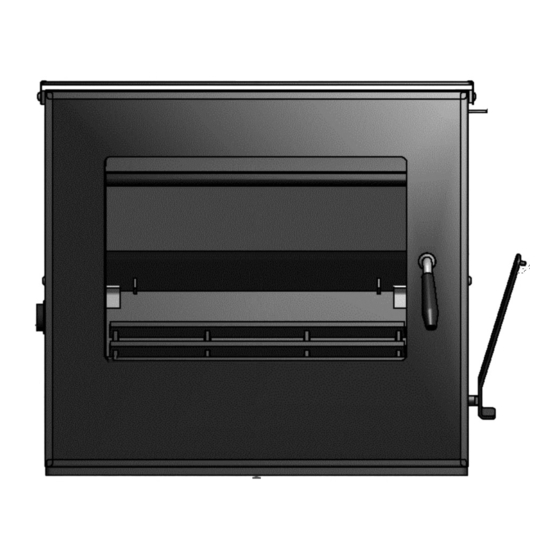
Page 3: List Of Components
Fig 2 – Insert Boiler Stove Assembly and controls 1. Component Identification and Installation Your Heat Design Stove is shipped securely packed and strapped. Carefully remove any straps and remove all wood, cardboard and any plastic packaging, open the door and remove all the contents. -
Page 4: Installation Instructions
4” pipe to the stove. The inlet pipe should be suitable located to prevent ingress of moisture and where it will not get block by leaves of other items. Ensure vent caps are fitted where the vent pipe meets the external wall to prevent the entry of rodents. HD25Bi 22/09/15... - Page 5 Health And Safety Precautions Handling Adequate facilities must be available for unloading and site handling. Heat Design Stoves are very heavily built so always ask for assistance when lifting and siting the stoves. Fire Cement Some types of fire cement are caustic and should not be allowed to come into contact with the skin. In case of skin contact, wash immediately with plenty of water.
-
Page 6: Installation Information
Material Clearances Safety Distances from Combustible Surfaces: Model Side Shelf HD25Bi 150mm 550mm In addition it is strongly recommended that any furniture or other combustible materials are kept at least 1000mm clear from the front of the stove. HD25Bi 22/09/15... -
Page 7: Hearths
Hearths: Heat Design stoves require a 125mm thick non-combustible constructional hearth beneath them to protect the building, this can include any solid non-combustible floor. A non-combustible superimposed hearth forming an apron of at least 225mm at the front of the stove and 150mm on either side must also be provided. -
Page 8: Plumbing
Fig. 3 – Connecting the stove to an existing Heating System with oil/gas as primary heat source. Fig. 4 – Central Heating system with the stove as the primary source of heat (indirect). All four tappings on the stove are used. HD25Bi 22/09/15... - Page 9 The manufacturers cannot be held responsible for any losses due to incorrect specification or connection of the heating system. This Heat Design Boiler Stove must always be connected with the flow and return connections on opposite sides of the appliance (cross-flowed) to an indirect hot water system. Fernox or a similar corrosion inhibitor should be used to prevent corrosion or formation of limescale in the heating system.
- Page 10 All connections to the boiler should be checked to ensure there are no leaks during operation and that the flow and return water connections are working properly. The stove should be fired up initially by the Plumber / Heating Engineer to ensure that it is operating safely with the rest of the heating system. HD25Bi 22/09/15...
-
Page 11: Operating Instructions
Secondary Air (Air Wash) This Heat Design boiler stove has a powerful “air wash” system. This secondary air supply to the stove is controlled via a sliding air control located on the top right of the stove. If you want clean glass, always leave this control open some way whilst burning unless the stove is being shut right down for a long period. -
Page 12: Cleaning
Brush the inside of the firebox clean from time to time to check the integrity of the plates and liners etc. It is not normally necessary to re-paint inside the firebox due to the high temperatures that mean that the paint HD25Bi 22/09/15... - Page 13 Use a screwdriver to loosen and tease out the ash and debris and it can then be hovered away as shown below. Repeat on opposite side. HD25Bi 22/09/15...
-
Page 14: Fuels
Re-fuelling When burning wood, the fire will die down as the fuel is consumed. When the flames disappear and the remainder is breaking down into glowing embers it is an appropriate time to consider re-fuelling. NOTE: If HD25Bi 22/09/15... -
Page 15: Refuelling Onto A Low Firebed
3.1 Warnings and Important Information. Inspect the inside of the stove and the flue ways and ensure they are 100% clear after a period of disuse (e.g summer). Only use manufacturers recommended replacement parts on the appliance (see page 19 for full list of spare parts). HD25Bi 22/09/15... -
Page 16: Replacing Door Rope And Glass
Replace the glass with genuine high quality stove glass from Heat Design and refit and tighten the four screws, pads and brackets. Replace the pads if they are broken or worn. HD25Bi 22/09/15... -
Page 17: Safety Notes For Your Guidance
Feel the chimneybreast for sign of excessive heat. If the wall is becoming hot, move the furniture away. Ensure that the Fire Brigade can gain access to your roof space in order to check this area for signs of fire spread. HD25Bi 22/09/15... -
Page 18: Stove Dimensions
8.0 Stove Dimensions Fig. 7 – Heat Design Insert Boiler Stove All dimensions in mm unless otherwise stated. Dimensions are approximate and are subject to change without prior notice. HD25Bi 22/09/15... -
Page 19: Frequently Asked Questions
A call out charge will apply if our engineer attends any stove problem that is not related to product failure. 6 Where can I get spare parts? Your local Heat Design Stove retailer will be pleased to supply spare parts and to provide any other information you require. -
Page 20: Hd25Bi Spare Parts List & Codes
10.0 HD25Bi Spare Parts List & Codes Component HD25Bi Component HD25Bi 01 Door Glass Y1HDI25B01A 32 Top Y1HDI25B38A 02 Glass Brackets and Screws Y1HDID02E 38 Boiler shell Y1HDI25B45A 03 Door Handle assembly Y1HDI18B03A 44 Door Hinge/Pin Y1HDI18B51A 14 Grate Angles (boiler only) Y1HDI25B30A 46 Rope Ø14mm (cut to size) Y1HDI25B54A... - Page 21 Heat Design, 30-60 Hawthorn Road, Western Industrial Estate, Naas Road, Dublin 12. T: 01 408 9192 F: 01 408 9193 HD25Bi 22/09/15...
Need help?
Do you have a question about the HD25Bi and is the answer not in the manual?
Questions and answers