Table of Contents
Advertisement
Advertisement
Table of Contents

Related Manuals for Keurig Hot K475


Summary of Contents for Keurig Hot K475
- Page 1 USE & CARE GUIDE...
- Page 2 IMPORTANT SAFEGUARDS When using electrical appliances, basic Turn off and unplug the brewer safety precautions should be followed, before cleaning or maintenance. including the following: Allow to cool before putting on or taking off parts and before cleaning Read all instructions before using. the appliance.
- Page 3 SAVE THESE Always keep the Flip-Top Reservoir Lid on the Water Reservoir unless INSTRUCTIONS. you are refilling it. This appliance is equipped with a Power Cord having a grounding WARNING TO USERS wire with a grounding plug. AND PARENTS: The appliance must be grounded using a 3-hole properly grounded 1.
- Page 4 CAUTION: There are three sharp their use. If an extension cord is used, needles that puncture pods, two (1) the marked electrical rating of the above the Pod Holder and the other cord set or extension cord should be at in the bottom of the Pod Holder.
-
Page 5: Table Of Contents
USER GUIDE TABLE OF CONTENTS KEURIG PLUS SERIES BREWING SYSTEM | 400 SERIES ® Features Touch-Screen Controls Quick Tips & To Dos 1 Let’s Get Brewing Setup Cleansing Brew Brew Your First K-Cup ® Brew Your First K-Carafe ® Set Carafe Auto Brew Mode 2 Tips and Maintenance Stopping the Brew Process Adding Water... -
Page 6: Features
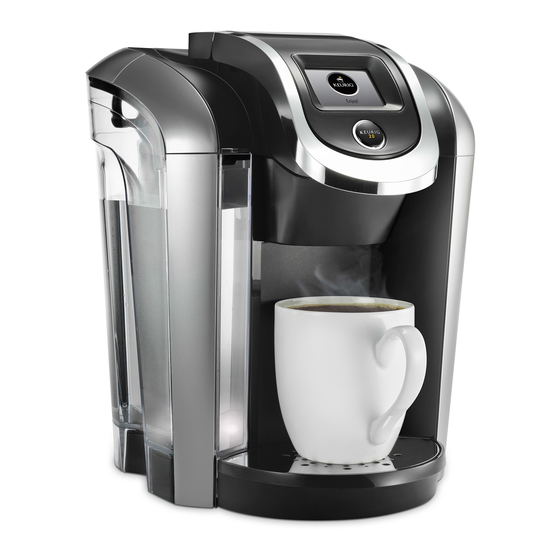
FEATURES K400 SERIES BREWER Handle Flip-Top Reservoir Lid Pod Holder Brew Head Water Reservoir Housing (K and L are Power Cord the Pod Holder Assembly) Top Housing Base Drip Tray Plate Touch-screen/Power Button Drip Tray Brew Button... -
Page 7: Touch-Screen Controls
TOUCH-SCREEN CONTROLS scroll 12 : 00 READY AUTO BREW Lift to Begin COCOA STRONG PRESS TO SET OTHER SCREEN FOR SCREEN FOR HOME SCREEN K-CUP PODS K-CARAFE PODS ® ® Clock STRONG KEURIG BREW ® (only available for coffee) Settings Button Setting 1 HOT COCOA/OTHER Power Button... -
Page 8: Quick Tips & To Dos
QUICK TIPS & TO DOS QUICK TIPS With your Keurig Plus Series brewer, you can brew a single cup or a full carafe. ® TO DO Register your brewer at Keurig.com. We’ll send you a special “thank you” when you do. Subject to availability and assortment/count will vary. Join Club Keurig for special savings on Keurig brand pods when purchased... -
Page 9: Let's Get Brewing
1 | LET’S GET BREWING! -
Page 10: Setup
SETUP SETUP Place the brewer on a counter and plug Lift the Handle, remove and discard the into a grounded outlet. shipping disk. Rinse the Water Reservoir, fill with Press the Power Button and wait bottled or filtered water, and return for preheating to complete, about it to the brewer. -
Page 11: Cleansing Brew
1 | LET’S GET BREWING! CLEANSING BREW CLEANSING BREW To begin a cleansing brew, place a Lift and lower the Handle. Do not place 12 ounce mug on the Drip Tray. a Keurig brand pod in the Pod Holder. ® Select an 8 ounce Brew Size and press You are now ready to use your brewer! the Brew Button. -
Page 12: Brew Your First K-Cup
BREW YOUR FIRST K-CUP ® Place a mug on the Drip Tray. Lower the Handle. Select a K-Cup pod, place firmly in the ® CAUTION: There are sharp needles that puncture the K-Cup ® pod above and below the Pod Holder. To avoid injury, do not Pod Holder. -
Page 13: Brew Your First K-Carafe
1 | LET’S GET BREWING! BREW YOUR FIRST K-CARAFE ® Make sure the Keurig Carafe is empty. Select a K-Carafe pod, place firmly in ® ® Remove the Drip Tray and insert the the Pod Holder and lower the Handle. Keurig Carafe securely in its place. -
Page 14: Set Carafe Auto Brew Mode
SET CARAFE AUTO BREW MODE Make sure the Keurig Carafe is empty. Select a K-Carafe pod, place firmly in ® ® Remove the Drip Tray and insert the the Pod Holder and lower the Handle. Keurig Carafe securely in its place. ®... -
Page 15: Tips And Maintenance
2 | TIPS & MAINTENANCE Select a Brew Size, then press SET. The Touch-screen will indicate DO NOT DISTURB! AUTO BREW CARAFE SIZE: DO NOT DISTURB! 6 : 00 CARAFE SET TO AUTO BREW AT: TOUCH HERE TO EDIT To edit any options, select TOUCH HERE To put the brewer in sleep mode, quickly TO EDIT. -
Page 16: Stopping The Brew Process
STOPPING THE BREW PROCESS FOR K-CUP , K-MUG®, AND K-CARAFE PODS ® ® To stop the brewing process, press and hold the Power Button for one second or slowly lift the Handle. Remove and dispose of any used pod. Brewing a used pod is not recommended. -
Page 17: Dispensing Hot Water Into A Mug
2 | TIPS & MAINTENANCE DISPENSING HOT WATER INTO A MUG Place a mug on the Drip Tray. Lift and Select your Brew Size and press the lower the Handle without a pod. Brew Button. READY COCOA STRONG OTHER When the brew process is complete, the Touch-screen will indicate Enjoy! Your brew is complete. -
Page 18: Settings Menu
SETTINGS MENU ACCESS SETTINGS SETTINGS 12 : 00 Explore everything your Keurig Plus Series ® LANGUAGE brewer has to offer by accessing the CLOCK SETTINGS menu. From the home screen, AUTO ON/OFF select the Settings button. Lift to Begin 1 OF 3 Use the arrows to scroll through the back button menu. - Page 19 2 | TIPS & MAINTENANCE SET CLOCK SETTINGS CLOCK The CLOCK menu gives you the following LANGUAGE TIME three settings. CLOCK DISPLAY AUTO ON/OFF Use the back button to return to the 1 OF 3 SETTINGS menu. back button Time: Set the current time using the TIME arrows, then choose AM or PM.
- Page 20 SETTINGS MENU ENABLE AUTO ON/OFF SETTINGS AUTO ON/OFF You can leave your brewer on at all times LANGUAGE AUTO ON so it’s ready to make your perfect cup any CLOCK AUTO OFF time of day, or you can set the AUTO ON, AUTO ON/OFF ENERGY SAVER AUTO OFF, or ENERGY SAVER mode.
- Page 21 2 | TIPS & MAINTENANCE PREFERRED BREW SETTINGS SETTINGS PREFERRED BREW SETTINGS The PREFERRED BREW SETTINGS menu PREFERRED BREW SETTINGS K-CUP allows you to change the default settings WALLPAPER for each Keurig Brew number. TEMPERATURE 2 OF 3 1 OF 3 Use the back button to return to the SETTINGS menu.
- Page 22 SETTINGS MENU Keurig Brew #3: Adjust brew size. PREFERRED BREW SETTINGS KEURIG BREW #3 Press SAVE to confirm or use the back button to return to the SETTINGS menu. 2 OF 3 SAVE back button Keurig Brew #4: Adjust brew size and KEURIG BREW #4 enable STRONG.
- Page 23 2 | TIPS & MAINTENANCE WALLPAPER SETTINGS WALLPAPER You can customize your Touch-screen color. PREFERRED BREW SETTINGS Simply press a color window to select a WALLPAPER WALLPAPER for the home screen. TEMPERATURE 2 OF 3 1 OF 4 back button Confirm Selection: Press SAVE to CONFIRM SELECTION...
- Page 24 SETTINGS MENU ENABLE HIGH ALTITUDE HIGH ALTITUDE SETTINGS To ensure your brewer works properly at HIGH ALTITUDE ENABLE higher altitudes (5,000 feet), ENABLE the WATER FILTER REMINDER HIGH ALTITUDE mode. RESTORE FACTORY SETTINGS 3 OF 3 Press SAVE to confirm or use the back SAVE button to return to the SETTINGS menu.
-
Page 25: Caring For Your Brewer
2 | TIPS & MAINTENANCE CARING FOR YOUR BREWER CLEANING THE BREWER EXTERIOR Keep your Keurig Plus Series brewer looking its best by ® cleaning the exterior from time to time. Just clean with a damp, soapy, lint-free, non-abrasive cloth. Never immerse the brewer in water or other liquids. - Page 26 CARING FOR YOUR BREWER CLEANING THE POD HOLDER Push up while grabbing the sides of the Lift the Handle. Pod Holder Assembly. Pull away from the brewer. CAUTION: Sharp needles. Do not put fingers in chamber. Pull out the Pod Holder Assembly (1) and Press the release buttons on both sides Base (2).
- Page 27 2 | TIPS & MAINTENANCE Separate the Pod Holder from Clean the Pod Holder (1), Housing (2), the Housing. and Base (3) with a damp, soapy, lint-free, non-abrasive cloth and rinse thoroughly. After all pieces are cleaned, reassemble Place the Base, then the Pod Holder the Pod Holder Assembly by inserting the Assembly into the Brew Head.
- Page 28 CARING FOR YOUR BREWER: HOW TO USE A BREWER MAINTENANCE ACCESSORY CLEANING THE BREWER ENTRANCE NEEDLE Please ensure the brewer is powered off. Having trouble brewing? You may have With the printed text on your Brewer coffee grounds stuck in the brewer’s Maintenance Accessory facing up, fill Entrance Needle.
- Page 29 2 | TIPS & MAINTENANCE Remove Brewer Maintenance Accessory Once you have removed the Brewer from Pod Holder. Maintenance Accessory from the brewer, power the brewer back on. Warning: Avoid sharp needles. Place a 12 ounce mug on the Drip Tray Brew your favorite Keurig®...
- Page 30 CARING FOR YOUR BREWER CLEANING THE EXIT NEEDLE If a clog arises in the Exit Needle, push Use a paper clip or similar tool to the lever of the Pod Holder to reveal the loosen the clog. Rinse thoroughly Exit Needle. with hot water.
- Page 31 2 | TIPS & MAINTENANCE KEURIG CARAFE OPERATION ® The unique Keurig Carafe was specifically designed for use with the Keurig Plus Series ® ® brewer. To connect the Keurig Carafe to the brewer, make sure the Keurig Carafe is ®...
- Page 32 CARING FOR YOUR BREWER WATER FILTER ALERT Your brewer is designed to deliver the perfect cup time after time, year after year. To keep it working at peak performance, your Keurig Plus Series brewer will let you know when it ®...
- Page 33 2 | TIPS & MAINTENANCE SORRY, BREW INTERRUPTED Your brewer will indicate “Sorry, brew interrupted” if there is a problem brewing. To clear the problem, slowly lift and lower the Handle, remove the pod, and attempt a cleansing brew (see page 11). SORRY, THERE IS A PROBLEM If the brewer indicates “Sorry, there is a problem”...
- Page 34 CARING FOR YOUR BREWER TIME TO DESCALE THE BREWER Depending on the mineral content of your water, calcium deposits or scale may build up in your brewer, this is why we recommend using bottled or filtered water. Scale is non- toxic but if left unattended can hinder brewer performance.
- Page 35 2 | TIPS & MAINTENANCE DESCALING YOUR BREWER Before you begin, you will need a large mug, fresh water, Keurig Descaling Solution, and ® access to a sink. Do not use a paper cup. • Empty the water from the Water Reservoir. If there is a Keurig Water Filter, remove ®...
- Page 36 CARING FOR YOUR BREWER DESCALING YOUR BREWER (CONTINUED) The cleaning action of Keurig Descaling Solution may result in a foam dispensed from the ® brewer. This is natural, as the solution is reacting with the scale inside. For a brewer that is heavily scaled, the brewer may not fill properly after the descaler is added.
-
Page 37: Recycling K-Mug® And K-Carafe
2 | TIPS & MAINTENANCE RECYCLING K-MUG® AND K-CARAFE PODS ® The plastic cups of K-Mug and K-Carafe Once brewing is complete, lift the Handle ™ ® pods can be recycled wherever #5 plastic is and carefully remove the K-Mug ™... -
Page 38: Troubleshooting
TROUBLESHOOTING BREWER DOES NOT HAVE POWER • Plug the brewer into an independent outlet without dimmer control. • Check to be sure that the brewer is plugged in securely. • Plug the brewer into a different outlet. • Reset your home’s circuit breaker if necessary. •... - Page 39 3 | TROUBLESHOOTING BREWER SHUTS OFF OR TURNS ON AUTOMATICALLY • Check to make sure that the AUTO ON/OFF settings have not been set (refer to page 20). THE TOUCH DISPLAY INDICATES “MORE WATER PLEASE.” • If the water level is not low, remove the Water Reservoir and empty the water. Then thoroughly clean (refer to page 25).
-
Page 40: Warranty
WARRANTY LIMITED ONE YEAR WARRANTY Keurig warrants that your brewer will be free of defects in materials or workmanship under normal home use for one year from the date of purchase. It is recommended that you fill out and return the warranty card enclosed with your brewer so that your purchase information will be stored in our system. - Page 41 4 | WARRANTY OTHER LIMITATIONS THIS WARRANTY IS EXCLUSIVE AND IS IN LIEU OF ANY OTHER EXPRESS WARRANTY, WHETHER WRITTEN OR ORAL. IN ADDITION, KEURIG HEREBY SPECIFICALLY DISCLAIMS ALL OTHER WARRANTIES WITH RESPECT TO YOUR K400 BREWER, INCLUDING ANY IMPLIED WARRANTY OF MERCHANTABILITY OR FITNESS FOR ANY PARTICULAR PURPOSE.
- Page 42 Keurig Green Mountain, Inc. 33 Coffee Lane Waterbury, VT 05676 1.866.901.BREW (2739) P/N | Pièce no | Pieza n.o PT000000882 Rev C 1/17...
Need help?
Do you have a question about the K475 and is the answer not in the manual?
Questions and answers