Table of Contents
Advertisement
Quick Links
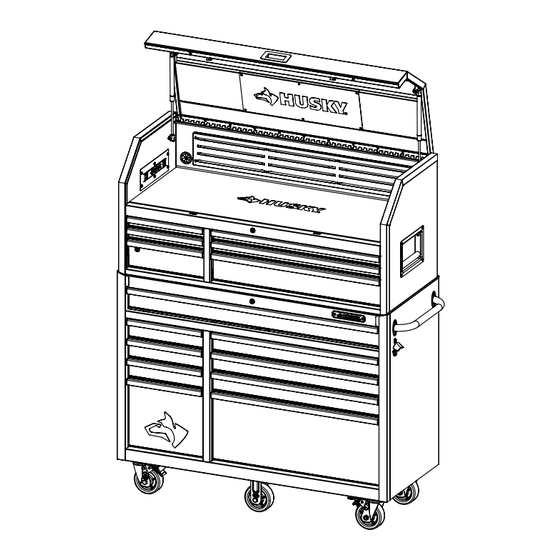
USE AND CARE GUIDE
52 INCH-15 DRAWER TOOL CHEST
AND CABINET SET
Questions, problems, missing parts?
Before returning to the store, call
Husky Customer Service
8 a.m – 7 p.m., EST, Monday-Friday
9 a.m – 6 p.m., EST, Saturday
1-888-HD-HUSKY
HUSKYTOOLS.COM
We appreciate the trust and co dence you have placed in Husky through the purchase of this chest/cabinet. We strive to continually
create quality products designed to enhance your home. Visit us online to see our full line of products available for your home
THANK YOU
improvement needs. Thank you for choosing Husky!
Chest: Model: # H52CH6HD
SKU: # 1002806926
Cabinet: Model # H52TR9HD
SKU # 1002806927
Set: Model # H52CH6TR9HD
SKU # 1002765707
Advertisement
Table of Contents

Related Manuals for Husky H52CH6HD


Summary of Contents for Husky H52CH6HD
- Page 1 THANK YOU We appreciate the trust and co dence you have placed in Husky through the purchase of this chest/cabinet. We strive to continually create quality products designed to enhance your home. Visit us online to see our full line of products available for your home...
-
Page 2: Table Of Contents
Table of Contents Table of Contents ..........2 Assembly ...............6 Safety Information ..........2 .............. Operation Warranty ..............4 Cordless Power Tool Battery Chargers ....9 Specifications ............4 Maintenance ............... Package Contents ..........4 Replacement Parts ..........10 Hardware Included ............ - Page 3 CAUTION: RISK OF ELECTRICAL SHOCK: This unit has two power supply cords. Make sure all cords are unplugged before any servicing or cleaning. HUSKYTOOLS.COM Please contact 1-888-HD-HUSKY for further assistance.
-
Page 4: Warranty
The manufacturer specifically disclaims any liability and shall not be liable for any consequential or incidental loss or damage, including but not limited to any labor/expense costs involved in the replacement or repair of said product. Contact the Customer Service Team at 1-888-HD-HUSKY or visit www.huskytools.com. Specifications Maximum weight per (chest drawer) 120 lbs. - Page 5 NOTE: Cabinet Keys are inside top drawer. NOTE: Chest Keys are attached to gas strut. NOTE: Privacy Drawer Keys are inside drawer. Part Description Quantity Chest Cabinet Cabinet handle Fixed caster Swivel caster Bottle opener HUSKYTOOLS.COM Please contact 1-888-HD-HUSKY for further assistance.
-
Page 6: Assembly
Assembly Two people are recommended for assembly. Attaching the bottle opener CAUTION: □ Position the bottle opener (F) over the holes on the Attaching the cabinet handle cabinet (B). □ Attach with the bolts (CC) and tighten with supplied hex key (DD). □... - Page 7 •Attach 2 fixed casters (D) to the side opposite of the handle (C) by inserting bolts (AA) through the washers (BB) and the fixed casters (D) into the cabinet (B). □ Tighten all casters with supplied hex key (DD) or 12 mm wrench/socket. □ Return the cabinet (B) to its upright position. HUSKYTOOLS.COM Please contact 1-888-HD-HUSKY for further assistance.
-
Page 8: Operation
Attaching Plastic Feet (Optional) NOTE: 4 Plastic Feet are located in bag found in top till. □ Insert plastic foot into hole on bottom of chest. Repeat for other 3 feet. Operation Removing the drawers Re-inserting the drawers □ □ Fully extend the empty drawer. -
Page 9: Cordless Power Tool Battery Chargers
Grease the casters annually using high-quality bricate the slides semi-annually with high-quality bearing grease. bearing grease. Periodically clean the drawer fronts, drawer trim, and other surfaces with a mild detergent and water. □ □ HUSKYTOOLS.COM Please contact 1-888-HD-HUSKY for further assistance. -
Page 10: Replacement Parts
Replacement Parts For assistance with replacement parts please call 1-888-HD-HUSKY. Part Description Quantity Lid Handle Gas Strut Outlet Outlet Panel Cover Rubber Grommet Drawer Liner Drawer Slide Lock Plastic Foot Side Handle Drawer Handle Cap Part Description Quantity Cabinet Handle... - Page 11 Questions, problems, missing parts? Before returning to the store call Husky Customer Service 8 a.m. - 7 p.m., EST, Monday-Friday 9 a.m. - 6 p.m., EST, Saturday 1-888-HD-HUSKY HUSKYTOOLS.COM Retain this manual for future use.
Need help?
Do you have a question about the H52CH6HD and is the answer not in the manual?
Questions and answers
I need drawer slides for my husky tool chest H52ch6trhd.