Table of Contents
Advertisement
Quick Links
EN
Digital Camera
User's Guide
Thank you for purchasing this CASIO product.
• Before using it, be sure to read the precautions contained in this User's Guide.
• Keep the User's Guide in a safe place for future reference.
• For the most up-to-date information about this product, visit the official EXILIM
Website at http://www.exilim.com/
Advertisement
Table of Contents

Subscribe to Our Youtube Channel
Summary of Contents for Exilim Casio EX-FR10
- Page 1 • Before using it, be sure to read the precautions contained in this User’s Guide. • Keep the User’s Guide in a safe place for future reference. • For the most up-to-date information about this product, visit the official EXILIM Website at http://www.exilim.com/...
-
Page 2: Accessories
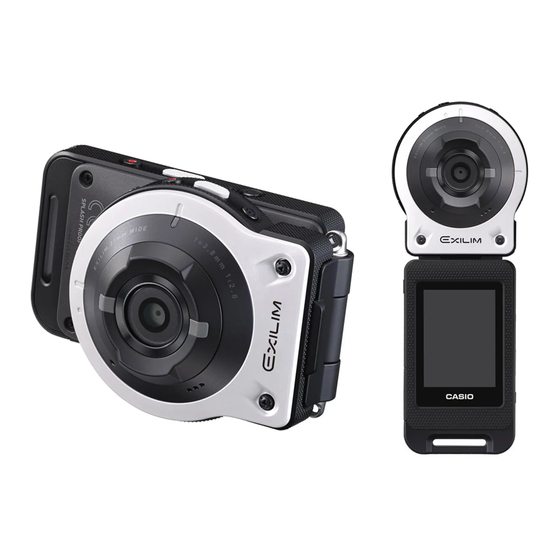
Accessories As you unpack your camera, check to make sure that all accessories shown below are included. If anything is missing, contact your original retailer. Hinge Unit Camera Controller • The hinge unit comes (EX-FR10) (EX-FR10CT) pre-attached to the camera. Lens hood Tripod nut Neck strap... -
Page 3: Read This First
• CASIO COMPUTER CO., LTD. shall not be held liable for any damages, lost profits, or claims by third parties arising out of the use of EXILIM Link. • CASIO COMPUTER CO., LTD. shall not be held liable for any damages or lost profits caused by loss of memory contents due to malfunction, repair, or any other reason. -
Page 4: Table Of Contents
Contents Accessories ........... . 2 Read this first! . - Page 5 Establishing a Connection between a Smartphone and Your Camera ..57 Installing the EXILIM Link App on Your Smartphone ..... 57 Configuring Wireless LAN Settings.
- Page 6 Files and Folders ..........76 Memory Card Data .
-
Page 7: General Guide
General Guide The numbers in parentheses indicate the pages where each item is explained. Controller Camera 1 234 cm cn co bk bl bo bn bm Camera [p] (Power) (page 24) Carabiner strap Memory card slot attachment bar [USB] cover (page 29) (page 15) (pages 18, 20) -
Page 8: Monitor Screen Contents And How To Change Them
Monitor Screen Contents and How to Change Them The monitor screen uses various indicators, icons, and values to keep you informed of the camera’s status. • The sample screens in this section are intended to show you the locations of all the indicators and figures that can appear on the monitor screen in various modes. - Page 9 . Snapshot Viewing Image menu icon (page 52) Information icon (page 9) Snapshot image size (page 43) Folder name/file name (page 76) REC mode icon (page 25) Date/time (pages 26, 64) Camera battery level indicator (page 23) Controller battery level indicator (page 23) Home icon (page 48) Exposure compensation (page 45) White balance (page 46)
-
Page 10: Quick Start Basics
Quick Start Basics What you can do with your CASIO camera Your CASIO camera is packed with a powerful selection of features and functions to make recording of digital images easier, including the following main functions. . Shooting A variety of shooting styles The camera connects to the controller using Bluetooth ®... - Page 11 . Viewing Highlight Photo You can configure camera settings to automatically select snapshot highlights and generate a collage of them each day. *See page for more information. Highlight Movie You can configure camera settings to automatically select snapshot and movie highlights, and create a movie of them each day.
-
Page 12: Using The Attachment
Using the Attachment You can configure the camera to suit your specific needs by attaching the hinge unit, which enables attachment of the controller, and other included and optionally available attachments. This way you can configure the camera to suit your specific needs. -
Page 13: Hinge Unit
Hinge Unit . To use the hinge unit as a stand . To change the shooting direction by 90 degrees While pulling down on the camera’s [FREE] lever, rotate the camera clockwise 90 degrees until you hear a click. • The white lines on the lens ring indicate the horizontal orientation of the camera. -
Page 14: Lens Hood
. To attach the hinge unit to the camera Align the camera’s operation lamp with the A mark on the hinge unit. Rotate the camera clockwise about 15 degrees until its operation lamp is aligned with the B mark on the hinge unit. Lens hood If unwanted light is shining on the lens, rotate Lens ring Attach... -
Page 15: Strap
Strap . Neck Strap The neck strap can be attached to the camera or the controller. Remove the buckles from the strap and attach the strap to the two strap holes on the camera or controller. Replace the buckles. Use the adjusters to adjust the strap length and then fix the adjusters on place. - Page 16 NOTE • When shooting hold the camera still. Carefully press the shutter button and take care to avoid all movement as the shutter releases and for a few moments after it releases. • Take care that your fingers and the strap do not cover Operation lamp any of the areas indicated in the illustration.
-
Page 17: Using The Touch Panel
Using the Touch Panel The monitor screen of the camera is a touch panel. This means you can perform the following operations by touching the screen with your fingers. Touch Momentarily touching the screen with your finger. Touch the screen to select an icon or menu item, and to configure settings. -
Page 18: First, Charge The Battery Prior To Use
First, charge the battery prior to use. The camera and the controller each have a built-in rechargeable lithium ion battery. The batteries are not charged when you purchase the camera, so you will need to charge both the camera and controller before using them. You can use either of the two following methods to charge the batteries. - Page 19 IMPORTANT! • A battery that has not been used for a long time, or ambient temperature extremes can cause charging to take longer than normal. If charging takes longer than about five hours, a timer will terminate it automatically, even if the battery is not fully charged.
- Page 20 • Make sure that you insert the cable connector into the USB port until you feel it click securely into place. Failure to insert the connector fully can result in poor communication or malfunction. • Note that even while the connector is fully inserted, you still will be able to see the metal part of the connector as shown in the illustration.
- Page 21 IMPORTANT! • The first time you connect the camera or controller to your computer with the USB cable, an error message may appear on your computer. If this happens, disconnect and then reconnect the USB cable. • A battery that has not been used for a long time, certain types of computers, and connection conditions can cause charging to take more than approximately five hours, which will trigger a timer that terminates charging automatically, even if the battery is not fully charged.
- Page 22 Operation lamp Operation Operation lamp Lamp Status Description Lit Red, (Lit Amber) Charging Flashing Red Abnormal ambient temperature, (Quickly flashing red charging taking abnormally long, or and green) battery problem (page 93) Off, (Lit Green) Charging complete • The information in parentheses in the above table shows the lamp status while the camera and controller are turned on during charging.
- Page 23 Checking the Current Battery Level As battery power is consumed, a battery indicator on the monitor screen indicates its current level as shown below. Level High Camera Battery Indicator Controller Indicator Color White * White indicates battery power is low. Charge the battery as soon as possible. Recording is not possible when is indicated.
-
Page 24: Turning Power On And Off
Turning Power On and Off . To turn off power Camera Controller Press [p] (Power). Press [p] (Power). [p] (Power) [p] (Power) Operation lamp Operation lamp • Turning on the camera causes the camera and controller operation lamps to light green, and automatically starts an operation to establish a Bluetooth wireless technology connection between the camera and controller. - Page 25 Toggling Between the REC Mode and PLAY Mode Touch the icon in the lower right corner of the screen or flick the screen upwards or downwards to toggle between the REC mode and PLAY mode. REC mode PLAY mode “ ”...
-
Page 26: Camera-Controller Wireless Connection (Bluetooth)
Camera-Controller Wireless Connection (Bluetooth) The camera and controller communicate over a Bluetooth wireless technology connection. Once you perform the “pairing” operation required for Bluetooth wireless technology connection, the camera and controller will automatically connect to each other whenever you turn them on. - Page 27 Touch the date display format you want. Example: July 10, 2015 YY/MM/DD 15/7/10 DD/MM/YY 10/7/15 MM/DD/YY 7/10/15 Set the date and the time. • Touch the value you want to change (year, month, day, hour, minute) and then touch “ ”, “...
-
Page 28: Preparing A Memory Card
Preparing a Memory Card Though the camera has built-in memory that can be used to store images and movies, you probably will want to purchase a commercially available memory card for greater capacity. The camera does not come with a memory card. Images recorded while a memory card is loaded are saved to the memory card. -
Page 29: To Load A Memory Card
To load a memory card Holding down camera’s [p] (Power) to turn off the camera and then open the [CARD] cover. Load a memory card. Positioning the memory card so its back is facing upwards (towards the lens side of the camera), slide it into the card slot all the way in until you hear it click securely into place. -
Page 30: To Format (Initialize) A New Memory Card
To format (initialize) a new memory card Format a memory card on the camera before using it for the first time. IMPORTANT! • Formatting a memory card that already has snapshots or other files on it, will delete its contents. Normally you do not need to format a memory card again. However, if storing to a card has slowed down or if you notice any other abnormality, re-format the card. -
Page 31: Shooting A Snapshot
Shooting a Snapshot (Premium Auto) Your camera has a variety of different recording modes to suit various shooting conditions and objectives (page 37). This section explains general shooting procedures using Premium Auto. With Premium Auto recording, the camera automatically determines whether you are shooting a subject or scenery, and other conditions. -
Page 32: Snapshot Shooting Precautions
. Shooting with the Camera Alone You can use the camera in a stand-alone configuration without turning on the controller or otherwise establishing a connection between it and the camera. • If an Interval Snapshot (page 34) operation is in progress, it will continue to shoot images even when controller power is turned off. -
Page 33: Recording Images
Recording Images REC Mode Screen This section explains the contents of the REC mode screens. While the REC mode main screen or home screen is displayed, pressing the camera or controller shutter button will shoot a snapshot. . Main Screen The main screen appears when you turn on the camera or when you enter the REC mode from the PLAY mode. -
Page 34: Shooting Multiple Images At A Specified Interval
Shooting Multiple Images at a specified Interval (Interval Snapshot) You can use Interval Snapshot to shoot snapshots and movies automatically at a specified interval. . To start an Interval Snapshot operation On the REC mode main screen, touch the “ ”... - Page 35 . To shoot images manually during an Interval Snapshot operation Pressing the shutter button on the camera during an Interval Snapshot operation will shoot a snapshot. Pressing [0] (Movie) on the camera will record a five-second movie. NOTE • Nothing is displayed on the monitor screen during an Interval Snapshot operation. •...
-
Page 36: Self-Shooting
Self-shooting (Mirror) You can use this function to display a mirror image of controller display. This comes in handy when using the controller to compose self-shot images. Normal image Mirrored image “ ” On the REC mode main screen, touch the “ ”... -
Page 37: Changing The Recording Mode
Changing the Recording Mode In addition to Premium Auto, your camera lets you select from among five ART SHOT scenes that apply different effects to your photos. Turn on the camera and controller (page 24). On the REC mode main screen, touch the “ ”... -
Page 38: Using The Self-Timer
. Auto Focus Restrictions • Any of the following can make proper focus impossible. – Solid color wall or other very low contrast subject – Strongly back lit subject – Very shiny subject – Blinds or other subject with a repeating horizontal pattern –... -
Page 39: Shooting With Zoom
Shooting with Zoom Your camera is equipped with digital zoom, that lets you zoom an image up to 4X. Note that a digital process is used to enlarge the center of the image, so there is deterioration of image quality. In the REC mode main screen, touch the “... -
Page 40: Recording A Movie
Recording a Movie Your camera lets you record Full HD movies. Movie quality details are shown in the table below. Movie Quality Full HD Frame Rate 30fps Image Size (Pixels) 1920 x 1080 Aspect Ratio 16:9 Select “Premium Auto” as the recording mode. On the REC mode main screen, touch the “... - Page 41 IMPORTANT! • Spending a long time using movie recording will cause the camera to become slightly warm to the touch. This is normal and does not indicate malfunction. • The camera also records audio along with movies. Note the Microphone following points when shooting a movie.
-
Page 42: Advanced Recording Settings
Advanced Recording Settings The following are menu operations you can use to configure various camera settings. . Example Menu Screen Operation On the REC mode main screen, touch the “ ” (Home) icon. On the home screen, touch “MENU”. This will display the menu screen. •... -
Page 43: Recording Beautiful Portraits
Recording Beautiful Portraits (Make-up) Procedure Enter the “REC Mode” * * MENU * Make-up When turned on, Make-up smoothes the skin texture of the subject and softens facial shadows caused by harsh sunlight for better looking portraits. Using Touch Shutter (Touch Shutter) Procedure Enter the “REC Mode”... -
Page 44: Specifying The Maximum Movie Recording Time
. Pixels and image size A digital camera image is a collection of small Pixel dots called “pixels”. The more pixels there are in an image, the more detail there will be. However, you generally can do with fewer pixels when printing an image (L size) through a print service, attaching an image to e-mail, when viewing the image on a computer, etc. -
Page 45: Shooting With Brightness Compensation
Shooting with Brightness Compensation (EV Shift) Procedure Enter the “REC Mode” * * MENU * EV Shift You can manually adjust an image’s exposure value (EV value) before shooting it. • Exposure Compensation Range: –2.0 EV to +2.0 EV • Unit: 1/3 EV Touch “+”, “–”... -
Page 46: Adjusting Hue When Shooting
Adjusting Hue when Shooting (White Balance) Procedure Enter the “REC Mode” * * MENU * White Balance You can adjust white balance to match the source of light available where you are shooting and avoid the blue cast that results when shooting outdoors and the green cast that results when shooting indoors. -
Page 47: Enabling Auto Rotation Of Images To Match Camera Orientation
Enabling Auto Rotation of Images to Match Camera Orientation (Auto Rotate) Procedure Enter the “REC Mode” * * MENU * Auto Rotate Selecting “ON” for this function will cause displayed images to rotate automatically in accordance with camera orientation during recording and viewing. Advanced Recording Settings... -
Page 48: Viewing Snapshots And Movies
Viewing Snapshots and Movies Play Mode Screen While in the PLAY mode, you can use the controller screen to view images your have recorded. You can also press the camera’s shutter button or [0] (Movie) button to record new images. . -
Page 49: Viewing Snapshots
Viewing Snapshots Use the following procedure to view snapshots on the camera’s monitor screen. • For information about how to play back movies, see page 50. On the REC mode main screen, touch the REC mode main screen “ ” (PLAY) icon or flick the screen upwards or downwards to enter the PLAY mode. -
Page 50: Viewing A Movie
Viewing a Movie On the REC mode main screen, touch the Movie recording time “ ” (PLAY) icon or flick the screen upwards Image quality or downwards to enter the PLAY mode. Flick the screen to the left or right to scroll through the movies until the one you want is displayed. -
Page 51: Zooming An On-Screen Image
Touch the “t” (Delete) icon. Touch “ ” (Delete 1 File). Flick the screen to the left or right to scroll through the files until the one you want to delete is displayed, and then touch “t” (Delete). This will delete the selected file. . -
Page 52: Viewing The Image Menu
Viewing the Image Menu The image menu shows multiple images on a single screen. On the PLAY mode main screen, touch “ ”. This displays the image menu. • While the main screen is displayed, spread (to enlarge) or squeeze (to reduce) your fingers on the screen to zoom the displayed image. -
Page 53: Creating A Collage Of A Day's Snapshots
Creating a Collage of a Day’s Snapshots (Highlight Photo) You can configure camera settings to automatically select snapshot highlights and generate a collage of them each day. The snapshots included in a Highlight Photo are selected automatically based on their high light scores and shooting condition information recorded along with the snapshots. -
Page 54: Creating A Movie Of A Day's Images
Creating a Movie of a Day’s Images (Highlight Movie) You can configure camera settings to automatically select snapshot and movie highlights, and create a movie of them each day. Images included in a Highlight Movie are selected based on their high light scores and shooting condition information recorded along with the images. -
Page 55: Changing The Highlight Score Of An Image
Changing the Highlight Score of an Image You can use the procedure below to change the highlight score of a snapshot or movie. The highlight score of an image is used when performing the operations described in the table below. Highlight Description Score... -
Page 56: Connecting The Camera With A Smartphone (Wireless Lan)
Controlling Your Camera with a Connected Smartphone Establishing a wireless LAN connection between the camera and a smartphone (or tablet computer) enables the functions described below. This operation requires installation of the EXILIM Link app on your smartphone. With this function: You can do this:... -
Page 57: Establishing A Connection Between A Smartphone And Your Camera
Installing the EXILIM Link Smartphone app on your smartphone makes it possible to remotely control the camera from your smartphone and to send images recorded with the camera to your smartphone. Search the EXILIM Link app on Google Play or the App Store and install it on your smartphone. -
Page 58: Configuring Wireless Lan Settings
Leaving a wireless LAN connection in effect will shorten camera battery life and cause the camera to become warm. Shut down the EXILIM Link app and turn off the camera to terminate the wireless LAN connection whenever you are not using it. -
Page 59: Using A Smartphone As A Camera Remote Controller
• After you are finished using Remote Capture exit the app on your smartphone. . Controlling Your Camera with a Smartphone During Remote Capture shooting, you can use the EXILIM Link app to control the camera from a smartphone. This manual explains EXILIM Link operations based on screens that appear using the iPhone version. -
Page 60: Sending A Snapshot Or Movie File From Camera Memory To A Smartphone
Note that movies are not displayed by Gallery. Movies are stored in a folder named “EXILIM Link”. A separate movie player is required to playback movies (whose files have the file name extension MOV). Depending on your movie player, you may not be able to playback movies and/or audio. -
Page 61: Changing The Camera Ssid And Password
– iPhone: Camera Roll – Android terminal: Gallery or another photo browser app • In the case of an iPhone, sent snapshots cannot be deleted with the EXILIM Link app. To delete an image, use Camera Roll. Changing the Camera SSID and Password Use the procedure below to change the SSID and password you use when establishing a wireless LAN connection between the camera and a smartphone. - Page 62 NOTE • Note that after changing the SSID and password on the camera, you will also need to change the Wi-Fi settings of the smartphone. • If you forget your camera SSID and password, you can perform the procedure below to return them to their initial defaults. Turn off the camera.
-
Page 63: Other Settings (Set Up)
Other Settings (Set Up) This section explains menu items that you can use to configure settings and perform other operations in both the REC mode and PLAY mode. For information about menu operations, see page 42. Configuring Camera Sound Settings (Camera Sound) Procedure * MENU * Setup * Camera Sound When “ON”... -
Page 64: Setting The Camera's Clock
Setting the Camera’s Clock (Adjust) Procedure * MENU * Setup * Adjust Touch the value you want to change (year, month, day, hour, minute). Touch “ ” or “ ” to change the currently selected value. • You can specify a date from 2001 to 2049. •... -
Page 65: Specifying The Display Language
Specifying the Display Language (Language) Procedure * MENU * Setup * Language . Specify the display language you want. On the menu screen, touch “Setup”. Touch “Language”. Flick upwards and downwards until you find the language you want, and then touch to select it. -
Page 66: Resetting The Camera To Factory Defaults
Resetting the Camera to Factory Defaults (Reset) Procedure * MENU * Setup * Reset See page 99 for details about the camera’s factory default settings. The settings below are not reset. clock settings, date style, screen language Other Settings (Set Up) -
Page 67: Printing
Printing Professional Print Service You can take a memory card that contains the images you want to print to a professional print service and have them printed. Printing on a Home Printer You can use a printer equipped with a memory card slot to print images directly from a memory card. -
Page 68: Printing With A Computer
Printing with a Computer There are a variety of different ways to print images stored on a computer. This section shows one standard printing example. . Printing on a Windows Computer Use the procedure under “Viewing and Storing Images on a Computer” (page 70) to store the image you want to print, and then display the image on your computer screen. -
Page 69: Using The Camera With A Computer
Using the Camera with a Computer Things you can do using a computer... You can perform the operations described below while the camera is connected to a computer. Save images to a • Save images and view them manually computer and (USB connection) (pages 70, 73). -
Page 70: Viewing And Storing Images On A Computer
Viewing and Storing Images on a Computer You can connect the camera to your computer in order to view and store images (snapshot and movie files). Never use your computer to modify, delete, move, or rename any image files that are in the camera’s built-in memory or on its memory card. Doing so can cause problems with the camera’s image management data, which will make it impossible to play back images on the camera and can drastically alter remaining memory capacity. - Page 71 Double-click “Removable Disk”. • Your computer recognizes the memory card loaded in the camera (or built-in memory if there is no card) as a removable disk. Right-click the “DCIM” folder. On the shortcut menu that appears, click “Copy”. Windows 8.1, Windows 8 users: Click “Documents”. Windows 7, Windows Vista users: Click “Start”...
-
Page 72: Playing Movies
Playing Movies To play back a movie, first copy it to your computer and then double-click the movie file. Some operating systems may not be able to play back movies. If this happens, you need to install separately available software. •... -
Page 73: Using The Camera With A Macintosh
Using the Camera with a Macintosh When you want to Operating Required Software do this: System Version page: Save images to your Macintosh and view OS X Installation not required. them there manually Save images to your Macintosh iPhoto, which comes bundled OS X –... - Page 74 . To connect the camera to your computer and save files Turn off the camera and then [USB] port use the micro USB cable that comes with the camera to connect it to your Macintosh. • For details about connecting to the camera and precautions when connecting, see page 20.
-
Page 75: Playing A Movie
. To view copied images Double-click the camera’s drive icon. Double-click the “DCIM” folder to open it. Double-click the folder that contains the images you want to view. Double-click the image file you want to view. • For information about file names, see “Memory Folder Structure” on page 77. •... -
Page 76: Files And Folders
Files and Folders The camera creates a file each time you shoot a snapshot, record a movie, or perform any other operation that stores data. Files are grouped by storing them in folders. Each file and folder has its own unique name. •... - Page 77 . Memory Folder Structure DCIM Folder DCIM Recording Folder 100CASIO Image File CIMG0001.JPG Movie File CIMG0002.MOV Recording Folder 101CASIO Recording Folder 102CASIO . Supported Image Files • Image files shot with this camera • DCF-compliant image files This camera may not be able to display an image, even if it is DCF-compliant. When displaying an image recorded on another camera, it may take a long time for the image to appear on this camera’s monitor screen.
-
Page 78: Appendix
Appendix Safety Precautions DANGER This symbol indicates information that, if ignored or applied incorrectly, creates the danger of death or serious personal injury. WARNING This indication stipulates matters that have the risk of causing death or serious injury if the product is operated incorrectly while ignoring this indication. CAUTION This indication stipulates matters that have the risk of causing injury as well as matters for which there is the likelihood of occurrence of physical damage only if the... - Page 79 DANGER • Failure to observe any of the following precautions creates the risk of battery overheating, fire, and explosion. – Never use or leave the battery near open flame. – Do not expose the battery to heat or fire. – Make sure the battery is oriented correctly when charging it. –...
- Page 80 WARNING . Smoke, abnormal odor, overheating, and other abnormalities • Continued use of the camera while it is emitting smoke or strange odor, or while it is overheating creates the risk of fire and electric shock. Immediately perform the following steps whenever any of the above symptoms are present.
- Page 81 WARNING " • Never touch the power plug while your hands are wet. Doing so creates the risk of electric shock. • Should the power cord or power plug become damage, contact your retailer or nearest CASIO authorized service center. •...
- Page 82 WARNING . Dropping and Rough Treatment • Continued use of the camera after it is damaged by dropping or other rough treatment creates the risk of fire and electric shock. Immediately perform the following steps whenever any of the above symptoms are present.
- Page 83 CAUTION . USB-AC Adapter • Misuse of the USB-AC adapter creates the risk of fire and electric shock. Make sure you observe the following precautions. – Never cover the USB-AC adapter or power cord with a quilt, blanket, or other cover while it is in use, and do not use it near a heater. Doing so can interfere with heat radiation and cause the area around them to become hot.
- Page 84 CAUTION . Locations To Be Avoided • Never leave the camera in any of the following types of locations. Doing so creates the risk of fire and electric shock. – Areas subject to large amounts of humidity or dust – Food preparation areas or other locations where oil smoke is present –...
-
Page 85: Shock Resistant, Waterproof, Dustproof
Shock resistant, Waterproof, Dustproof This camera is designed to be shock resistant, waterproof, and dustproof as described below. 0 Shock resistant: This camera has passed drop testing from a height of 2.13 meters/7 feet* onto a plywood (lauan material)* Based on CASIO test equivalent to MIL-Standard 810F Method 516.5-Shock. (6 faces, 8 corners, 12 edges: Total of 26 drops.) 0 Waterproof: Corresponds to IEC/JIS Protection Class 7 (IPX7)*... - Page 86 • This camera will sink if dropped underwater. Use the strap or some other means to avoid dropping. • The waterproofing of this camera protects it against salt water and fresh water only. Protection is not provided against hot spring water. •...
- Page 87 . Cleaning Your Camera after Use Perform the following steps to clean the camera after using it under water or after it becomes soiled with sand, dirt, or mud. Note that the [CARD] cover and [USB] cover must be closed securely when performing these steps. Immerse the camera in fresh water.
- Page 88 . Other Precautions • The accessories that come with the camera are not waterproof. • Subjecting the camera to extreme impact can cause loss of waterproofing. • Moisture on the camera can freeze in very cold environments. Ice left on the camera can lead to malfunction.
-
Page 89: Precautions During Use
Precautions During Use . Data Error Precautions Your digital camera is manufactured using precision digital components. Any of the following creates the risk of corruption of data in camera memory. – Removing the memory card while the camera is performing some operation –... - Page 90 . Lens • Never apply too much force when cleaning the surface of the lens. Doing so can scratch the lens surface and cause malfunction. • You may sometimes notice some distortion in certain types of images, such as a slight bend in lines that should be straight.
- Page 91 . Precautions During Wireless Function (Wireless LAN, Bluetooth Wireless Technology) Use Operation of this product may affect or may be affected by nearby devices that use wireless functionality. Radio transmission interception The radio waves that are used to send and receive data can be intercepted by third parties.
- Page 92 Other trademarks and trade names are those of their respective owners. • EXILIM and EXILIM Link are registered trademarks or trademarks of CASIO COMPUTER CO., LTD. • All other company or product names mentioned herein are registered trademarks or trademarks of their respective companies.
-
Page 93: Power Supply
Power Supply Charging . If the camera or controller operation lamp starts flashing red... If the camera or controller operation lamp starts flashing red during charging, it means that further charging is not possible for one of the reasons below. Perform the actions described below to correct the problem and then try charging again. -
Page 94: Battery Precautions
Battery Precautions . Precautions during Use • Operation provided by a battery under cold conditions is always less than operation under normal temperatures. This is due to the characteristics of the battery, not the camera. • Charge the battery in an area where the temperature is within the range of 15°C to 35°C (59°F to 95°F). -
Page 95: Disposing Of The Camera
Disposing of the Camera When disposing of the camera, be sure to first remove its built-in lithium ion battery and send it in for recycling. IMPORTANT! • The battery of this camera is built-in and cannot be replaced by you. Contact your retailer or a CASIO authorized service center to have the battery replaced. - Page 96 . Controller Remove the two screws that secure the back of the controller. Swing the back cover open in the direction indicated by the arrow. Remove the four screws that secure the back of the controller. Remove the monitor screen. Appendix...
- Page 97 Hook your fingertip at the location indicated in the illustration and lift the battery up to remove it. . Old Rechargeable Battery Handling Precautions • Insulate the positive and negative terminals with tape, etc. • Do not peel the covering off of the battery. •...
-
Page 98: Using A Memory Card
Using a Memory Card See page 28 for information about supported memory cards and how to load a memory card. . Using a Memory Card • If a memory card starts to behave abnormally during image playback, you can restore normal operation by reformatting it (page 65). However, it is recommended that you always take along multiple memory cards whenever using the camera far away from the home or office. -
Page 99: Reset Initial Default Settings
Reset Initial Default Settings The tables in this section show the initial default settings on menus that appear in the REC mode and PLAY mode when you reset the camera (page 66). • A dash (–) indicates an item whose setting is not reset or an item for which there is no reset setting. -
Page 100: When Things Don't Go Right
When things don’t go right... Troubleshooting Problem Possible Cause and Recommended Action Power Supply Power does not turn 1)The battery of new camera is not charged. Charge the battery before using the camera. 2)The camera battery may be dead. Charge the battery (page 18). - Page 101 Problem Possible Cause and Recommended Action Camera powers The battery may be dead. Charge the battery (page 18). down during Self- timer countdown. There is digital Sensitivity may have been increased automatically for a dark noise in images. subject, which increases the chance of digital noise. Use a light or some other means to illuminate the subject.
- Page 102 Problem Possible Cause and Recommended Action File Deletion A file cannot be The file may be protected. A protected image cannot be deleted. deleted. Wireless LAN I can’t establish a 1)The camera cannot connect with a smartphone if they are wireless LAN too far apart from each other.
- Page 103 Problem Possible Cause and Recommended Action Other The wrong date and The date and time setting is off. Set the correct date and time time are displayed, (page 64). or the wrong date and time are being stored along with image data.
-
Page 104: Display Messages
Display Messages The camera’s protection function may have activated because camera temperature is too high. Turn off the ALERT camera and wait until it cools down before trying to use it again. This message appears when the camera or controller battery Battery is low. - Page 105 Camera connection was A Bluetooth connection between the camera and controller lost. Power will could not be established or maintained (page 102). turn off. Camera is getting Camera temperature is XX degrees or greater. Allow the hot. Power will turn camera to cool down sufficiently before using it.
-
Page 106: Number Of Snapshots/Movie Recording Time
Number of Snapshots/Movie Recording Time Snapshot microSD Image Size Approximate Built-in Memory Memory Card (Pixels) File Size Recording Capacity Recording Capacity 14M (4320 3240) X.XX MB XXXX 16:9 (4320 2432) X.XX MB XXXX 5M (2560 1920) X.XX MB XXXX Movies Maximum Built-in Recording... -
Page 107: Specifications
Specifications File Format Snapshots: JPEG (Exif Version 2.3; DCF 2.0 standard) Movies: MOV format, H.264/AVC standard, IMA-ADPCM (monaural) Recording Media Built-in Memory (Image Storage Area: XX.XMB*) microSD/microSDHC/microSDXC * Built-in memory capacity after formatting Recorded Image Sizes Snapshots: 14M (4320 3240), 16:9 (4320 2432), 5M (2560 1920) Movies:... - Page 108 White Balance Auto, Indoors, Outdoors Sensitivity Snapshots: Auto (ISO 80 to ISO 3200) (Standard Output Movies: Auto Sensitivity) Monitor Screen 2.0-inch TFT color LCD (Super Clear LCD) (Controller) 230,400 dots Capacitive type touch panel External connection Micro USB port (Hi-Speed USB compliance, USB charging) terminal Microphones (Camera) Monaural Speaker (Camera)
- Page 109 Approximate Battery Life All of the values provided below represent the approximate amount of time under normal temperature (23°C (73°F)) before the camera turns off. These values are not guaranteed. Low temperatures shorten battery life. Number of snapshots (Operating Time)* XXX shots Actual movie recording time (Full HD movie)* XX minutes...
- Page 110 Power Consumption X.X V DC, Approximately X.X W Shock resistant* This camera has passed drop testing from a height of 2.13 meters/7 feet onto a plywood (lauan material). * Based on CASIO test equivalent to MIL-Standard 810F Method 516.5-Shock. (6 faces, 8 corners, 12 edges: Total of 26 drops.) Waterproof* Corresponds to IEC/JIS Protection Class 8 (IPX8) and...
- Page 111 Declaration of Conformity According to EU Directive Manufacturer: CASIO COMPUTER CO., LTD. 6-2, Hon-machi 1-chome, Shibuya-ku, Tokyo 151-8543, Japan 0560 Responsible within the European Union: CASIO EUROPE GmbH Casio-Platz 1, 22848 Norderstedt, Germany The copy of the Declaration of Conformity can be found on http://world.casio.com/ce/dc/.
- Page 112 FCC marking is a standard conformity mark in the United States. GUIDELINES LAID DOWN BY FCC RULES FOR USE OF THIS UNIT IN THE U.S.A. (not applicable to other areas). NOTICE This equipment has been tested and found to comply with the limits for a Class B digital device, pursuant to Part 15 of the FCC Rules.
- Page 113 CASIO COMPUTER CO., LTD. 6-2, Hon-machi 1-chome Shibuya-ku, Tokyo 151-8543, Japan MA1407-A 2014...
Need help?
Do you have a question about the Casio EX-FR10 and is the answer not in the manual?
Questions and answers