Table of Contents
Advertisement
Quick Links
1. Name of the product
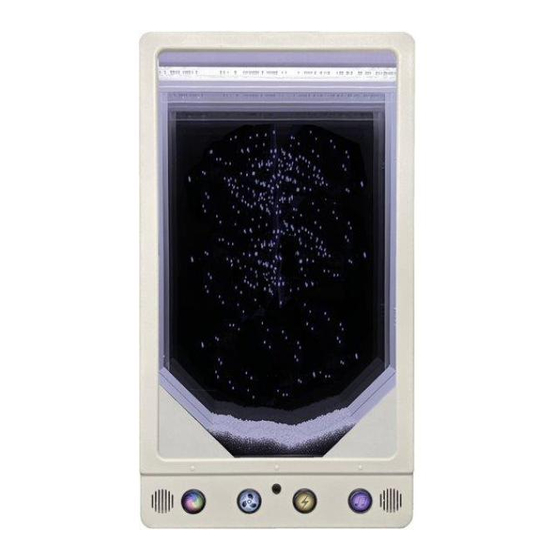
Nenko Interactive – Snowpanel
2. Product code
29011085
3. Short description
Follow the swirling motion of snow as used in the Harry Potter movies and bring a touch of
Hollywood to your sensory surroundings. Can be used separately, or in pairs or groups, in turn, and
promote social skills. Great for visual tracking and works relaxed through the circulating movement.
Use the color change button to learn color recognition when you change the background color of the
bright LED lights. Learn action-reaction by simply turning the fan on and off at the touch of a button
or control the speed to create yourself, from a relaxing snow flurry to a swirling blizzard. Use the
sound button to play sound effects or music from the included micro-SD card to provide both visual
and auditory sensory stimulation. Panel is Nenko Interactive compatible and therefore also responds
to controllers such as microphone, 6-button switch, cube and the Nenko Sense System.
Including fixation system for the panel. The fixation screws for the wall are not included
Size: 50 x 90 x 10 cm
5. Sensory stimulations
See, hear and feel
Advertisement
Table of Contents

Summary of Contents for NENKO 29011085
- Page 1 Panel is Nenko Interactive compatible and therefore also responds to controllers such as microphone, 6-button switch, cube and the Nenko Sense System.
- Page 2 6. Installation You can place this on the back side of the panel to see where the screws need to be placed in the designated places. 7. Commissioning The Snow Panel is immediately ready for use: Simply plug the panel into the wall outlet and turn on the power. To turn on the panel, press the power button:...
- Page 3 The LCD screen lights up and displays a locking symbol. The panel starts in the last used mode. To unlock the panel, press and hold the up and down arrow keys for 3 seconds: The menu is now accessible. Settings are as follows: •...
- Page 4 Wireless connectivity can be customized with this setting. Connectivity can be turned on or off: When connectivity is enabled, the panel responds to other interactive products in the room, such as a Nenko Interactive – Cube. Turn connectivity on or off using the up and down arrow buttons. Select the desired setting, and...
- Page 5 There are 5 coupling channels. Channel 0 is the default factory setting. When the panel is set to Channel 0, all compatible interactive switches in the room will operate the panel , e.g. oval external, Nenko Interactive – Cube. Select the desired pairing channel using the up and down arrow buttons. Select the desired setting, and then press OK again to save it.
- Page 6 The snow panel has 4 robust buttons at the base for easy access: From L-R: Color change changes the color of the LED lights – 7 colors: green, blue, dark blue, pink, red, orange, yellow. turn the fan on or off – on to move the artificial snow Speed adjusts the speed of the artificial blizzard - three settings of mild to snowstorm...
- Page 7 8. Maintenance These panels are designed for low maintenance. Clean the outside as desired with a soft, damp cloth. 9. Technical information INPUT: 100-240V 50/60Hz, 1.5A OUTPUT: 12V 5A Power approvals: For more information, you can visit our website www.nenko.com...
Need help?
Do you have a question about the 29011085 and is the answer not in the manual?
Questions and answers