Table of Contents
Advertisement
Quick Links
ELECTRONIC CASH REGISTER
ELEKTRONISCHE REGISTRIERKASSE
CAISSE ENREGISTREUSE ELECTRONIQUE
CAJA REGISTRADORA ELECTRONICA
INSTRUCTION MANUAL
BEDIENUNGSANLEITUNG
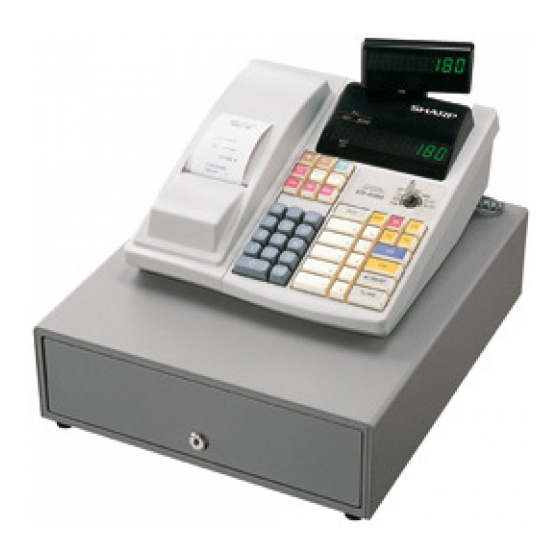
The above illustration shows model ER-A180.
Die obenstehende Abbildung zeigt das Modell ER-A180.
ER-A160
MODEL
MODELL
ER-A180
MODELE
MODELO
MANUEL D'INSTRUCTIONS
MANUAL DE INSTRUCCIONES
L'illustration ci-dessus montre le modèle ER-A180.
La ilustración anterior muestra el modelo ER-A180.
Advertisement
Table of Contents

Subscribe to Our Youtube Channel
Related Manuals for Sharp ER-A180


Summary of Contents for Sharp ER-A180
- Page 1 CAJA REGISTRADORA ELECTRONICA MODEL MODELL ER-A180 MODELE MODELO INSTRUCTION MANUAL MANUEL D’INSTRUCTIONS BEDIENUNGSANLEITUNG MANUAL DE INSTRUCCIONES The above illustration shows model ER-A180. L’illustration ci-dessus montre le modèle ER-A180. Die obenstehende Abbildung zeigt das Modell ER-A180. La ilustración anterior muestra el modelo ER-A180.
- Page 2 CAUTION: The cash register should be securely fitted to the supporting platforms to avoid instability when the drawers are open. CAUTION: The socket-outlet shall be installed near the equipment and shall be easily accessible. VORSICHT: Die Netzsteckdose muß nahe dem Gerät angebracht und leicht zugänglich sein. ATTENTION: La prise de courant murale devra être installée a proximité...
-
Page 3: Introduction
INTRODUCTION Thank you very much for your purchase of the SHARP Electronic Cash Register, Model ER-A160/ER-A180. Please read this manual carefully before operating your machine in order to gain full understanding of functions and features. Please keep this manual for future reference, it will help you, if you encounter any operational problems. -
Page 4: Table Of Contents
1 Replacing the batteries........................37 2 Replacing the paper roll ........................38 3 Replacing the ink ribbon ........................39 4 Ink refill (ER-A180 only) ........................40 5 Drawer handling ..........................41 6 Opening the drawing by hand ......................42 7 Installing the fixing angle bracket ......................42 8 In case of power failure or paper jam ....................43... -
Page 5: Parts And Their Functions
Battery compartment cover Ink ribbon cover Power cord Drawer lock Mode switch Drawer Keyboard Front view Rear view Printer ER-A180 Operator display Paper bed Printer cover Power cord Receipt paper Customer display Take-up spool (Pop-up type) Battery compartment cover Ink ribbon cover... - Page 6 =Department 16) You can change the number of departments to 10 or 15 (ER-A160), or to 5, 15, 20 or 30 (ER-A180). The key layout of 15, 20, 30 departments are as follows. (The layout of 5 and 10 departments are as shown above.) Consult your dealer for changing the number of departments.
- Page 7 Mode switch and mode keys The mode switch can be operated by inserting one of the two supplied mode keys - manager (MA) and operator (OP) keys. These keys can be inserted or removed only in the “REG” or “ ”...
-
Page 8: Getting Started
GETTING STARTED Follow these steps when you use the cash register for the first time. Install the Cash Register Unpack the cash register and place it in a location near a wall outlet. Be sure to locate it in such a location as described in “IMPORTANT”... - Page 9 Open the battery compartment cover located in front of the Battery compartment paper bed. cover Press the tab toward you then pull and lift the cover to expose the battery compartment. Install three new batteries in the battery compartment. Be sure that the positive (+) and negative (-) poles of each battery are facing in the proper direction.
- Page 10 When using the take-up spool (using as journal paper): á • Insert the end of the paper into the slit in the spool. (Press the key to feed more paper if required.) • Wind the paper two or three turns around the spool shaft. •...
- Page 11 Programming the VAT(Value Added Tax) rate If you program the VAT/tax rate, your cash register can calculate the sales tax. In the VAT system, the tax is included in the price you enter in the register, and the tax amount is calculated when tendered according to the VAT rate programmed.
-
Page 12: Basic Sales Entry
To display the signed-on cashier code ‹ ‹ ‹ *Cashier code *Cashier code: 1-6(ER-A160) 1-8(ER-A180) Enter the code using numeric keys. Basic sales entry Enter the price for the first item with numeric keys. Press the appropriate department key. Repeat steps 1 and 2 for all the items. - Page 13 Example: Key operation example Print ù Date û Department code Ñ É Unit price 2000 Subtotal VAT 1 Sales total Amount tendered Change Register number Consecutive number Cashier code Time In this example, the department 4 and 5 are set as taxable 1(default setting) and VAT 1 rate is programmed as 10%.
-
Page 14: Other Types Of Entries
Single item entries Department When using a programmed unit price * To shift the department key, press the department shift key at Unit price * Department key this point. (ER-A180 only) (max. 7 digits) Ó Ö PLU code Subdepartment å... -
Page 15: Multiplication Entries
* To shift the department key, press the When you use a programmed unit price department shift key before pressing ≈ Q' t y Unit price Dept. key the department key. (ER-A180 only) Ó Ö PLU code å Ö Unit price PLU code •... -
Page 16: Displaying Subtotals
Displaying subtotals Ñ The subtotal is displayed by pressing the key. When you press it, the subtotal of all entries which have been made is displayed and the symbol “ ” will light up in the display. Ñ If you want to print the subtotal when you press the key, change the setting by programming. -
Page 17: Auxiliary Entries
Tax2 VAT3 Tax3 When the multiple VAT/tax is assigned to a department or a PLU, a symbol of the lowest number assigned to VAT/tax rate will be printed. For details, contact your authorized SHARP dealer. Key operation example Print ù... -
Page 18: Discount Entries
Percent calculation for the subtotal Percent calculation for item entries Key operation example Print Key operation example Print ¯ ¯ ˘ § Ñ Ö ∞ § É É (When 10% is programmed (When premium and 15% are ∞ § for the key) programmed for the key) -
Page 19: Payment Treatment
Payment treatment Currency exchange Your register allows payment entries of foreign currency. Pressing the key creates a subtotal in foreign currency. For an additional payment in foreign currency Preset exchange rate For direct finalization After an entry É is completed *Exchange rate Amount tendered... -
Page 20: Received On Account Entries
Received on account entries Amount (Available cash only) *Less than the programmed entry digit limit (max. 8 digits) Key operation example Print 4800 Paid out entries Ü Amount (Available cash only) *Less than the programmed entry digit limit (max. 8 digits) Key operation example Print Ü... -
Page 21: Override Entries
Override entries You can override the entry digit limit setting by making an entry in the MGR mode. Turn the mode switch to the MGR position using the manager (MA) key. Make an override entry. On this example, the register has been programmed not to allow discount entries over 2 digits. - Page 22 Correction of the next-to-last or earlier entry (indirect void) With the key, you can void any incorrect department entry, PLU/subdepartment entry or item refund entry É made during a transaction if you find it before finalizing the transaction (e.g. pressing the key).
-
Page 23: Reading (X) And Resetting (Z) Of Sales Totals
OPX/Z X1/Z1 X2/Z2 Dept. key or Flash report: :Department total amount Ó (Only display) Dept. key (ER-A180 only) To clear the display, ≈ press the key or key: Amount of cash in drawer turn the mode switch to É another position. -
Page 24: Sample Reports
Sample report General report • Sample X1 report Read symbol*1 Received on account counter and total Dept. code Paid-out counter and total Sales q'ty No-sale counter Sales amount Cash sale counter and total Cheque sale counter and total Credit sale Dept. - Page 25 (from #1 to #6 for ER-A160, from #1 to #8 Cashier code for ER-A180). Customer counter Sales total Direct + Indirect void counter and total...
-
Page 26: Programming
In VAT system, the sign and the lowest taxable amount are ignored. They are valid only when you select add on tax system. Programming for departments Your machine is equipped with 5 (ER-A160) or 10 (ER-A180) standard departments. You can increase the number of departments up to 15 (ER-A160) or 30 (ER-A180). Functional programming Sign Assign plus department for normal sales, or minus department for minus transaction. - Page 27 Example: BCD = 101 or 110 Unit price To set zero *To shift the department key, press É the department shift key at this Unit price(max. six digits) Dept. key point. (ER-A180 only) Ó To program another dept. Key operation example Print ¯ 1000 É...
-
Page 28: Plu(Price Lookup) Programming
To program the following PLU To program another PLU *1: 1 through 200 (ER-A160) or 1 through 400 (ER-A180) *2: To shift the department key, press the department shift key at this point. (ER-A180 only) Key operation example Print Associated dept. -
Page 29: Programming For Miscellaneous Keys
Programming for miscellaneous keys Programming the rate ( *: Rate To program zero 0.00 — 100.00 (% rate) ∞ § É 0.000000 — 999.999999 (Currency *Rate exchange rate) To program another rate Key operation example Print ∞ 6068 É Percent rate Currency exchange rate (0.606800) You must use a decimal point when setting rates that are fractional. - Page 30 Programming function parameters for keys +/- sign Programming of the +/- sign assigns the premium or discount function for each key. â Item % / Item Percent/discount calculation for the individual department and PLU â Subtotal % / Subtotal Percent/discount calculation for the subtotals Entry digit limit (For discount key only) The limit is in effect for the REG-mode operations but can be overridden in the MGR mode.
-
Page 31: Programming Various Functions
Key operation example Print ≈ 0001 From left, ABCD e É Programming an entry digit limit for î keys The limit is in effect for REG-mode operation but can be overridden in the MGR mode. When “0” is set, the operation of the corresponding key is prohibited. To program “0”... - Page 32 Programming optional feature selection You can enable or disable the operation of Paid out, Received-on account, Refund, No-sale, Void in the REG-mode, and also select if you enable fractional quantity entry or not. To set “0” for all items Ñ ≈...
- Page 33 * Item: Selection: Entry: Printer type Journal printer Receipt printer Receipt print form Total Detailed Always enter 0. Date print Consecutive no. print Always enter 0. Zero skip in PLU report Zero skip in general/cashier/hourly report The default setting is ABCDEFGH = 11000011. Key operation example Print Ñ...
- Page 34 To set “0” for all items Ñ ≈ Ñ É *ABCD * Item: Selection: Entry: Printing exchange total amount and change amount on receipt or journal Always enter 0. Cheque and credit operation when tendering in foreign currency Exchange calculation method Division Multiplication Key operation example...
-
Page 35: Reading Stored Program
Reading stored programs Key sequence for reading stored program Report name Key sequence É Programming report É Auto key programming report ≈ Ö PLU programming report Start PLU code End PLU code Sample printouts 1 Programming report *When the tax system is automatic tax 1-3, Date manual tax 1-3,or the combination of automatic Dept. -
Page 36: Programming For Euro
PROGRAMMING FOR EURO Your register can be modified to correspond with each period set for the introduction of EURO, and in your register each currency is treated as shown on the table below depending on which period you are in. Basically your register can be automatically modified to correspond to the introduction of EURO by executing the modification operation in the X2/Z2 mode. - Page 37 Automatic Modification of Register System for Introduction of EURO To make your register correspond to the introduction of EURO, your register system can be automatically modified. According to the steps of the introduction, you can make your register correspond to EURO. Set the manager key (MA) to X2/Z2 position, and use the following sequence.
- Page 38 When “3” is substituted to “A”: Issuing a general Z1 report Issuing a general Z2 report Resetting GT Setting “not printing” for a PGM function “Printing exchange total amount and change amount on receipt or journal” Setting “multiplication” for a PGM function “Exchange calculation method” Changing the domestic currency symbol to the EURO symbol ( ) and setting the number of digits after decimal of the domestic currency amount to 2 Setting the round-off function for currency exchange...
-
Page 39: Operator Maintenance
OPERATOR MAINTENANCE Replacing the batteries If the low battery symbol “ ” appears on the far left of the display, the voltage of the batteries is less than the required level. In this situation, you must replace new batteries within two days. And if the no battery symbol “... -
Page 40: Replacing The Paper Roll
Remove the holding plate form the spool shaft. Installing the paper roll Be sure to use paper rolls specified by SHARP. The use of any other paper rolls than specified could cause paper jamming, resulting in register malfunction. Paper specification Paper width: 57.5 ±... -
Page 41: Replacing The Ink Ribbon
Replacing the ink ribbon When printing becomes faded, replace the ink ribbon with a new one specified by SHARP. Removal To prevent the ink ribbon form drying or becoming dirty, do not remove it from its bag until just before using. -
Page 42: Ink Refill (Er-A180 Only)
Ink refill (ER-A180 only) If the logo becomes too light, it’s time to refill the logo ink. You must use the logo ink specified by SHARP. Consult your dealer for the logo ink. For refilling the logo ink, follow the procedure given below. -
Page 43: Drawer Handling
To detach the drawer, pull it forward fully with the till removed, and remove it by lifting it ER-A160 Coin case Bill case Bill Coin case separator 5-denomination coin case (detatchable) Till Drawer ER-A180 Coin case Bill case 8-denomination coin case (detatchable) Till Drawer... -
Page 44: Opening The Drawing By Hand
(See the figure shown below.) The drawer will not open, if it is locked with a drawer lock key. ER-A160 ER-A180 Lever Lever... -
Page 45: In Case Of Power Failure Or Paper Jam
In case of power failure or paper jam When power is lost, the machine retains its memory contents and all information on sales entries. The following situations occur during a power failure or paper jam. (Batteries must be correctly installed.) When a power failure occurs when the register is turned on or during a computation process: When power returns, the register resumes operation from the point of failure. -
Page 46: List Of Options
• ER-51DK7G: 10 5 x 1 size dummy keys SPECIFICATIONS Model: ER-A160/ER-A180 Dimensions: ER-A160: 330 (W) x 364 (D) x 238 (H) mm ER-A180: 355 (W) x 424 (D) x 252 (H) mm Weight: ER-A160: 8.7 kg ER-A180: 10.7 kg Power source: Official (nominal) voltage and frequency... - Page 47 • Kasta ej batteriet i vattnet eller i hushållssoporna. Batteriet får ej heller utsätttas för öppen eld. ER-A160 Geräuschpegel: 56 dB (A) Gemessen nach DIN 45635 bzw. EN27779 (Spitzenwert bei Aufspringen der Kassenschublade: 70 dB (A)) ER-A180 Geräuschpegel: 57 dB (A) Gemessen nach DIN 45635 bzw. EN27779 (Spitzenwert bei Aufspringen der Kassenschublade: 67 dB (A))
- Page 48 SHARP CORPORATION Printed in Korea / Imprimé en Corée / Gedruckt in Korea / Impreso en Corea T(TINSM2406BHZZ)
Need help?
Do you have a question about the ER-A180 and is the answer not in the manual?
Questions and answers