Table of Contents
Advertisement
Quick Links
Advertisement
Table of Contents

Related Manuals for Hagerman Audio BUGLE2


Summary of Contents for Hagerman Audio BUGLE2
- Page 1 BUGLE2 MM / MC Phonostage PCB Made in USA...
-
Page 2: Copyrights And Trademarks
BUGLE2 Phonostage Kit PCB Copyrights & Trademarks Copyright Hagerman Audio Labs 2013 - 2017. All rights reserved. No part of this document may be photocopied, reproduced, or translated to another language without the prior written consent. Disclaimer The information contained in this document is subject to change without notice. -
Page 3: Specifications
Description Congratulations, you have just purchased one of the highest performance-per-dollar audiophile products available! The Bugle2 was designed to be a simple yet flexible phonostage capable of achieving very good sound quality comparable to far more costly units. It is a second-generation circuit topology that uses low noise audio opamps implementing passive split equalization filters and to provide a low output impedance. - Page 4 BUGLE2 Phonostage Kit PCB Parts The following parts need to be purchased to complete your kit. If you want to make substitutions, it is recommended to build as stock first to make sure it works properly. Then modify to your liking. For resistor details, see chart in back of this manual.
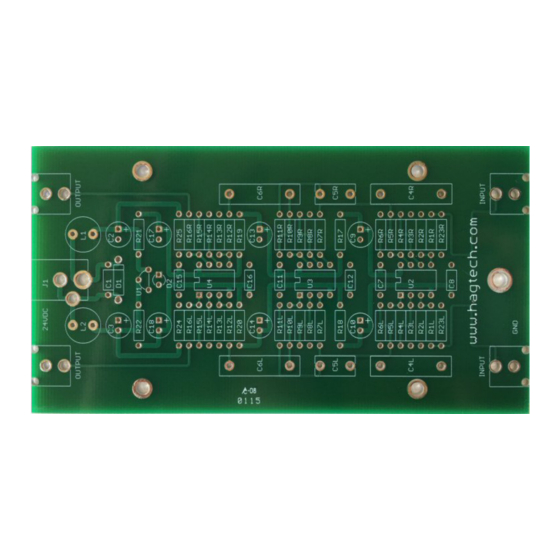
- Page 5 BUGLE2 Phonostage Kit PCB Assembly Using the stuffing guide, install all of the resistors. Solder in place and cut leads. The guide shows values for 40dB. Gain and loading options are listed in the following chart. Resistor 40dB 50dB 60dB...
- Page 6 BUGLE2 Phonostage Kit PCB Install opamps into sockets. The dot in the plastic indicates pin1, which is the hole with the square pad. Install opamps The assembly is now ready for initial testing. Connect the power supply to the DC jack.
-
Page 7: Installation
RCA output plugs into the Bugle2 input jacks. Plug in the power supply. Enjoy! The Bugle2 must get an Earth ground from the linestage or receiver via the connecting cables; otherwise there will be hum. If the inputs to the linestage are floating, then add an extra ground wire to the Bugle2.
Need help?
Do you have a question about the BUGLE2 and is the answer not in the manual?
Questions and answers