
Related Manuals for LG LAC5910N


Summary of Contents for LG LAC5910N
- Page 1 LAC3900_LAC5900_6900N.IQ_ENG_MFL61778411 ENGLISH LAC3910N / LAC5910N / LAC6910N LAC3910NP / LAC5910NP / LAC6910NP...
-
Page 2: Table Of Contents
Table of Contents Safety Note Listening to the radio Auto search memory [LAC3910N/LAC3910NP/LAC5910N/LAC5910NP] Storing and recalling broadcast frequencies Front Panel / Remote Control To scan the preset stations [LAC6910N/LAC6910NP] Front Panel / Remote Control To tune in the preset stations... -
Page 3: Safety Note
This unit cannot play 8cm disc (use 12cm disc only). 8 cm compatible with the LG players when formatting rewritable discs. When setting the option to Live File System, you cannot use it on LG players. (Mastered/Live File System : Disc format system for Windows Vista) CAR CD/MP3/WMA Receiver... -
Page 4: Lac3910N/Lac3910Np/Lac5910N/Lac5910Np]
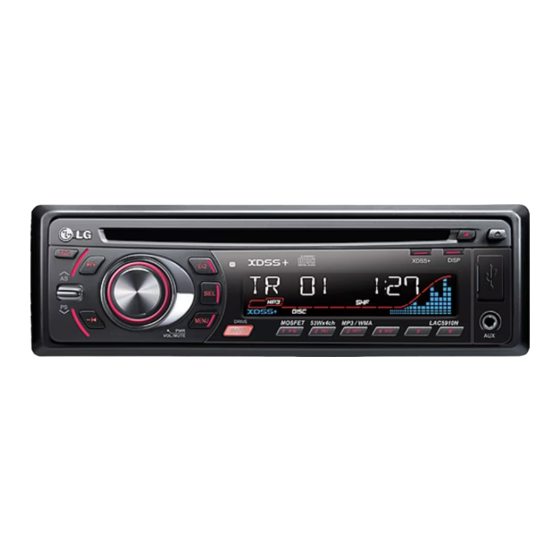
[LAC3910N/LAC3910NP/LAC5910N/LAC5910NP] Front Panel / Remote Control SOURCE [SRC] 10 Extreme Dynamic • Auto Store [U U /AS] Sound System • Preset Scan [u u /PS] [XDSS+] • MP3/WMA Track 11 Display [DISP] +10/-10 U U /u u 12 Eject • Folder Up/Down U U /u u... -
Page 5: Lac6910N/Lac6910Np] Front Panel / Remote Control
LAC6910N/LAC6910NP] Front Panel / Remote Control • Auto Store [U U /AS] Extreme Dynamic Sound System • [BAND] Power [POWER] / Mute [XDSS+] • Preset Scan [u u /PS] • DRIVE [DRV] Select [MENU/SEL] 10 Display [DISP] • MP3/WMA Track +10/-10 U U /u u 10 Volume Up / Down Source [SRC]... -
Page 6: Lac3910N/Lac3910Np/Lac5910N/Lac5910Np]
LAC3910N/LAC3910NP/LAC5910N/LAC5910NP] About Detachable Control Attaching the control panel Detaching the control panel Align the left side of the panel with Press the “ ” (RELEASE) to the stopper. open the control panel. Push the right side or panel into the Hold the right part of the control unit until it clicks. -
Page 7: About Detachable Control Panel
LAC6910N/LAC6910NP] About Detachable Control Panel Attaching the control panel Detaching the control panel Press the “ ” button to unlock Attach part A of the control panel to the control panel. part B of the unit. Push the control panel to left. Attach part C of the control panel to part D of the unit while pushing the Pull the control panel out of the... -
Page 8: Installation
Installation ISO-DIN Installation Basic Installation Slide the unit into the ISO-DIN Before installing, make sure that the Bend the claws frame. ignition-switch is set to OFF and according to Fit screws removed from the old the thickness remove the terminal of the car battery of the unit. -
Page 9: Connection
Connection Before connecting, make sure that the ignition switch is set to OFF, and remove the battery # terminal to avoid short circuits. To Audio out To Audio in Front Left Rear Left (Sub-woofer Left) Front Right Rear Right (Sub-woofer Right) Sub-woofer is optional. -
Page 10: Basic Operation
Adjusting the sound level Basic Operation Press SEL (SEL/MENU on the remote control) repeatedly to select the mode you want to adjust from VOL(volume), BAL(left/right speaker), FAD(front/rear ON PLAYER ON REMOTE speaker) and SUB(Sub-woofer:optional). To adjust sound quality, rotate PWR or 1. -
Page 11: Listening To A Cd
Shuffle Listening to a CD Press or press and hold SHF on the player (SHF on the remote control). Each ON PLAYER ON REMOTE files in the current selected folder ( SHF) or all of the tracks/files (SHF) on the disc is played randomly. Press SHF again to cancel it. 1. -
Page 12: Listening To The Radio
Connecting USB device(Optional) Listening to the radio ON PLAYER ON REMOTE ON PLAYER ON REMOTE 1. Open the USB cover. 1. Select a source to tuner. 2. Connect the USB device. 2. Select a band. BAND BAND 3. Adjust the volume. Rotate PWR VOLUME 3. -
Page 13: Connecting An Auxiliary Equipment
LCD WHI / RED Auxiliary input You can change the LCD window color. WHI(white) <-> RED(red) [LAC3910N/LAC3910NP/LAC5910N/LAC5910NP] LED RED / GRN / AUTO [LAC6910N/LAC6910NP] LED BLU / RED / AUTO You can change the button color. COL TM (Color changing time) -
Page 14: Troubleshooting
Troubleshooting Symptom Cause Correction General Power doesn’t turn on / The Leads and connectors are not properly. Confirm once more that all connections are unit doesn’t operate. correct. The fuse is blown. Rectify the problem that caused the fuse to blow, and then replace it. -
Page 15: Specifications
Specifications General Output Power 53W x 4CH (Max.) Power Source DC 12V Speaker impedance 4Ω Ground System Negative Dimensions (W x H x D) 180 x 50 x 176 mm (Without Control Panel) Net Weight 1.3 kg Tuner Frequency Range 87.5-107.9, 87.5-108 MHz S/N Ratio 55 dB... - Page 16 P/NO : MFL61778411...
Need help?
Do you have a question about the LAC5910N and is the answer not in the manual?
Questions and answers