Advertisement
Quick Links
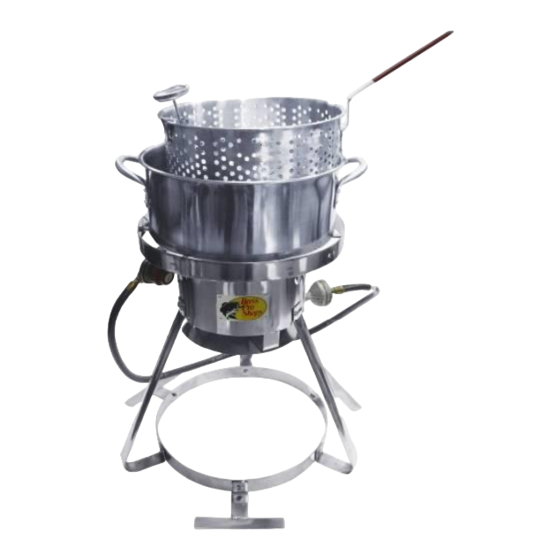
Stainless Steel Fish Fry Kit
Assembly, Use and Care
Model: TF2002801-BA-01
Tools required:
Philips screwdriver / Adjustable wrench
This instruction manual contains important information necessary for the proper
assembly and safe use of the appliance.
Read and follow all warnings and instructions before assembling and using the
appliance.
Follow all warnings and instructions when using the appliance.
Keep this manual for future reference.
This appliance is NOT for frying turkeys.
TF2002801-BA-01-English
For Outdoor Use Only
Page 1 of 16
20180510-V1
Advertisement

Summary of Contents for Bass Pro Shops TF2002801-BA-01
- Page 1 Stainless Steel Fish Fry Kit Assembly, Use and Care For Outdoor Use Only Model: TF2002801-BA-01 Tools required: Philips screwdriver / Adjustable wrench This instruction manual contains important information necessary for the proper assembly and safe use of the appliance.
- Page 2 7. The minimum environmental temperature of this appliance is -21°F (-29°C). Do not use this appliance under above rated temperature. Failure to follow these instructions could result in fire, explosion or burn hazard which could cause property damage, personal injury or death. Page 2 of 16 TF2002801-BA-01-English 20180510-V1...
-
Page 3: Prop 65 Warning
WARNING: Indicates a potentially hazardous situation which, if not avoided, will result in death or serious injury. CAUTION CAUTION: Indicates a potentially hazardous situation or unsafe practice which, if not avoided, may result in minor or moderate injury. Page 3 of 16 TF2002801-BA-01-English 20180510-V1... - Page 4 Do not move the appliance when in use. Allow the cooking vessel to cool to 115°F (45°C) before moving or storing. Page 4 of 16 TF2002801-BA-01-English 20180510-V1...
- Page 5 If you see, smell, or hear escaping gas, immediately get away from the LP tank / appliance and call your FIRE DEPARTMENT. All spare LP tanks must have safety caps installed on the LP tank outlet. Page 5 of 16 TF2002801-BA-01-English 20180510-V1...
- Page 6 Do not release liquid propane (LP) gas into the atmosphere. This is a hazardous practice. To remove gas from LP tank, contact an LP dealer or call a local FIRE DEPARTMENT for assistance. Check the telephone directory under “GAS Companies” for nearest certified LP dealers. Page 6 of 16 TF2002801-BA-01-English 20180510-V1...
- Page 7 The regulator will seal on the back-check feature in the LP tank valve, resulting in some resistance. An additional one-half to three quarters turn is required to complete connection. TIGHTEN BY HAND ONLY – DO NOT USE TOOLS. Page 7 of 16 TF2002801-BA-01-English 20180510-V1...
- Page 8 Customer Service Center at 1 – 888 – 837 – 1380. Use only replacement parts specified by manufacturer. 6. Always close LP tank valve after performing tank test by turning hand wheel clockwise. Page 8 of 16 TF2002801-BA-01-English 20180510-V1...
- Page 9 Check and clean burner / manifold tube for insect nests. A clogged tube can lead to fire beneath the appliances. Spiders’ nests or wasps’ mud inside the burner may cause fire. If a fire occurs, immediately turn off gas supply at LP tank valve. (See representative illustration in Fig.1.) Page 9 of 16 TF2002801-BA-01-English 20180510-V1...
- Page 10 NOTE: Clean the entire appliance each year and tighten all hardware on a regular basis (1-2 times a year or more depending on usage). Cleaning should be done where detergents won’t harm patio, lawn or the like. Page 10 of 16 TF2002801-BA-01-English 20180510-V1...
- Page 11 10.5QT Fish Pot Fish Basket Basket Handle 5” Thermometer Hook Hardware List Part# Description Diagram Qty. Bolt M6 x 12 12pcs Flange Nut M6 12pcs Bolt M5 x 10 4pcs Nut M5 4pcs Tooth Washer 4pcs Page 11 of 16 TF2002801-BA-01-English 20180510-V1...
- Page 12 2. Assemble the Legs (2) to the Stand Ring (3) by using 3pcs bolts (A) and 3pcs flange nuts (B). Assemble the Small T-Support Legs (4) by using 3pcs bolts (A) and 3pcs flange nuts (B). Page 12 of 16 TF2002801-BA-01-English 20180510-V1...
- Page 13 4. Insert the Regulator Hose Assembly (7) fitting into the burner and tighten. Be sure not to strip threads on brass fitting. DO NOT OVERTIGHTEN. Proper connection is critical for correct operation of the unit. Page 13 of 16 TF2002801-BA-01-English 20180510-V1...
- Page 14 5. Attach the Basket Handle (10) by inserting 4pcs bolts (C) through Fish Basket (10), 4pcs tooth washers (E) and 4pcs nuts (D). 6. Press and fix the U-shaped end of hook (12) into the slot on Regulator (7). Page 14 of 16 TF2002801-BA-01-English 20180510-V1...
- Page 15 Prior to lighting, position thermometer clip so that at least 2.75” of thermometer tip is submerged in oil. Reposition thermometer as necessary to cook. Continue to use thermometer until burner is turned off. Page 15 of 16 TF2002801-BA-01-English 20180510-V1...
- Page 16 (Made In China) For assistance, contact customer service at customerservice@rankam.com or at 1 – 888 – 837 – 1380, 8:00am – 5:00pm, Pacific Standard time, Monday to Friday Manufactured for Bass Pro Shops 2500 E. Kearney Springfield, MO 65898 Page 16 of 16...
Need help?
Do you have a question about the TF2002801-BA-01 and is the answer not in the manual?
Questions and answers