
Related Manuals for Fenton RP106 Series


Summary of Contents for Fenton RP106 Series
- Page 1 RP106 Series Record Player Ref. nr.: 102.104; 102.105 INSTRUCTION MANUAL GEBRUIKSAANWIJZING BEDIENUNGSANLEITUNG MANUAL DE INSTRUCCIONES MANUEL D'INSTRUCTIONS INSTRUKCJA OBSŁUGI V1.1...
- Page 2 ENGLISH Congratulations to the purchase of this Fenton product. Please read this manual thoroughly prior to using the unit in order to benefit fully from all features. Read the manual prior to using the unit. Follow the instructions in order not to invalidate the warranty. Take all precautions to avoid fire and/or electrical shock.
-
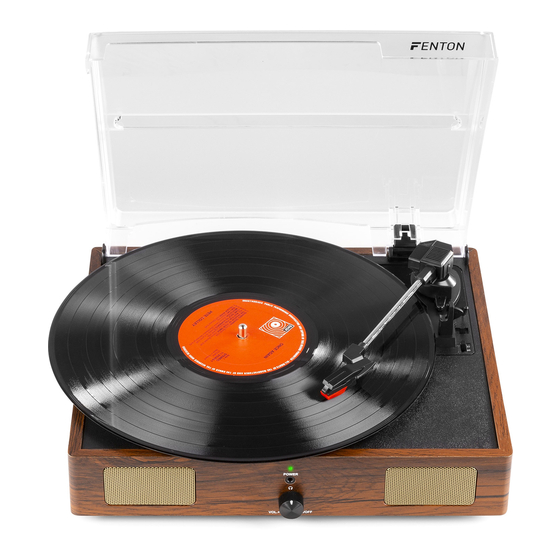
Page 3: Operation
OVERVIEW 1. Tone Arm Lever The fixed tonearm can be unlocked (raised and lowered) by using this lever. 2. Auto-stop Switch ON/OFF This switch turns auto stop on or off. When the automatic stop is enabled, the platform will start rotating as soon as the tone arm is placed over the record and will stop rotating when it has reached the end of the record. -
Page 4: Connecting With Computer
CONNECTING WITH COMPUTER Before you connect the turntable to a computer, unplug it from your mixer or Hi-Fi system. The included software is a third party application and therefore Fenton does not handle any questions or problems regarding the software. - Page 5 NEDERLANDS Hartelijk dank voor de aanschaf van dit Fenton product. Neemt u a.u.b. een paar momenten de tijd om deze handleiding zorgvuldig te lezen, aangezien wij graag willen dat u onze producten snel en volledig gebruikt. Lees deze handleiding eerst door alvorens het product te gebruiken. Volg de instructies op anders zou de garantie wel eens kunnen vervallen.
- Page 6 OVERZICHT 1. Toonarmhendel De vaste toonarm kan worden opgetild en neergelaten door de hendel. 2. Autostop schakelaar AAN/UIT Met deze schakelaar schakelt u automatisch stoppen aan of uit. Als de automatische stop is ingeschakeld, zal het plateau beginnen te draaien zodra de toonarm wordt geplaatst over de plaat en stopt met draaien wanneer de het einde van langspeelplaat heeft bereikt.
- Page 7 VERBINDEN MET EEN COMPUTER De bijgeleverde software is een applicatie van derden en Fenton handelt daarom geen vragen of problemen af die betrekking hebben op deze software. Zet de computer aan Sluit de platenspeler aan wanneer de computer is opgestart. De computer zal nu de besturingsprogramma’s installeren.
- Page 8 DEUTSCH Vielen Dank für den Kauf dieses Fenton gerat. Nehmen Sie sich einen Augenblick Zeit, um diese Anleitung sorgfältig durchzulesen, damit sie die Möglichkeiten, die unser Produkt bietet, sofort voll ausnutzen können. Lesen Sie erst die Anleitung vollständig vor der ersten Inbetriebnahme durch. Befolgen Sie die Anweisung, da sonst jeglicher Garantieanspruch verfällt.
- Page 9 BEDIENELEMENTEN 1. Tonarm-Hebel Der feste Tonarm kann durch den Hebel angehoben und abgesenkt wird. 2. Auto-Stop-Schalter Wenn der automatische Stopp aktiviert ist, beginnt sich die Plattform zu drehen, sobald der Tonarm über die Aufnahme gelegt wird und stoppt die Drehung, wenn sie das Ende der Aufnahme erreicht hat. Einige Vinylplatten stoppen vor dem Ende.
- Page 10 VERBINDEN MIT COMPUTER Bei der mitgelieferten Software handelt es sich um eine Anwendung eines Drittanbieters. Fenton bearbeitet keine Anfragen oder Probleme, die sich auf die Software beziehen. 1. Schalten Sie Ihren Computer ein. 2. Wenn der Computer gestartet wird, schließen Sie den Plattenspieler an. Der Computer installiert die Treiber dann automatisch.
- Page 11 Esta garantía no es aplicable en caso de accidente o daños ocasionados por uso indebido del aparato o mal uso del mismo. Fenton no se hace responsable de daños personales causados por el no seguimiento de las normas e...
-
Page 12: Vision General
VISION GENERAL 1. Brazo El brazo fijo se puede levantar y bajar a mano, o presionando la palanca elevar / bajar. 2. Interruptor Autostop ON/OFF Este interruptor activa o desactiva la parada automática. Cuando la parada automática está activada, la plataforma comenzará a girar tan pronto como el brazo de tono se coloque sobre la grabación y dejará... -
Page 13: Configuración Del Software
CONECTANDO CON EL PC El software incluido es una aplicación de terceros y por lo tanto Fenton no maneja ninguna pregunta o problema con respecto al software. 1. Encienda el ordenador 2. Coloque el interruptor principal de alimentación en la parte posterior del plato giratorio en la posición "on"... - Page 14 à la garantie La garantie deviendrait également caduque en cas d’accidents ou dommages causés par une utilisation inappropriée de l’appareil ou un non-respect des consignes présentes dans cette notice. Fenton ne pourrait être tenu responsable en cas de dommages matériels ou corporels causés par un non-respect des consignes de sécurité...
- Page 15 PRESENTATION 1. Bras de Lecture Le bras, fixé, peut être levé et baissé à la main ou en appuyant sur le poussoir monter / baisser. 2. Interrupteur Autostop ON/OFF Cet interrupteur active l'arrêt automatique ou le désactive. Lorsque l'arrêt automatique est activé, la plate-forme commence à tourner dès que le bras de lecture est placé...
- Page 16 BRANCHEMENT AVEC UN ORDINATEUR Le logiciel inclut est une application tierce, Fenton ne peut gérer les questions ou problèmes quant au logiciel. 1. Allumez l'ordinateur. 2. Mettez l'interrupteur secteur sur la face arrière de la platine disque sur la position “ON“.
- Page 17 POLSKI Gratulujemy zakupu urządzenia marki Fenton. Proszę o przeczytanie instrukcji przed użyciem urządzenia, aby jak najlepiej móc wykorzystać jego możliwości. Przeczytaj tę instrukcję przed pierwszym użyciem urządzenia. Postępuj zgodnie z instrukcją, aby nie utracić gwarancji. Zwróć uwagę na wszystkie ostrzeżenia, aby uniknąć pożaru lub/oraz porażenia prądem. Naprawy mogą być przeprowadzane jedynie przez autoryzowany serwis.
- Page 18 PRZEGLĄD 1. Dźwignia Ramienia Tonowego Stałe ramię tonowe może być odblokowane (podnoszone i opuszczane) za pomocą tej dźwigni. 2. Przełącznik Autostop ON/OFF Przełącznik ten włącza lub wyłącza funkcję automatycznego zatrzymania. Gdy automatyczne zatrzymanie jest włączone, platforma zacznie się obracać, gdy tylko ramię tonu zostanie umieszczone nad nagraniem i przestanie się...
-
Page 19: Połączenie Z Komputerem
POŁĄCZENIE Z KOMPUTEREM Przed podłączeniem gramofonu do komputera, odłącz go od miksera lub systemów Hi-Fi. • Dołączone w zestawie oprogramowanie jest autorstwa firm trzecich. Z tego powodu Fenton nie udziela informacji na • pytania dotyczące programu lub pomocy z oprogramowaniem. - Page 20 TECHNICAL SPECIFICATION / TECHNISCHE SPECIFICATIE / TECHNISCHE DATEN / ESPECIFICACIONES TÉCNICAS / SPÉCIFICATIONS TECHNIQUES / SPECYFIKACJA TECHNICZNA Output Connections : RCA, 3.5mm Jack Speed Settings (RPM) : 33, 45 Power Supply : 100-240VAC 50/60Hz (5V USB) Dimensions (L x W x H) : 280 x 320 x 110mm Weight : 2,00 kg The specifications are typical.