
Related Manuals for Philips FWM2200/85


Summary of Contents for Philips FWM2200/85
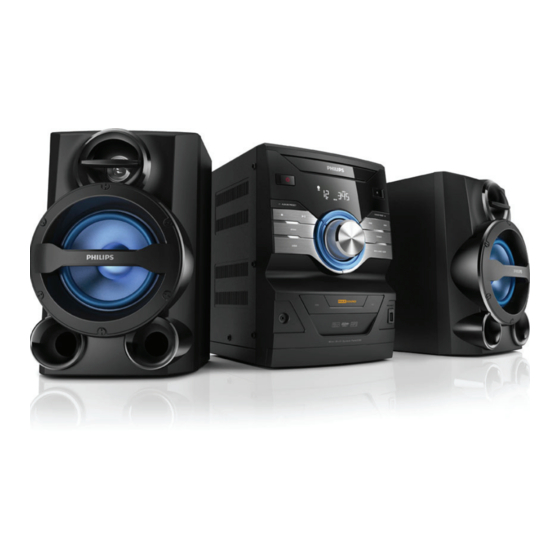
- Page 1 Always there to help you Register your product and get support at www.philips.com/welcome FWM2200 Question? Contact Philips User manual...
-
Page 3: Table Of Contents
Contents 9 Set the alarm timer 1 Important Know these safety symbols 10 Set the sleep timer Important Safety Instructions 2 Your Mini Hi-Fi System 11 Product information Introduction Specifications What’s in the box USB playability information Overview of the main unit Supported MP3 disc formats Overview of the remote control Maintenance... -
Page 4: Important
1 Important • Protect the power cord from being walked on or pinched, particularly at plugs, convenience receptacles, and the point where they exit from the clock radio. • Only use attachments/accessories specified by the manufacturer. Know these safety symbols • Use only with the cart, stand, tripod, bracket, or table specified by the manufacturer or sold with the Hi-Fi system. - Page 5 • Where the MAINS plug or an appliance coupler is used as the disconnect device, the disconnect device shall remain readily operable. Warning • Never remove the casing of this apparatus. • Never lubricate any part of this apparatus. • Never place this apparatus on other electrical equipment.
-
Page 6: Your Mini Hi-Fi System
• Main unit Congratulations on your purchase, and • Remote control (with batteries) welcome to Philips! To fully benefit from the • Speaker box x 2 support that Philips offers, register your product • MW loop antenna at www.philips.com/welcome. • MP3 link cable • Short user manual... -
Page 7: Overview Of The Main Unit
Overview of the main unit 200w M i n i H i - F i S y s t e m F w m 2 2 0 0 c iR sensor a Disc compact • Receive the infrared signals from the remote control. -
Page 8: Overview Of The Remote Control
Overview of the remote • Start or pause play. control • Stop play or erase a program. g DISC • Select the disc source. h USB • Select USB source. i Volume controller • Adjust volume. j MAX SOUND • Turn on/off instant power boost. k DBB MP3 LINK • Turn on/off dynamic bass... - Page 9 c CD • Select disk source. • Start or pause play. d USB r PRESET/ALBUM • Select USB source. • Select a preset radio station. • Skip to previous/next album. e DISP/MUTE s TUNER • Mute/unmute sound. • Display clock and play information. • Select tuner source.
-
Page 10: Get Started
3 Get started Connect speakers Note Caution • For better sound effect, use the supplied speakers only. • Use of controls or adjustments or performance of • Connect only speakers with impedance that is the procedures other than herein may result in hazardous same or higher than the supplied speakers. -
Page 11: Connect Power
Connect power Set clock In standby mode, press and holdCLOCK Caution SET for two seconds. • Risk of product damage! Make sure that the power » [SET CLOCK] (set clock) scrolls supply voltage corresponds to the voltage printed on on the display, and then [24H/12H] the bottom or back of the unit. -
Page 12: Play From Hard Media
4 Play from hard Insert the USB storage device into the socket. media Press USB to switch the source to USB storage device. » Play starts automatically. Play a disc Basic play operations Note • You can control play through following Make sure that the disc contains playable audio content. -
Page 13: Program Tracks
Program tracks You can program a maximum of 20 tracks. In CD/USB mode, when no track is played, press PROG. » [PROG] (program) and the preset number blink on the display panel. For MP3/WMA tracks, press select an album. Press to select a track number, and then press PROG to confirm. -
Page 14: Listen To Radio
5 Listen to radio Store radio stations manually Tune to a radio station. Press PROG. Note » The preset number begins to blink. • For optimal reception, fully extend the antenna and Press repeatedly to select a preset adjust its position. number. -
Page 15: Play Audio From An External Device
6 Play audio from Play audio via the AUX IN an external sockets device LINE OUT With this Hi-Fi system, you can play audio from an external audio device. Play audio via the MP3 LINK socket AUX IN Press MP3 LINK/AUX repeatedly to select AUX source. -
Page 16: Adjust Sound
7 Adjust sound During play, you can adjust volume and select sound effects: Function Action Press VOL +/-. To increase/decrease volume To mute/unmute sound Press and hold MUTE for two seconds. Press MAX. To turn on/off instant power boost Press DBB. To turn on/off dynamic bass enhancement Press DSC... -
Page 17: Display Information
8 Display information During play, press DISP repeatedly to view time and other play information. -
Page 18: Set The Alarm Timer
9 Set the alarm timer Note • Make sure that you have set the clock correctly. In standby mode, press and hold SLEEP/TIMER until SET TIMER scrolls. Press CD, TUNER, or USB to select an alarm source. Press SLEEP/TIMER to confirm. Press to set the hour. -
Page 19: Set The Sleep Timer
10 Set the sleep timer You can set a time period after which this Hi-Fi system switches to standby mode automatically. Press SLEEP/TIMER repeatedly to select a period (in minutes). » When the sleep timer is activated, is displayed. • To deactivate the sleep timer, press SLEEP/TIMER repeatedly until SLP OFF is displayed. -
Page 20: Product Information
11 Product Disc information Laser Type Semiconductor Disc Diameter 12 cm, 8 cm Support Disc CD-DA, CD-R, CD-RW, MP3-CD, Note WMA-CD Audio DAC 24 Bits / 44.1kHz • Product information is subject to change without prior Total Harmonic < 1% notice. -
Page 21: Supported Mp3 Disc Formats
WMA files in Lossless format • After prolonged use, dirt or dust may accumulate at the disc lens. To ensure good Supported MP3 disc formats play quality, clean the disc lens with Philips CD lens cleaner or any commercially • ISO9660, Joliet available cleaner. Follow the instructions supplied with cleaner. -
Page 22: Troubleshooting
Replace or clean the disc. device, check the following points before • Use a finalized CD or correct format disc. requesting service. If the problem remains unsolved, go to the Philips Web page (www. Poor radio reception philips.com/support). When you contact Philips, • Increase the distance between the unit and make sure that the device is nearby and the your TV or VCR. -
Page 23: Notice
Any changes or modifications made to this device that are not expressly approved by Please visit www.recycle.philips.com for Philips Consumer Lifestyle may void the user’s additional information on a recycling center in authority to operate the equipment. your area. Environmental information All unnecessary packaging has been omitted. - Page 24 Specifications are subject to change without notice © 2013 Koninklijke Philips Electronics N.V. All rights reserved. FWM2200_85_UM_V1.0_EN...
Need help?
Do you have a question about the FWM2200/85 and is the answer not in the manual?
Questions and answers