Advertisement
Quick Links
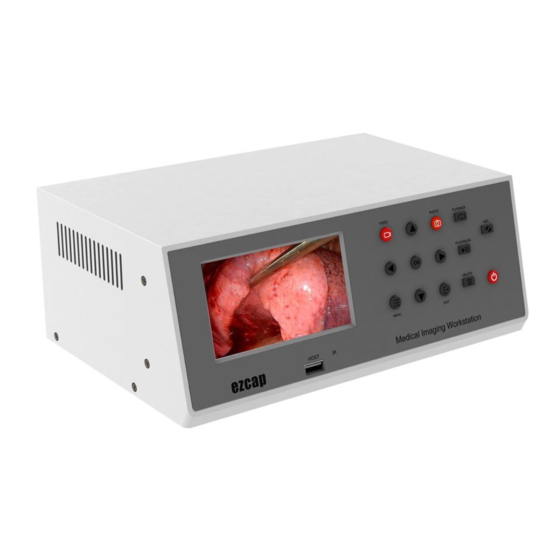
Medical Imaging Workstation
Operation Manual
Thanks for purchasing ezcap292 HD Medical Imaging Workstation. The operation manual guides
you how to set up and operate.
Features/ports and buttons
Front panel:
1.HOST – Plug a USB flash (or USB HDD) to save recorded video files or update firmware.
2.IR – Receive the command signal from remote control.
3.VIDEO – Press to start recording video, press again to stop recording.
4.PHOTO – Press to snapshot a photo. (No effect during recording video)
5.MENU – Press to enter the setup menu.
6.EXIT – Quit current function.
7.PLAYBACK – Press to switch from Preview record mode to Playback mode.
8.PLAY/PAUSE – Press to play video file in Playback mode, and press again to pause.
9.DELETE – Delete file in Playback mode.
10.HDD/USB Switch – Press to switch between HDD and USB HOST.
11.POWER – Power on when connect power supply, press to power off, and press again to
power on again. (Device will remember all the settings before power off when you power
on again. No effect during recording.)
Advertisement

Subscribe to Our Youtube Channel
Summary of Contents for EzCAP 292
- Page 1 Medical Imaging Workstation Operation Manual Thanks for purchasing ezcap292 HD Medical Imaging Workstation. The operation manual guides you how to set up and operate. Features/ports and buttons Front panel: 1.HOST – Plug a USB flash (or USB HDD) to save recorded video files or update firmware. 2.IR –...
-
Page 2: Back Plate
12.OK/UP/DOWN/LEFT/RIGHT – For menu operation. UP/DOWN also for volume up and down, and LEFT/RIGHT also for microphone volume up and down. Back plate: 13.FOOT SWITCH – Foot pedal ports, PHOTO for snapshot, and VIDEO for recording video. 14.LINE OUT/LINE IN – Audio line output / Audio line input. 15.IR –... -
Page 3: Remote Control
28.POWER – Connect DC 12V3A power supply. Remote Control: 1.POWER – Power on and off. 2.PHOTO - Press to snapshot a photo. (No effect during recording video) 3.HDMI/YPbPr/AV/SDI/DVI/VGA – Select video source. 4.USB – Select USB HOST to be storage. 5.HDD –... - Page 4 VGA。 Please connect one of them only at the same time, and don’t connect them together. The video source that has been connected first is effect if you connect two kinds of video sources or above at the same time. The device has the memory function, it will choose the video source that has been selected before device powered off.
- Page 5 VIDEO button turn on few seconds then turn off, it means device snapshot a photo and save in storage already. It only works when NOT recording. Press UP/DOWN button to adjust the audio volume, and press LEFT/RIGHT button to adjust the microphone volume.
- Page 6 44.1 or 32 to make the sound without noise. ezcap292 Medical Imaging Workstation does not only support Windows, but also supports Mac OS X and Linux, you just set the video capture device to “ezcap Medical HD”. Playback / Check recorded file...
- Page 7 Playback recorded file directly After recording, you may want to playback the recorded file. Just press the PLAYBACK button (or PLAYBACK key on remote control), you will see the playback page on screen. Choose PHOTO folder to check photo files, and choose MOVIE to check video files: Use menu direction button (or direction buttons on remote control) to choose movie then press PLAY/PAUSE button to playback the recorded video.
-
Page 8: Other Settings
Playback, check, or backup recorded file on your computer You also can pull out USB flash drive or USB HDD from USB HOST, and connect to your computer to backup them, and playback with other video playback software. And you can connect mini USB cable with READ HDD port and your computer, and set device to USB mode (not HDD mode), then you can backup the video files in HDD to your computer, and playback with other video playback software. - Page 9 Picture mode: Sound mode:...
-
Page 10: Update Firmware
Update firmware. There are two firmware for this device – system part, record part. Please make sure the device is on USB HOST mode before you update firmware. 1, Update firmware for SYSTEM PART: Copy the firmware file (MERGE.bin) to USB flash drive, plug USB drive to USB HOST, then press MENU button, use direction key to choose Software Update (USB) as above picture, then press OK and LEFT to update. - Page 11 Operating humidity 5 至 80% (No condensation) Dimention 262(L) X 172(W) X 120(H) mm Weight 1.6 Kg Ezcap292 Medical Imaging Workstation X1,Remote Control X 1,IR Accessories Receiver cable X 1, USB 3.0 cable X 1, Mini USB cable X 1, Operation Manual X 1 Recording Format Still Image...
- Page 12 3.0) X 1, Extension port(RS232) X 1, DC Power Supply port X 1 Recording Times for a 500GB Hard Drive (1920 X1080) High quality (16Mbps) 75 hours Medium quality (10Mbps) 115 hours Low quality (5Mbps) 275 hours *Features and specifications are subject to change without notice.
- Page 13 医疗影像工作站 操作手册 谢谢您购买使用我司 ezcap292 医疗影像工作站,手册将会说明该设备的使用场合、连接、设置和如 何使用,希望该产品能够带给你美好的使用体验。 外观、接口、按键和指示灯 面板: 1.HOST – 连接 U 盘或 USB 移动硬盘,保存采集录制的影像资料;或用于设备固件程序升级。 2.IR – 红外遥控接收,用于接收遥控器发出的指令。 3.VIDEO – 按下录制影像,再次按下停止录制。 4.PHOTO – 按下抓取一张图片。(录制视频期间该键无效) 5.MENU – 按下进入菜单。 6.EXIT – 退出当前功能。 7.PLAYBACK – 预览模式下,按下进入回放模式。 8.PLAY/PAUSE – 回放模式下,按下开始播放选中的视频文件,再次按下暂停播放。 9.DELETE – 删除键,回放模式下,选择需要删除的文件后按下该键,提示是否删除,按下 OK 键执 行删除。...
- Page 14 12.OK/上/下/左/右 – 菜单导航及确认按键。上/下按键还可以调整音量大小,左/右按键还可以调整 麦克风音量大小。 背板: 13.FOOT SWITCH – 脚踏板接口,PHOTO 对应抓取图片,VIDEO 对应录制视频。 14.LINE OUT/ LINE IN – 音频线路输出和输入接口。 15.IR – 连接红外遥控接收接线,将接收头固定在想要的位置便于接收遥控器发送指令。 16.MIC – 麦克风输入接口。 17.SDI OUT / IN – SDI 信号输出输入接口。 18.YPbPr IN – 色差信号输入接口。 19.CVBS OUT / IN – CVBS 信号输出输入接口。 20.HDMI IN –...
- Page 15 遥控器 1.POWER - 开关键,设备默认为电源开模式,在关闭电源并重 新启动后,设备会记忆关电之前的所有设定。 2.PHOTO - 抓图键,只有在不录制的状态下有效。 3.HDMI/YPbPr/AV/SDI/DVI/VGA - 选择输入视频源。 4.USB - 选择 USB HOST 作为存储媒介。 5.HDD - 选择 HDD 作为存储媒介。 6.REC/STOP - 开始录制视频和停止录制视频。 7.OK/上/下/左/右 – 菜单导航选择和确认键, 左右按键调节主音 量,上下按键调节麦克风音量。 8.MENU – 按下接入设置菜单。 9.EXIT - 退出当前功能。 10.WATERMARK - 按下显示当前时间水印并被记录于录制视频 文件左上方,再次按下则取消时间水印。 11.PLAYBACK - 按下进入回放模式,按...
- Page 16 3, 连接音频源接线,你有如下音频源接口选项:线路输入 LINE IN,麦克风输入 MIC。 请不要混淆两种音频源接入接口,因为两者的电平不一样,会导致音量很低或杂音等现象。 4, 连接视频输出至显示器,你有如下选项:CVBS OUT,SDI OUT,HDMI OUT。 因为设备本身具有显示屏,所以连接外部显示器不是必需的。 HDMI OUT 对所有输入视频源有效,而 CVBS OUT 仅对 CVBS 输入有效,SDI OUT 仅对 SDI 输入有 效。 5,连接 LINE OUT 音频输出至耳机或音箱。 如果你需要听到声音,则可以连接此接口。而如果输入源是 SDI 或 HDMI,且连接了外部带有扬声器 的显示器,因为 SDI 和 HDMI 输入本身包含音频输出,则无需连接 LINE OUT 接口。 6,连接存储设备。你可以选择用...
- Page 17 预约录影: 在设定预约录影前,请先正确设定本地正确时间。 按下遥控器 SCH REC 按键,首先设置预约录影时间等信息,并点击 Select 后在 task 栏目下显示设置 的具体信息。完成设置后,设备会根据具体设置自动开始和停止录制。 设定录制视频质量和是否分段: 按下 MENU 按键 (或遥控器 MENU 按键) 进入如下菜单界面,按上下导航键选择需要设定的子菜单。 时钟:设定系统时间。 预约录影:设定预约录影 (与之前预约录影的描述一致)。 录制画质设置:设定录制视频质量,高对应 16Mbps, 中对应 10Mbps,低对应 4Mbps。 录制文件:设定录制的文件是否分割为每 1.95G 一个文件, 或者不分段仅仅一个文件。分段表示录制 文件会被分割, 不分段表示录制文件不会被分割而是一个文件, 不分段仅仅对 NTFS 格式的存储设备有 效。 时间水印:设定时间水印 (与上述 WATERMARK 描述一致)。...
- Page 18 停止录制后,如果连接的是 U 盘或 USB 硬盘,请从设备移除,连接电脑查看录制的影像文件。 视频采集卡模式 – 连接设备到电脑,使用软件采集视频并存到电脑里 ezcap292 医疗影像工作站还可以作为 USB 高清视频采集卡使用。 USB 3.0 高速接口,UVC 架构, 可以与专业医疗视频软件配合采集录制视频,并串流和分享。只需要用 USB 3.0 线连接背板的 PC 接口 和电脑的 USB 3.0 接口,运行视频采集软件,并选择”ezcap Medical HD”作为视频采集设备即可。 如果输入的影像有音频,且预览或采集的影像音频质量糟糕,则需要你设定音频采集采样率为 48KHz。 设备连接到电脑后,右击电脑桌面右下角的扬声器图标,选择“录音设备(R)”。 双击 音频接口 ezcap Medical HD 后, 在出来的窗口下点击 高级 栏目条, 并在出来的下拉框中选择 2 通道, 16 位, 48000 Hz (DVD 音质)。...
- Page 19 用面板的导航键(或遥控器导航键)将光标移动到需要播放文件,按下播放键开始播放。 你还可以使用其它播放功能键(面板和遥控器都有)来实现通常播放器的快退、快进、上一个、播放/暂 停、下一个这些常用功能。 使用 DELETE 按键(面板和遥控器都有)删除文件:先用导航键指定到需要删除的文件,按 OK 键确认选 定该文件,按下 DELETE 键会出现如下提示,选择 Yes 删除该文件。 在电脑上回放,确认,备份录制文件 你还可以从 USB HOST 接口拔出 U 盘或 USB 移动硬盘,并插入电脑的 USB 接口,将录制文件拷贝到 电脑里,或通过电脑的视频播放器来回放并确认录制的视频文件。 用迷你 USB 线连接背板的 READ HDD 接口和电脑的 USB 接口,可以将 2.5 寸硬盘的录制文件拷贝到 注意,此时必须设定设备为 USB 存储器模 电脑里,或通过电脑的视频播放器来确认录制的视频文件。 式。...
- Page 20 其它设定 按下 MENU 按键(或遥控器 MENU 按键)进入菜单操作,通过导航键来选择你需要设定的项目。 设定菜单语言。 图像模式。 声音模式。...
- Page 21 设备固件程序及其它 设备包括两部分程序 – 系统部分 和 录制部分, 这两部分的固件程序升级是分开进行的。 升级程序前,请确保设备处于 USB 存储器模式下。 1, 更新系统部分的固件程序: 复制固件程序文件(MERGE.bin)至 U 盘,将 U 盘插入设备 USB HOST 接口,按 MENU 按键和导航键选择“软件升级(USB)”,并按下 OK 键和左方向键升级。 显示屏会显 示从 1%到 100%升级进程,然后显示屏黑屏后重新亮起并正常显示视频,则表示升级成功。 2,更新录制部分的固件程序: 复制固件程序文件(一般文件格式为 jedi.img)至 U 盘,按下 POWER 键关机,将 U 盘插入设备 USB HOST 接口,再次按下 POWER 键开机,此时 VIDEO 旁的红色指示灯 会闪烁几秒后熄灭,表示升级完成。此时如果将...
- Page 22 存储温度 -20 至 60°C 操作湿度 5 至 80% (无结露) 尺寸 262(长) X 172(宽) X 120(高) mm 重量 约 1.6 Kg ezcap292 医疗影像工作站 X 1,电源适配器 X1,红外遥控器 X 1,遥控 包装内容 接收线 X 1,USB 3.0 线 X 1,迷你 USB 线 X 1,操作手册 X 1 记录格式...
- Page 23 口(RS232) X 1, 直流电源适配器输入接口 X 1 500GB 硬盘驱动器录制时长 (1920 X1080) 高 (16Mbps) 75 小时 中 (10Mbps) 115 小时 低 (5Mbps) 275 小时 注:功能和规格若有变更,恕不另行通知。...
Need help?
Do you have a question about the 292 and is the answer not in the manual?
Questions and answers