
Related Manuals for GentleTent GT ROOF

Summary of Contents for GentleTent GT ROOF
- Page 1 INSTRUCTION MANUAL GT ROOF INSTRUCTION VIDEO GT ROOF www.gentletent.com Coming Home Gentletent.com...
-
Page 2: Component Parts
COMPONENT PARTS TENT & RAIN COVER PROTECTIVE COVER DROP STITCH PLATFORM TELESCOPIC LADDER MOUNTING SET 12V ELECTRIC PUMP PEGS HAND ROPES REPAIR PUMP Coming Home Gentletent.com... - Page 3 ADAPTER 1 VALVES OPEN OPEN CLOSE CLOSE ADAPTER 2 OPEN CLOSE CLOSE NOT INCLUDED Items you need which are not included: WRENCH 10mm ROOF RACK Coming Home Gentletent.com...
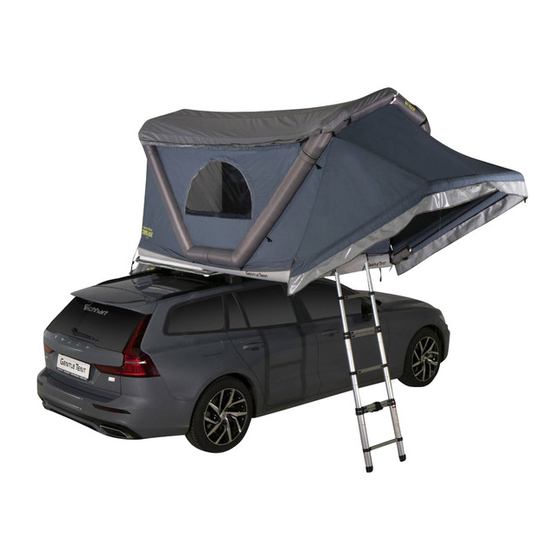
- Page 4 CONSTRUCTION Coming Home Gentletent.com...
- Page 5 STEP 1 Arrange the mounting sets correctly Insert the mounting sets into the rail Use the 10mm wrench to tighten the screws Coming Home Gentletent.com...
- Page 6 Open the zipper which is located under the overlap Attach the protective cover to the places provided for this purpose STEP 3 Pressure: 6 - 7 PSI You need adapter 1 and the electric pump Inflate drop stitch-platform Coming Home Gentletent.com...
- Page 7 STEP 4 Attach the ladder to the intended location STEP 5 Valves Pressure release valves Pressure: 3 - 3.5 PSI You need adapter 2 and the electric pump Inflate tent body Inflate tent nose Coming Home Gentletent.com...
- Page 8 STEP 6 Permanent cover for - UV & rain protection Cover extension for - Heavy rain - Thermo support Mount permanent cover If required mount cover extension Coming Home Gentletent.com...
- Page 9 DISMANTLING Coming Home Gentletent.com...
- Page 10 STEP 1 Valves Pressure release valves Deflate tent nose Deflate tent body 2. STEP Dismantle the ladder Coming Home Gentletent.com...
- Page 11 STEP 3 Deflate the drop stitch platform STEP 4 Disconnect the protective cover Unroll the protective cover and lay it over the platform Close the zipper which is located under the overlap Coming Home Gentletent.com...
- Page 12 STEP 5 Use the 10 mm wrench to open the screws Coming Home Gentletent.com...
-
Page 13: Optional Accessories
Optional accessories GT ROOF AWNING GT MATTRESS GT MATTRESS L WEBSITE www.gentletent.com Notes ATTENTION: PLEASE OBSERVE THE FOLLOWING TO PREVENT DAMAGE SPEED LIMIT NO SHARP ITEMS NO FIRE OR HEAT NO SMOKING Coming Home Gentletent.com... - Page 14 For stubborn stains, a mild detergent or a special tent cleaner can be used. After frequent cleaning, it is advisable to impregnate the tent. To do this, the tent must be dry before treatment, then impregnated and dried completely again. Coming Home Gentletent.com...
- Page 15 Wasser zur regelmäßigen Reinigung. Für hartnäckige Flecken kann ein sanftes Reinigungsmittel oder ein spezieller Zeltreiniger verwendet werden. Nach häufiger Reinigung macht es Sinn, das Zelt zu imprägnieren. Dazu muss das Zelt vor der Behandlung trocken sein, danach imprägniert werden und dann nochmals vollständig getrocknet werden. Coming Home Gentletent.com...
- Page 16 Contact ADDRESS PHONE E-MAIL GentleTent GmbH +43 664 3941078 support@gentletent.com Khleslplatz 8, 1120 Wien, Austria www.gentletent.com Coming Home Gentletent.com...
Need help?
Do you have a question about the GT ROOF and is the answer not in the manual?
Questions and answers