Table of Contents
Advertisement
Quick Links
1.888.610.7664
WIRELESS SERIES
For use with free BLACKMAX
US Patent No. 9,043,161. For Android or iOS mobile devices.
OWNER'S MANUAL (English)
(Software Version 1.1 or Higher with CPS
2 Valve Series: MD50W, MD50WHE, MD50WVHE
4 Valve Series: MD100W, MD100WHE, MD100WVHE
www.calcert.com
15
10
20
5
25
0
30
app featuring CPS
Link
®
®
™
Link
App)
®
™
sales@calcert.com
Advertisement
Table of Contents

Related Manuals for CPS BlackMax Series

Summary of Contents for CPS BlackMax Series
- Page 1 Link ® ® ™ US Patent No. 9,043,161. For Android or iOS mobile devices. OWNER’S MANUAL (English) (Software Version 1.1 or Higher with CPS Link App) ® ™ 2 Valve Series: MD50W, MD50WHE, MD50WVHE 4 Valve Series: MD100W, MD100WHE, MD100WVHE 1.888.610.7664...
-
Page 2: Table Of Contents
CONTENTS Overview ...........................2 General Safety Instructions .......................3 Controls and Features ......................4-5 Manifold Accessories ........................6 Quick Start Instructions (For Use With BLACKMAX Mobile APP) ..........7 BLACKMAX App Home Screen .................... 8-10 Testing: Pressure or Vaccum Hold ..................11 Data Logging ...........................12 Help Screen ..........................13 Quick Start Instructions (Wireless Manifold without APP) .............14 Initial Operation ........................15... -
Page 3: General Safety Instructions
Material Safety Data Sheet for further safety information on refrigerants and lubricants. NOTE: It may be unlawful to discharge or exhaust refrigerants into the atmosphere. CPS strongly recommends the practice of recovery or recycling. Check your local government agencies for refrigerant handling regulations. -
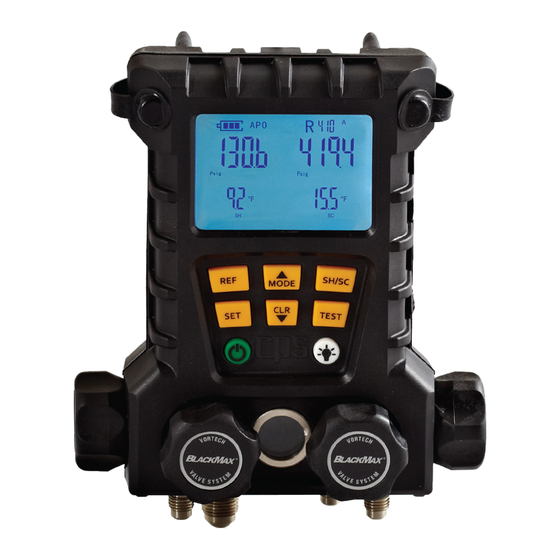
Page 4: Controls And Features
CONTROLS AND FEATURES - BLACKMAX WIRELESS DIGITAL MANIFOLD 1. [ON/OFF] - Press and hold to turn On or Off 2. [SET] - For entering programed values 3. [REF] (Refrigerant) - Scrolls through 5 pre-selected “favorite” or commonly used refrigerants 4. [MODE] - Programming (change English vs. Metric units; Turn Auto-Power OFF) 5. - Page 5 CONTROLS AND FEATURES - BLACKMAX WIRELESS DIGITAL MANIFOLD 21.) Connection Points For Thermistor Sensors 4 Valve Manifold (Front) 4.) Mode 3.) Refrigerant 5.) Superheat/ Subcool 6.) Test 2.) Set 7.) Clear 1.) On/Off 8.) Backlight 13.) Low 9.) High Side Valve Side Valve 12.) Vacuum...
-
Page 6: Manifold Accessories
ACCESSORIES Vacuum Gauge Accessory Kit MDXVG AVT45 Brass Vacuum Gauge Tee Connector Accessory (Included with (only available MDXVG Kit) with MDXVG Kit) Universal Charger MDXBK 4 (AA) UK/Ireland/ U.S. Plug 5 Ft. Cord Rechargeable Singapore/ NiMH Batteries Hong Kong Plug Euro Plug Australia/New Zealand/China Plug... -
Page 7: Quick Start Instructions (For Use With Blackmax Mobile App)
BLACKMAX Wireless Digital Manifold APP. 2. Install 4 AA Alkaline (included) or rechargeable batteries in back of manifold. 3. Press and hold [ON/OFF] (green button) to turn manifold ON. Open the “BLACKMAX CPS Link” icon from your mobile device. Indicates wireless manifold... -
Page 8: Blackmax App Home Screen
BLACKMAX APP HOME SCREEN Current Refrigerant Low Side High Side View 1 Analog Scale Digital Scale Working Temperature(s) Touch icons here to select any of these functions Home Presure Vacuum Data Settings Screen Hold Hold Logging View 2 Touch arrows to toggle between Home Screens (View 1... - Page 9 BLACKMAX APP SETTINGS SCREEN Change Units Target Superheat Settings Select One Zero Offset Open manifold to atmosphere before each use especially if manifold has been dropped or pressurized beyond 800 psig (55 Bar). Change Language 1.888.610.7664 www.calcert.com sales@calcert.com...
- Page 10 CHANGE OR CONFIRM REFRIGERANTS Move screen Up/Down then select a new active refrigerant. Note: Refrigerant selected will become the default (but not affect FAVORITE FIVE. Changing FAVORITE FIVE refrigerants permanently must be done using the manifold. See page 21 for more information) 1.888.610.7664 www.calcert.com...
-
Page 11: Testing: Pressure Or Vaccum Hold
TESTING: Pressure Hold or Vacuum Hold Pressure Hold Test Touch “Start” or “Stop” at any time. Default duration = 5 minutes (Max time = 100 mins) You may navigate to other screens while this test runs gray line is starting point Final graph will show initial, current and final pressures. -
Page 12: Data Logging
DATA LOGGING Mobile Device Logs 1. Shows logs stored in the mobile device’s local storage. 2. For Geolocation, Delete, View or Export logs, touch icons. All stored files have Logs stored in option of showing mobile device Geolocation, Delete, View Or Export New Log Tab 1. -
Page 13: Help Screen
HELP SCREEN APP HELP Select for general description of any item; General Home Pressure Hold Vacuum Hold Data Logging Settings Side Menu Video Watch instructional videos on how to use this app Manifold Manual Download a pdf version of this manual (from 1.888.610.7664 www.calcert.com sales@calcert.com... -
Page 14: Quick Start Instructions (Wireless Manifold Without App)
OPERATING THE WIRELESS MANIFOLD WITHOUT THE APP If your mobile device is NOT available, Wireless BLACKMAX Digital Manifolds may also be operated as stand-alone devices. Simply follow these instructions. QUICK START INSTRUCTIONS (WIRELESS DIGITAL MANIFOLD) 1. Install 4 AA Alkaline (included) or rechargeable batteries into back of manifold. 2. -
Page 15: Initial Operation
INITIAL OPERATION 1. To Select A Refrigerant Other Than the One Shown- From Main Screen [FIG.1], press [REF] to scroll through a list of 5 common factory programmed refrigerants. Note: To change default refrigerants, go to page 20. Note: Thermistor sensors must be connected to get a T Low and / or T High temperature reading. 2. -
Page 16: Setting To Zero Pressure
Low cost tracer gas mixtures such as 95% N2 and 5% H2 are popular and can be sensed by a CPS E_MOS leak detector. 1. At Main Screen [FIG.1] press [TEST]. The Test Pressure Set Screen will appear [FIG.5]. - Page 17 PRESSURE HOLD TEST (CONTINUED) 3. Use [UP/DOWN ARROWS] to adjust test duration in 5 minute increments to desired setting (Note: Minimum time is pre-set at 5 minutes. Maximum time is 95 minutes). Press [SET] to store Test Duration. Display will advance to Pressure Set Screen [FIG.8]. FIG.7 FIG.8 Psig...
- Page 18 VACUUM HOLD TEST 3. Assemble the BLACKMAX MDXVG vacuum gauge accessory to the Suction Port on an AC system as shown [FIG.11]. FIG.11 Discharge Discharge Suction Suction port port port port Vacuum Gauge AVT45 Brass Accessory Tee Connector 4. In this mode, the manifold will show current vacuum FIG.12 in the system.
-
Page 19: Programming/Setting Units
VACUUM HOLD TEST FIG.14 Inactive Current Vacuum Level Psig Leak test duration hh : mm Vacuum Display Screen B) Continue to Evacuate the system to the desired level which is indicated in the upper left display once the desired vacuum level is reached: a. - Page 20 PROGRAMMING/SETTING UNITS There are 2 major options. In each, a blinking symbol represents a choice the user can make by pressing [SET]. 1. PrO (Programming) a. Change Refrigerants: Change any or all of 5 common refrigerants accessible at Main Screen. b.
- Page 21 PROGRAMMING/SETTING REFRIGERANTS 5. To select refrigerant displayed, press [REF]. A tone will sound and counter will increment by one indicating that the first refrigerant in the sequence of 5 favorites has been replaced with one selected. 6. To select another refrigerant, repeat steps 3 and 4. 7.
-
Page 22: Setting Apo On Or Off
PROGRAMMING/SETTING VACUUM UNITS (MIC VS. INHG) 1. At main screen [FIG.1] press and hold [MODE] until “PrO” screen [FIG.16] appears. “PrO” blinks. 2. Press [SET] to enter “ PrO” Screen. The Refrigerant Selection Screen appears [FIG.17]. 3. Press [SET] to bypass Refrigerants Screen. The Temperature Units Screen (blinking) appears [FIG.18]. 4. -
Page 23: Connecting To An A/C System
CONNECTING TO AN A/C SYSTEM Various service and test procedures below can be performed after your manifold has been properly connected to an AC system as shown: FIG.24 FIG.25 RECOVERING REFRIGERANT Reference [Fig.24] and [Fig.25] MD50W 2 Valve Manifold [FIG.24] MD100W 4 Valve Manifold [FIG.25] 1.) Connect Low (A) and High (B) Service hoses to 1.) Connect Low (1) and High (2) Side Service... -
Page 24: Evacuating Procedure
EVACUATING PROCEDURES MD50W 2 Valve Manifold [FIG.24] MD100W 4 Valve Manifold [FIG.25] 1.) Connect Low (A) and High (B) Service hoses to 1.) Connect Low (1) and High (2) Service service ports (E) and (D) hoses to service ports (L) and (H) 2.) Connect hose from tee (C) to Inlet port of 2.) Connect 3/8”... -
Page 25: Charging Procedure - High Side
CHARGING PROCEDURE - HIGH SIDE High Side Charging should be done on a completely evacuated system. MD50W 2 Valve Manifold [FIG.24] MD100W 4 Valve Manifold [FIG.25] 1.) A scale should be used to weigh in the charge. Place tank on scale so liquid refrigerant is supplied. 2.) Open Supply tank valve to fill manifold with liquid refrigerant. -
Page 26: Appendix C (Specifications: Mdxbk Charger Accessory)
5. Turn right side up, open a port to pour out the rubbing alcohol. 6. Repeat the above procedure until the alcohol appears to be clean and clear of contaminants. 7. Check the gasket located inside the VAC port. If worn or deformed, replace with a new CPS gasket (PN: HXG) 8. -
Page 27: Appendix F (Limited Warranty)
1 year from the date of purchase, or 15 months from the date of manufacture, whichever is sooner. If any BLACKMAX product is believed to be defective it must be returned to CPS Products. If the product is found to be defective, CPS will repair or replace the item(s), at our option, at no charge. -
Page 28: Appendix H (Error Indicator Screens)
If certain malfunctions occur, MD50W and MD100W series will display error messages: oP -Appears in display areas reserved for temperature readings when thermistor sensor connected to that port is open circuited or not connected. Replace sensor with CPS model number TMX3C.
Need help?
Do you have a question about the BlackMax Series and is the answer not in the manual?
Questions and answers