Table of Contents
Advertisement
Quick Links
S
afety Instructions
S
afety Instructions
This product has been manufactured to satisfy the international safety standards.
Please read all of safety and operating instructions before operating the product and keep this
manual for future reference.
MAINS SUPPLY
AC 90-250V~, 50/60Hz
Operate your product only from the type of power supply indicated on the marking label. If you
are not sure of the type of power supplied to your home, consult your local power company.
Disconnect the STB from the mains before you start any maintenance or installation procedures.
OVERLOADING
Do not overload a wall outlet, extension cord or adapter as this may result in electric fire or
shock.
LIQUIDS
The product should not be exposed to any liquids such as dripping or splashing. No objects
filled with liquids, such as vases, should be placed on the apparatus,
CLEANING
Before cleaning, disconnect the product from the wall outlet, Use a cloth lightly dampened with
water (no solvents) to clean the exterior.
VENTILATION
The slots on top of the product must be left uncovered to allow proper airflow to the unit. Do not
stand the product on soft furnishings or carpets. Do not expose the product to direct sunlight,
place it near a heater. Do not stack electronic equipment on top of the product.
ATTACHMENTS
Do not use any attachment that is recommended by the manufacturer it may cause a hazard or
damage the product.
CONNECTION TO THE SATELLITE DISH LNB
Disconnect the product from the mains before connecting or disconnecting the cable from the
satellite dish. Failure to do so can damage the LNB.
CONNECTION TO THE TV
Disconnect the product from the mains before connecting or disconnecting the cable from the
satellite dish. Failure to do so can damage the TV.
LOCATION
Place the product indoors in order not to expose to lightning, rain or sunlight.
Do not install near any heat sources such as radiators, heat registers, stoves, or other
apparatus (including amplifier) that product heat.
LIGHTNING, or NOT IN USE
Unplug the product from the wall outlet and disconnect the cable during a lightning storm or
when unused for a long time.
SERVICING
Do not attempt service that this product yourself, as opening or removing covers may expose
you to dangerous voltage or other hazard. Refer all servicing to qualified service personnel.
"The mains plug is used as the disconnect device. Then disconnect device shall remain
readily operable"
English
2
Advertisement
Table of Contents

Related Manuals for Vantage Hearth HD 7100C

Summary of Contents for Vantage Hearth HD 7100C
-
Page 1: Safety Instructions
afety Instructions afety Instructions This product has been manufactured to satisfy the international safety standards. Please read all of safety and operating instructions before operating the product and keep this manual for future reference. MAINS SUPPLY AC 90-250V~, 50/60Hz Operate your product only from the type of power supply indicated on the marking label. If you are not sure of the type of power supplied to your home, consult your local power company. -
Page 2: Table Of Contents
ontents ontents Safety instructions ........ 2 Chapter 5 Menu Map ..........15 Main Menu ..........16 Chapter 1 Installation ..........16 Before You Begin ........4 Auto Scanning ........16 General Features ......... 4 Manual Scanning ........16 Accessories .......... 4 Defaults Setting ........ -
Page 3: Before You Begin
hapter 1 >> Before You Begin efore You Begin General Features • Accurate, Brilliant Friendly OSD with Full Function • MPEG-2 (MP@ML), MPEG-2 (MP@HL), MPEG4 AVC/H.264, HP@L4 • 2 SCARTS for TV, VCR (optional) • 16 Bit Colors Graphic User Interface •... -
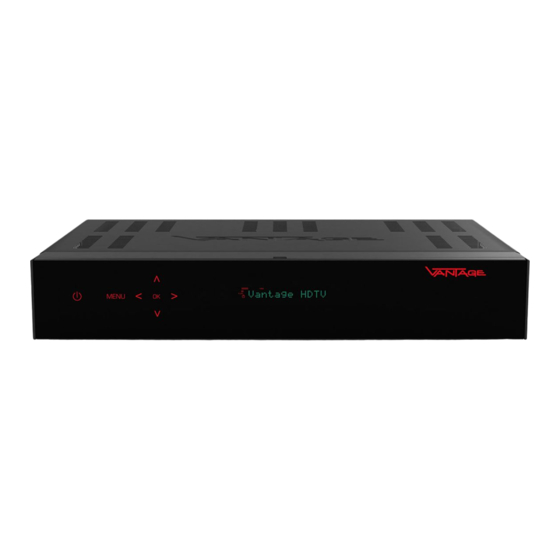
Page 4: Controls And Functions
hapter 2 >> Controls and Functions ontrols and Functions Front Panel Power ( ) button MENU button Turns your receiver On/Off. Displays the menu Exits from the current menu or goes to the Arrow (◄/►) buttons previous menu Adjusts the volume and moves the cursor left/right on the menu OK button Confirms selection... -
Page 5: Remote Control Unit
hapter 2 >> Controls and Functions Remote Control Unit Power ( ) button for TV & STB Text ( ) button Turns your receiver & TV On/Off. Changes to the teletext mode. Numeric (0~9) buttons INFO ( ) button Controls the number entry and changes Displays program information in the program channel directly. - Page 6 hapter 2 >> Controls and Functions normal operation mode. LED will be F2 button OFF. Shows Media Player. - If you want to teach it again, then you F3 button need to press TV Power key. --- LED Starts Time shift function. will stay “ON”after blinking one time.
-
Page 7: Chapter 3 Connections
hapter 3 >> Connections onnections Loop through Location of your receiver • Install your receiver in horizontal position • Do not put any heavy stuff such as a TV on your receiver • Do not install your receiver in the places as follows: Vibrating place, direct sunrays, Humid place, too high or low temperature, and no ventilated place. -
Page 8: Connecting Your Analog Receiver
hapter 3 >> Connections Connecting your analog receiver To facilitate the user using analog receiver to view analog channels, this product has been provided with a loop through terminal marked as “Loop”. Connect the coaxial cable from this terminal to the IF input terminal of your analog receiver. Now by keeping your receiver in standby, you will be able to tune and view analog channels from your analog receiver. -
Page 9: Initial Settings And Operations
hapter 4 >> Initial Settings and Operations nitial Settings and Operations Menu Information A menu is a field of text shown on the TV screen. Selectable lines are generally activated (highlighted). No-activated lines cannot be selected. Most of menus show short information at the bottom of the screen. -
Page 10: Basic Operation
hapter 4 >> Initial Settings and Operations Basic Operation This section explains various functions while watching TV or listening to the Radio. Switching Channel You can switch the current channel by three different methods. • Method 1: Press the Arrow (▲/▼) buttons or PR+/- buttons. •... -
Page 11: Info Bar
hapter 4 >> Initial Settings and Operations Info Bar Channel information always appears for a specific period of time whenever you switch channels. General Information Press the INFO ( ) button; you can see general information of the current channel. Channel number and name Current time Signal Level... -
Page 12: Mosaic
hapter 4 >> Initial Settings and Operations MoSAic You can see multi picture by pressing the RED (MoSAic) button. Sleep Timer Function Press the GREEN (Sleep) button, you will see the time set for the sleep timer if already set from the Time Setting menu. -
Page 13: To View Channel List In Specific Order (Alphabet/Satellite/Provider/Hd)
hapter 4 >> Initial Settings and Operations To view channel list in specific order (Alphabet/Satellite/Provider/HD) 1 Press the Colored (Red/ Green/Yellow/Blue) button. Channel list is highlighted. 2 Select Alphabet, Frequency, Provider, or HD using the Arrow (▲/▼) buttons. The channel list is sorted automatically by your selection. 3 Select the channel pressing the Arrow (▲/▼) or Page ( / ) buttons and press the OK button to watch it. -
Page 14: Menu Map
hapter 5 >> Main Menu enu Map Installation Auto Scanning Manual Scanning Blind Scanning Defaults Setting System Setup Language Setting OSD Language / Audio 1st Language / Audio 2nd Language /EPG 1st Language / EPG 2nd Language / Teletext Language / Subtitle Language OSD Setting Transparency / Window Trans / Banner Time / Screen Saver Time/Serial Module... -
Page 15: Main Menu
hapter 5 >> Main Menu ain Menu The menu has been carefully designed from user-friendly point of view to assure easy operation to your receiver. The main menu is classified into 7 sub menus that will carry out the various operations individually. -
Page 16: Defaults Setting
hapter 5 >> Main Menu Installation >> Blind Scanning Blind Scanning When you don’t have any transponder information, you can use this function to have all channels from selected cable. 1 Go for menu and select “blind scanning” using the Arrow (▲/▼) buttons and press OK button. -
Page 17: Osd Setting
hapter 5 >> Main Menu System Setup >> OSD Setting OSD Setting You can adjust OSD Transparency, Window Trans OSD Banner Time, and Screen Saver Time. 1 Select OSD Setting using the Arrow (▲/▼) buttons on the System Setup menu and press the OK button. 2 Select any of Transparency, Window Trans, Screen saver Time, VFD Module and Display in Standby Mode, and Screen saver Time using the Arrow (▲/▼) buttons... -
Page 18: Time Setting
hapter 5 >> Main Menu System Setup >> Time Setting Time Setting You can set the time zone. 1 Select Time Setting using the Arrow (▲/▼) buttons on the System Setup menu and press the OK button. Set Time Zone: Press the Arrow (◄/►) buttons to set time mode for Auto or Manual ... -
Page 19: Channel Setup
hapter 5 >> Main Menu Channel Setup You can edit TV and Radio channels and the favorite channel group in this menu. Press the Menu ( ) button. Select Channel Setup using the Arrow (◄/►) buttons on the main menu. Channel Setup >>... -
Page 20: Favorite Channels
hapter 5 >> Main Menu Channel Setup >> Favorite Channels Favorite Channels You can edit favorite channels. There are 9 favorite channel groups (News, Sports, Movie, Music, Shopping, Kids, Adults, Drama, and Education). 1 Select Favorite Channels using the Arrow (▲/▼) buttons on the Channel setup menu and press the OK button. -
Page 21: Sw Manager
hapter 5 >> Main Menu Channel Setup >> SW Manager SW Manager You can download the software of your receiver through satellite when the new software is available for your system. During download, don’t turn off your receiver. In case of the power is turned off, turned on your receiver again to complete the download. -
Page 22: Lock Control
hapter 5 >> Main Menu Parental Lock >> Lock Control Lock Control Whenever you want to use the locked system you will be prompted to enter the PIN Code in the request dialog box. Using Arrow (▲/▼) buttons and press OK button to select a lock status. •... -
Page 23: Multimedia
hapter 5 >> Main Menu Multimedia You can access to the multimedia function with USB, SATA and Ethernet device. • Please switch off the system before connecting USB and SATA cable to STB. Otherwise, this can be causing the system to malfunction!! Multimedia >>... -
Page 24: Conditional Access
hapter 5 >> Main Menu 7) Media player: press F2 to start the media player. 8) Time shift: Press F3 to start time shift function 9) File list: press text button to see the file list in the media player menu Multimedia >>... -
Page 25: Troubleshooting
roubleshooting roubleshooting Problem Solution No display LED on the front panel. Plug the power cord correctly. No power supply No picture. Ensure that the STB is switched on. Check the connection status. Check channels and Video output status. Poor picture quality. Check the signal level If this is too low, try adjusting the alignment of your dish. -
Page 26: Specifications
pecifications pecifications TUNER & CHANNE Input Frequency 47~870 MHz Input connector IEC Female (RF IN), IEC Male (RF OUT) IF Frequency 36.125 MHz FEC Mode rate 1/2,2/3,3/4,5/6,7/8 Demodulation Constellation 16, 32, 64, 128 and 256 QAM QAM System Clock 28.92Mhz Switching Mode Power Supply Input Voltage AC90-250V~,50/60Hz... - Page 27 pecifications pecifications Conditional Access System PCMCIA (Optional) 2 Slot of DVB-CI Smart Card(Optional) 2 Smart card Reader for Embedded CAS like Front panel Display Dot-Matrix VFD (Vacuum Fluorescent Display) Keys Touch pad 7Keys Accessories IR(Freq. : 38Khz), Battery : 2x1.5V AAA HDMI Cable 1.5M Manual...
Need help?
Do you have a question about the HD 7100C and is the answer not in the manual?
Questions and answers