Table of Contents
Advertisement
Quick Links
Advertisement
Table of Contents

Summary of Contents for XONTEL XT-30G
- Page 1 Smart Video Phone XonTel XT-30G User Guide...
- Page 2 Please read the following safety notices before installing or using this phone. They are crucial for the safe and reliable operation of the device. Please use the external power supply that is included in the package. Other power supplies may cause damage to the phone, affect the behavior or induce noise. ...
-
Page 3: Table Of Contents
Introduction ................................5 Smart Video Phone XonTel XT-30G Overview ......................5 Phone components description ........................... 6 Touch Screen Description ............................9 Functional applications ............................. 12 Update of the phone ..............................13 Dsskey ..................................15 Contact ..................................18 Add new local contact ............................18 Add account ................................ - Page 4 Call Service ................................56 Register ..................................56 Outgoing & Incoming call ............................57 Video Call ................................58 Blind Transfer ................................59 Semi-attended Transfer ............................60 Attended Transfer ..............................61 Conference Call................................ 62 Call Hold .................................. 63 Android Settings ..............................64 Ethernet configuration..............................
-
Page 5: Introduction
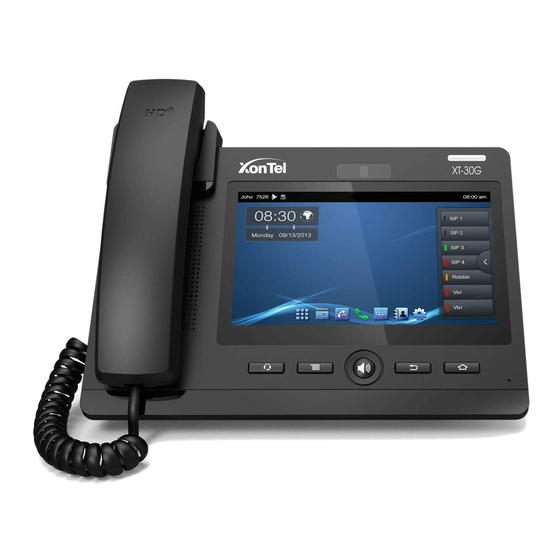
Introduction Thank you for purchasing the XT-30G Android smart video phone. The XT-30G is a fully featured video phone that provides voice and video communication over the data network. This phone has all the features of a traditional telephone and all gives access to many data service features. -
Page 6: Phone Components Description
Phone components description Function Headset key. Click it enter the dial interface when the phone is in desktop, receive the call using headset mode or switch the call to headset mode during a call. Option key. You can browse and accomplish all functions of the phone through pressing this key. - Page 7 Interface illustration picture 1 Name Meaning DC Power Interface Input: 220V AC Output: 12V DC PC (LAN) Interface Specification RJ45, connect it to computer Internet (WAN) Interface Specification RJ45, connect it to computer Handset interface Specification RJ9, used to connect the handset to the phone Interface for high-definition HDMI interface.
- Page 8 Interface illustration picture 2 Interface illustration picture 3 Name Meaning USB interface. Connect it to USB disk. SD Card. Connect SD Card for saving data.
-
Page 9: Touch Screen Description
1. Put the handset line into the handset interface according to the interface illustration. 2. Plug the power adapter into the DC port; poke the other side of the power adapter into an electric socket. 3. Insert one end of RJ45 network cable into the phone WAN port (Please refer to the interface illustration picture 1) and put the other end into the network equipment. - Page 10 All of the status information about XT-30G is displayed on the top of the screen. You can click on the notification icon in the left of the status bar or drag down the drop- down list with your fingers to enter the notification panel to further review and deal with all of the information.
- Page 11 Network Displays that the network connection is Status successful. Tap the icon directly into (successful) the network settings. Network status (failed) Shows that the network connected failed. You need to check the network are configured correctly Displays that the phone successfully identifies the USB device.
-
Page 12: Functional Applications
Functional applications: Click this icon, and it will switch to pre-dial interface. You can make some phone calls through the screen or keyboard. Phone Has the function of sending and receiving e-mail. When an account has been configured successfully, you can send and receive your e-mail on the phone and this account will Email automatically sync the contacts to the mailbox account. -
Page 13: Update Of The Phone
Enter the call log and you can view all call records. You can also view the "Incoming Calls", "Outgoing Calls" and "Missed Call log Calls" records by pressing the Option key. Have export contacts, add blacklists and outgoing call barring functions. - Page 14 Check the figure shown below. “down”, “up”, “OK”, to Through the hardkey operate on the recovery menu. Select “update from USB equipment” or “update from external storage device” (SD card), enter the sub-directory and select the upgrade packages, click on “OK” key to start upgrade.
-
Page 15: Dsskey
Web Update: Input the phone’s IP on the web; Input the user name and password to phone’s web; Enter “MAINTENANCE”—“UPDATE”; Click the button “Browser” to select the image on your PC and click the button “Update”; Waiting, the system will be update success. Dsskey Introduction: This module contains five expansion module, 140 editable key. - Page 16 Memory Key By clicking on the button you can dial the mapped number directly. Subscribe: BLF, Presence, Speed Dial and Intercom. Pickup number: the number which server set. Pickup: That is, when A calls B, B ringing but no one answered the call, C could dial a number which is comprised of specified prefix and B’s number, and then C can talk with A.
- Page 17 The LED status of BLF LED Status Description Steady green The object is idle. Slow blinking red The object is ringing. Steady red The object is active. Fast blinking red The object has failed. Steady orange Subscribed number is in a call with current line. Not subscribed.
-
Page 18: Contact
The LED status of Presence LED Status Description Steady green The object is online. Slow blinking red The object is ringing. Steady red The object is active. Fast blinking red The object has failed. Not subscribed. Note: Please set Type first, then set subtype and value base on the introduction. You can select value from contacts by clicking the contact icon. -
Page 19: Add Account
Add account 1. Tap the contact button; 2. Tap “+” in the upper-right corner. 3. Select “Add account”. 4. Edit exchange account and follow the prompts to complete the editing. -
Page 20: Create Group
Create group 1. Tap the “Group” button; 2. Click “+” in the upper-right corner; 3. You can select “Create local group” or “Create account group”; 4. Edit group name, then pick members from contact list; 5. Click “Done” to save the group. Favorite 1. -
Page 21: Network Phonebook
Network Phonebook Set the remote phonebook 1. Click the edit icon in the upper-right; 2. Click URL; 3. Follow the prompts to fill in the information. 4. Click “Done” to save it. -
Page 22: Blacklist & Call Barring
Set the LDAP 1. Click the edit icon in the upper-right; 2. Click LDAP; 3. Edit the information following the prompts; 4. Click “Done” to save it. Blacklist & Call Barring You can enable Blacklist, click the “+” to add number or contacts what you want. Using the same method to set the whitelist and Call Barring. -
Page 23: Phone Settings
Phone Settings System info Tapping "Settings" can directly enter the default window "System info". It displays the current system information state. System info interface Configuration item Meaning Displays the connection status of the PPPoE, there are three display states : Disabled,Connecting and the PPPoE IP address. -
Page 24: Network
Displays the Subnet Mask of the current network Subnet mask model. Displays the default gateway of the current IP Gateway network model. Displays the primary DNS server address of the Primary DNS current network model. Displays the standby DNS server address of the Secondary DNS current use of the network model. - Page 25 Static IP interface Configuration Meaning You can select to use DHCP, which means whether DHCP Use the DNS to connect network assigned by the DHCP server. Static IP IP address: Input your assigned IP address. Subnet mask: Input your assigned subnet mask. IP gateway: Input your assigned gateway.
-
Page 26: Pppoe
PPPoE Tap "Network" --- > "PPPoE". After configuring the parameters, you can click "Save" button to save. PPPoE interface Configuration Meaning User: Input your assigned PPPoE Username. PPPoE Password: Input your assigned PPPoE Password. Auto connect on power up: Whether to automatically connect PPPoE on power up. -
Page 27: Qos
Tap "Network" --- > "QoS", after selecting or modifying the default settings click the "Save" button to save QoS-DSCP Settings DSCP is one standard of QoS. It can set the priority of Voice, Video and Signal. Configuration item Meaning Enable DSCP: Enable/Disable DSCP. Voice DSCP: Set the number of Voice DSCP. - Page 28 Configuration item Meaning Enable WAN port VLAN: Enable/Disable WAN port VLAN. WAN port VLAN ID: Set the number of VLAN QoS- WAN VLAN SIP 802.1P priority: Set the priority number of SIP 802.1p priority. Slide down the screen to QoS-Port VLAN interface. Port VLAN is based on port VLAN, in the same VLAN port to communicate with each other.
-
Page 29: Port
Port Tap "Network" --- > "Port", after selecting or modifying the default settings click "Save" button to save. Port Settings Configuration item Meaning RTP port range start (10000-60000): Set the telephone’s RTP start port. This port is distributed to dynamic allocation. Port RTP port quantity: Set the maximum number of allocated RTP port. -
Page 30: Stun
STUN Tap "Network" --- > "STUN", after selecting or modifying the default settings click "Save" button to save. STUN interface Configuration item Meaning Server address: Configure the SIP STUN server address. STUN Server port: Configure the SIP STUN server port. The default is 3478. -
Page 31: Account
Account Tap "Accounts"--- >"Account1", the default password is 123456, you can slide down to set more parameters follow the prompts, after all the parameters are set, you can click "Save" button to save. (Note: The Account1, 2, 3, 4 ,5,6 has the same settings.) Account page 1 Configuration item Meaning... - Page 32 Display name: Configure the display name, it allows the English alphabet input (does not support Chinese). Domain realm: Configure the SIP domain name (You do not need to configure it because the system will configure automatically). Proxy Server Address: Configure the proxy server address. Proxy Server Port: Configure the proxy server address.
- Page 33 Server name: Configure the SIP register server name. Registration expire(s): Configure the server registration expire(s), default is 60 seconds. If the registration time of the server required is greater or less than the time of the phone to configure, telephone can automatically modify to the time limit that server recommended, and register again.
- Page 34 Enable PRACK: Configure whether to support SIP-PRACK (used by "Color Ring Back Tone"). Recommend to use the default configuration Convert URI: When you send URI it will convert # to %23. Enable DNS SRV: Configure whether to enable RFC2782 protocol edition. Enable display name quote: Set to make quotation mark to display name as the phone sends out signal, in order to be compatible with server.
-
Page 35: Call
Call Tap "Call" to enter the interface, after configuring the parameters of each interface, you can click "Save" button to save. General Tap “Call” ——>”General” interface, after configuring the parameters, you can click "Save" button to save. General interface... - Page 36 Configuration Meaning Do not disturb: It will not allow any phone call while enable the function, but there will have prompt in the missed calls. General Enable call waiting: Whether enable call waiting. Call waiting tone: If enable the function, there will have call waiting tone if there has a call waiting.
- Page 37 Semi-attended transfer:During the talk, press Transfer firstly, and then press Send after inputting the number that you want to transfer to. You are waiting for connection, now, press Transfer and the transfer will be done. (To use this feature, you need enable call waiting and call transfer first).
- Page 38 Enable intercom tone: If incoming call is intercom call, the phone plays the intercom tone. Enable intercom barge: Enable Intercom Barge by selecting it, the phone auto answers the intercom call during a call. If the current call is intercom call, the phone will reject the second intercom call.
- Page 39 Default Ext Line: You can select any sip to be the default line, the number will display in the upper-left. Default Dial Mode: Choose the default mode when you call other. Default Ans Mode: Choose the mode how you receive the call.
-
Page 40: Dial Plan
Dial plan Tap "Call" --- > "Dial plan" interface. After configuring the parameters, you can click "Save" button to save. Dial plan interface Configuration item Meaning Use E164: Enable/Disable E164. After it is enabled, it will directly dial numbers according with E164 rules. - Page 41 Blind Transfer on Onhook: Enable/Disable. After enable this function, when you end input the transfer number, you can directly on hook the phone to do the blind transfer. Attended Transfer on Onhook: Same as above, but do the attended transfer. Attended Transfer on Conference: Enable this function, when you host a 3-way conference, you can on hook to do the attended transfer.
-
Page 42: Account Call Settings
Account call settings Tap “Call” ——>”Account1\2\3\4\5\6” interface, after configuring the parameters, you can click "Save" button to save. Configuration Meaning Enable DND: When enable the DND line, you can choose to enable DND here to control this account reject the incoming call. Enable Always Forward: Set the forward number Account 1 below and enable this function, when it has a coming... - Page 43 No Answer Forward Number: Same as the above, when the phone does not answer the call after timeout, it will forward the incoming call. MWI number: Fill in the MWI number. Enable Hotline: Enable this function, configure the hotline number and time, the phone will auto call this number when enter the dialing interface and timeout.
-
Page 44: Display
Display Configuring the phone screen displays a number of parameters, including screensavers and power indicator. After enable operator mode, if you press the home key, the main interface will enter Dsskey interface. If disable this function, the phone will return to desktop interface when press home key. -
Page 45: Time & Date
Time & date Tap "Settings" ----- > "Date time" interface. After configuring the parameters, you can click "Save" button to save successfully. -
Page 46: Maintain
Maintain Tap "Settings" --- > "Maintain" to enter the interface. Service port Tap "Maintain" --- >"Service port" interface. After configuring the parameters, you can click "Save" button to save successfully. Service port interface Configuration Meaning Enable telnet: Open telnet function. Telnet is a common method of remote control of the Web server, end users can enter the command Service port... -
Page 47: Cwmp Set
Web server type: Select "HTTP" or "HTTPS". After selecting one server, you can use the selected server to login the telephone’s web page. Such as: https://192.168.1.20 HTTP port: Input server port, default is 80. CWMP set Tap "Maintain" --- >" CWMP set" interface. After configured the parameters, you can click "Save"... - Page 48 CWMP set Interface 2 Configuration Meaning Enter the password to access the network menu landing configuration interface. , select China Telecom or Normal. Enable TR069: Enable network mode ACS Server: Input the address of the ACS server provider CWMP set Account: Input service provider assigns the account.
-
Page 49: Backup
Backup Tap "Maintain"--- >" Backup", the default password is 123456, enter the backup interface. Backup Interface Configuration Meaning Reset Phone: This will erase all data from your phone’s internal storage. Backup: The contact data, phone settings data Backup and calendar backup to a specified folder Recovery: Recovery has backup contacts, phone settings configuration. -
Page 50: Update
Update Tap "Maintain"--- >" Update", enter the update interface For ACS authentication, if authentication is successful you can check the system updates. Update Interface Audio Touch "Audio" --- > "Audio" interface. This is global setting, applies to all the sip lines. After configuring the parameters, you can click "Save"... -
Page 51: Audio Param
Configuration item Meaning Enable VAD: Whether to enable VAD. (Voice Activity Detection); If you enabling VAD function, Audio then the G.729 payload length cannot be set greater than 20ms. Audio param Touch "Audio" ---> "Audio param" interface. After configuring the parameters, you can click "Save"... -
Page 52: Video
Video Touch "Settings" --- > "Video" and enter the video settings interface. Video param Touch "Video" --- > "Video param" interface. After configuring the parameters, you can click "Save" button to save successfully. Note: If you want More clear and smooth video screen, please select H.264 within 2M bandwidth. Video param interface... -
Page 53: Bandwidth
Bandwidth Touch "Video"--- > "Bandwidth" interface. After configuring the parameters, you can click "Save" button to save successfully. Bandwidth interface Configuration item Meaning Video bit rate: Set receiving video bandwidth in video calls. You can choose 11 kinds of video bandwidth types ("64Kbps", "192Kbps", "256Kbps", "384Kbps", "512Kbps", "768Kbps", "1Mbps", "1.6Mbps",... -
Page 54: Softkey
Softkey Tap “Settings->Softkey” to enter softkey interface. Select softkey-screen first, then add or delete the softkey by clicking the arrow, you can also click the arrow up or down to adjust the soft key’s position. Softkey interface For example, the below picture shows the call dialer softkey. It can show up to six keys. Call Dialer softkey... -
Page 55: Mcast
MCAST This feature allows you to make some kind of broadcast call to people who are in multicast group. You can configure a multicast DssKey on the phone, which allows you to send a Real Time Transport Protocol (RTP) stream to the pre-configured multicast address(es) without involving SIP signaling. -
Page 56: Call Service
Call Service Register You can register the sip line on the web or by LCD, the below picture show the web register configuration. The status can show the if the line register successfully. When register success, the upper-left of status bar will show the display name and number Register... -
Page 57: Outgoing & Incoming Call
Outgoing & Incoming call 1. Pick up the handset, press the headset/handsfree key or click line key to the dial interface. 2. Select the line and enter the number. 3. Click #send, it will call out follow the default dial mode you set. 4. -
Page 58: Video Call
Video Call 1. Pick up the handset, press the headset/handsfree key or click line key to the dial interface. 2. Select the line and enter the number. 3. Click to make a call. 4. Click to end or re-invite the video. 5. -
Page 59: Blind Transfer
Blind Transfer 1. During the call, click “ Transfer “ button to enter the dial interface. 2. Input the number or select contact from contacts or call log. 3. Click “ Transfer “ key. 4. If call transfer success, the phone will auto end the call, if transfer failed, the phone will return to the conversation interface and hold the call. -
Page 60: Semi-Attended Transfer
Semi-attended Transfer During the conversation, click “ Transfer “ button to enter the dial interface; Input the number or select contact from contacts or call log. When the other end ringing, click “ Transfer “ button to complete the semi attend transfer. NOTE: You need to enable the call waiting and call transfer to use this function. -
Page 61: Attended Transfer
Attended Transfer 1. During the conversation, press the “ Transfer “ button. 2 Input the number you want to transfer to. Press “ Transfer “ button after the call answered, and transferred successfully. NOTE: Call waiting and call transfer must be enabled. The SIP server must support RFC3515. -
Page 62: Conference Call
Conference Call 1. Press the “ Conference” button during an active call. 2. The first call will be placed on hold and dial tone will be heard. 3. Dial the number to be added to the conference. 4. Press “Conference” button. 5. -
Page 63: Call Hold
Call Hold 1. Click the “Hold” button to put the active call on hold. 2. If there is only one call on hold, press the “Resume” button to retrieve the call. 3. If there is more than one call on hold, click the dialog to change conversation, then click “Resume“... -
Page 64: Android Settings
Android Settings Ethernet configuration Click "Settings", select " Ethernet configuration " switch to the Ethernet configuration interface. You can choose to turn on or turn off the Ethernet, if you turn on the Ethernet, it will auto connect to networking, otherwise, the phone cannot connect to networking. Security Set the Screen lock Click “Settings”, enter the android settings interface. -
Page 65: Language & Input
Language & Input Language & input interface 1. Click “Settings” enter the android settings interface. 2. Click “Language & input” enter the above picture interface. 3. Select language to set what you want to use. 4. Tick the input method which you want to use. -
Page 66: Web Settings
SIP and cannot browse the configuration file. Default user with general level: Username: guest Password: guest Default user with root level: Username: admin Password: xontel... -
Page 67: Network
Network About the network mode settings, please refer to the phone settings. QoS & VLAN The phone supports 802.1Q/P protocol and DiffServ configuration. Use of a Virtual LAN (VLAN) allows voice and data traffic to be separated. Chart 1 shows a network switch with no VLAN. Any broadcast frames will be transmitted to all other ports. -
Page 68: Service Port
Note: In practice, VLANs are distinguished by the use of VLAN IDs. Service Port... - Page 69 Field Name Explanation Web Server Type Specify Web Server Type –HTTP or HTTPS HTTP Port Port for web browser access. Default value is 80. To enhance security, change this from the default. Setting this port to 0 will disable HTTP access. Example: The IP address is 192.168.1.70 and the port value is 8090, the accessing address is http://192.168.1.70:8090.
-
Page 70: Registration
Registration Note: If the proxy configuration is same as the register configuration, in the web interface, the proxy fields are empty. While it is different with register configuration, the config info will display in the web interface. The backup proxy server will be used if the primary server is unavailable. -
Page 71: Dial Plan
Dial Plan Dial Plan Basic Settings This phone supports the following dialing modes: 1. Press # to Send– Dial the desired number, and press # to send it to the server. 2. Send after seconds – Number will be sent to the server after the specified time. 3. -
Page 72: Dial Plan Add
Dial Plan Add This feature allows the user to create rules to make dialing easier. There are several different options for dial rules. The examples below will show how this can be used. Example 1: Substitution -- Assume that it is desired to place a direct IP call to IP address 172.168.2.208. - Page 73 Field Name Explanation Number There are two types of matching: Full Matching or Prefix matching. In Full matching, the entire phone number is entered and then mapped per the Dial Peer rules. In prefix matching, only part of the number is entered followed by T.
-
Page 74: Security
Security Browse to the security file to be updated. Click the Update button to update. Note: The sip TLS file and https file both support “xx.pem” format.
Need help?
Do you have a question about the XT-30G and is the answer not in the manual?
Questions and answers