Table of Contents
Advertisement
Quick Links
Advertisement
Table of Contents

Related Manuals for GoWISE USA GW22500

Summary of Contents for GoWISE USA GW22500
- Page 1 Instruction Manual GW22500 W W W . G O W I S E U S A . C O M...
-
Page 2: Table Of Contents
Table of Contents Product introduction ......3 Important Safeguards ......4 Assembly &... -
Page 3: Product Introduction
Blend your favorite smoothies, dips, treats as well as cook your favorite soups, milk and more with the GoWISE USA High-Performance Professional Heating Blender. This blender is designed with a 1400W motor and 8 stainless steel blades designed to crush, slice, and chop any ingredient resulting in a creamy refreshment or snack or a delicious hot bowl of soup. -
Page 4: Important Safeguards
5. Avoid contact with moving parts. 6. Do not operate the appliance if the cord or plug is damaged in any way. Contact GoWISE USA customer support for more instructions. 7. Do not operate the appliance after it malfunctions, or is dropped or damaged. - Page 5 23. GoWISE USA is not responsible for the end use of this product or when used for purposes that are not specified. 24. Be sure to read the installation, operation, and maintenance instructions thoroughly before installing or servicing this equipment.
-
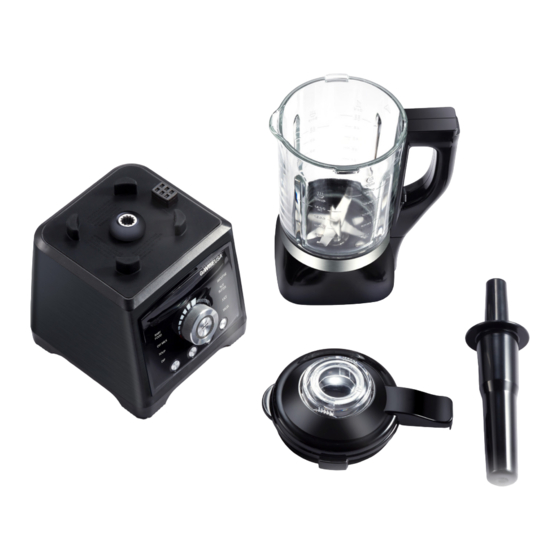
Page 6: Assembly & Parts List + Specs
Assembly & Parts List Refilling cap Blade group 9. Base 6. Pulse switch 10. Tamper Pitcher Speed control 4. Handle 8. Start/Stop Specs Color Voltage Power Capacity Black 120V/60Hz 1400W 59 oz... -
Page 7: About Your Blender
About your Blender START/STOP The START/STOP button activates the motor on a setting. When the light surrounding the button is blinking, it is ready for the user to select a preset or speed setting. PULSE Function The PULSE function is used for extra power in short bursts. The button activates the blades to turn at their highest speed setting for as long as the button is pressed. - Page 8 About your Blender (cont) Adjustable Speed Dial The Speed dial allows you to adjust the rotation speed of the blades starting from the slowest speed to the highest speed. This dial provides more control over how to chop or blend ingredients.
-
Page 9: Before First Use
Before First Use Remove all packaging material and promotional labels before using your high-speed blender for the first time. Wash inside of the pitcher, lid, lid cover and tamper in warm soapy water before using it for the first time. NOTE: DO NOT IMMERSE THE Pitcher IN WATER OR GET THE BASE OF THE Pitcher WET. -
Page 10: How To Use Your Blender
Using Your Blender Plug the unit into a household power outlet. Make sure the blender sits on a level and dry surface, moisture may result in the blender moving during operation. 2. Place the pitcher onto the motor base correctly. You may need to rotate the pitcher so that the connection aligns correctly. - Page 11 Using Your Blender (cont) To blend during a heating preset, press the CHOP button. This will spin the blade for 1-2 seconds and will not stop or interrupt your preset. This is helpful for mixing ingredients and preventing the contents at the bottom from burning.
- Page 12 Using the Presets To select a preset, press the START/STOP button to turn the blender on. Press “Preset” to cycle through the 8 presets until the indicator light of the desired preset is on. Press START/STOP to select the preset. 1.
- Page 13 Using the Presets (cont) 4. Dip: Press the preset button until the Soup indicator is blinking. Press Start/Stop to select the preset. The time will start counting up in the LCD display. The contents will heat until it reaches a boil then drop to a simmer. Press Chop periodically to mix ingredients and prevent burning.
- Page 14 Using the Tamper The tamper is used to press ingredients down towards the blades. It is recommended to move the tamper either straight down or around the sides for the best results. Do not use excessive force with the tamper. Follow steps in “Using your Blender”...
-
Page 15: Tips
TIPS Crushing Ice For best results when crushing ice, the ice must be dry, (not watery or melting ice) and use the tamper. Fill the container with no more than 1/3 full of ice. 2. Press the lid firmly into the container, remove the lid cover. - Page 16 TIPS Jammed Ingredients When blending certain ingredients, chunks may get stuck below the blades. This is indicated by a loud noise from the blender. In this instance, please follow the instructions below: Press the START/STOP button to turn off the blender.
-
Page 17: Cleaning And Storage
4. Clean the lid, lid plug and tamper in warm soapy water, rinse and dry. NOTE: No parts of the blender are dishwasher safe. If you have any questions regarding your product, please contact GoWISE USA customer support at 1-855-233-9199 or via e-mail support@gowiseusa.com. - Page 18 General Warranty (Excluding Refurbished/Auction Items) GoWISE USA has a 1-year limited warranty for all products. Products are warrantied against defects in materials and workmanship for 1-year from the date of purchase, when used in accordance with the instructions provided. This warranty does not cover damages or wear resulting from accident, misuse, abuse, commercial use, or unauthorized adjustment and/ or repair.
-
Page 19: Warranty Information
REFURBISHED ITEMS THAT ARE PURCHASED FROM 3RD PARTY SELLERS. Regarding Purchase From 3rd Parties In order for the GoWISE USA customer service team to look up the warranty information regarding the product(s), the original order information and/or proof of purchase is required. Without this information GoWISE USA will be unable to move forward with providing a replacement under warranty, as we do not know the date or origin of the purchase. -
Page 20: Notes
Notes... - Page 21 Notes...
- Page 22 Notes...
- Page 23 Notes...
Need help?
Do you have a question about the GW22500 and is the answer not in the manual?
Questions and answers