Table of Contents
Advertisement
Quick Links
Advertisement
Table of Contents

Summary of Contents for HUBITOOLS HU23079
- Page 1 Two Way Articulation Probe User Manual...
-
Page 3: First Time Use
First Time Use Step 1: Remove the battery cover. Step 2: Place battery in correctly, put the battery cover back on. Step 3: Insert probe onto the device connector and tighten it up clockwise. User Guide... -
Page 4: System Mode
Step 4: Insert SD memory card correctly, then screen will shows memory card capacity. 2010/09/22 12:35:45 Step 5: Hold down the device switch until the screen displays. Step 6: After the device turns ON, aim the probe front end at an area to be snapped or recorded. -
Page 5: Multifunction Key
-Browse: Under “Browse” mode, the user may view recorded pictures and video and conduct basic file management. -Menu: Under “Menu” mode, the user may change device settings. Note: Under the “Menu” mode, the system will automatically return to the “Preview”mode if no action is made. Multifunction Key Preview Browse... -
Page 6: System Menu
Screen System time 2010/09/22 12:35:45 Battery power Memory card capacity System menu Step 1: Press to enter the Menu mode. MAIN MENU Step 2: Press the button AUTO POWER OFF choose the item you need. DELETE ALL FILES Step 3: Press to enter it. - Page 7 AV Output This command will send the video signal out through the AV port. The screen of the device will turn black until you execute this command again. Date / Time The user may set system time through this instruction. -Format: Set sequence of day, month, SETTINGS year.
-
Page 8: Adjust The Brightness
Operating Guide Zoom-in & Mirror -Zoom-in: Press to enlarge the image, press again to enlarge more, and press it again to the default image setting. * Default image * enlarged 3X * enlarged 5X -Mirror: Press to mirror the image, and press it again to the default image setting. -
Page 9: Video Recording
Taking Photos 2010/09/22 12:35:45 Press button during Preview mode to take the photo. If the bottom of the screen displays the file name, then your file is PICT0000.JPG properly saved. Video Recording Press button during Preview mode 2010/09/22 12:35:45 to record the video. In the recording process, the recording time is displayed 00:00:12 on the screen. -
Page 10: Specification
Specification Main System System Dimension 140mm x 116mm x 42mm System Weight 300g (w/o battery) Display 3.5” TFT LCD QVGA Display Resolution 320X240 Power AA x 4 (Alkaline or Ni-HM) Battery life 4hours Recording Medium SD CARD (Support to 32G) Video Out Format NTSC &... - Page 11 Cautions for Use -To avoid danger, do not put the insert tube into any flammable liquid or gas. Oil Pass: Leadless Gasoline, Machine Oil, Diesel, Brake Oil (DOT 4), Transmission Oil, Neutral Cleanser. -Do not use this product in a fuel tank or other dangerous environment such as a gasoline or alcohol storage tank.
- Page 12 -Avoid direct exposure to sunlight for long period of time. Store the system in a cool, dry and well-ventilated place. -Always remove the battery before long-term not using. -Camera lens cleaning: The user may clean the camera lens with a cotton swab and small amount of soft grease remover.
- Page 13 The USB port provides both card reader and DC- in power function. 1. Card reader function (mass storage mode): While USB cable is connected to PC, the screen will show MASS STORAGE MODE (while SD card is correctly inserted), you can access the image/video data from the SD card. Note: You can only process the images data in SD card, other operations are not allowed.
- Page 14 2. DC-in mode power function You can activate DC-in power by plugging in the power adaptor. After the power adaptor is plugged-in, the system will show up MASS STORAGE MODE, you can press “esc” button to live view and continue the inspection. Note: You don’t need to remove batteries inside the system while DC-in mode is on.
-
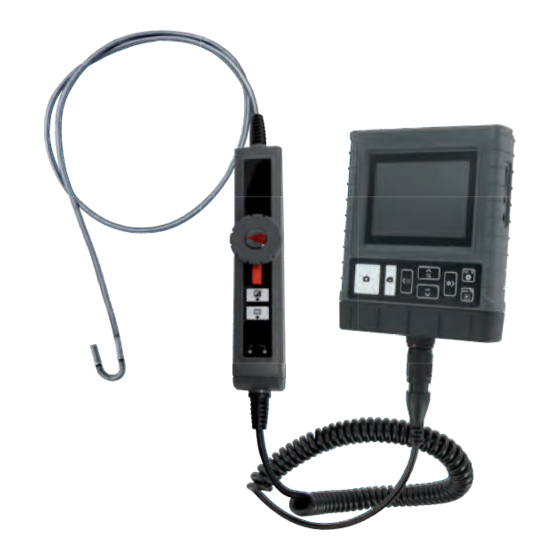
Page 15: Product Outlook
Product outlook... -
Page 16: Connecting Cable
1. Probe - To guide camera head to inspection area. 2. Bending Neck - To bend camera to change view angle. 3. Camera Head - Lighting and image capture. 4. Control Wheel - To adjust bending neck angle. 5. Control Wheel shaft lock - To lock bending neck angle. 6. -
Page 17: Getting Started
Getting started Step1: Connect Articulation probe to main system with align do t then tighten the screw nut. Step2: Turn on the system until the image is displayed. Step3: After the system is turned on, you can start your inspection. - Page 18 Operations Articulation Rotate the control wheel clockwise to bend tip right, counter clockwise to bend left. Lock To fix bending neck angle, just switch the lock shaft clockwise to the lock position. LOCK...
-
Page 19: Function Buttons
Function buttons Boost button * live image boost Image rotation button... -
Page 20: Specifications
Specifications 4.5mm Two Way Articulation Probe Probe head diameter 4.5mm Probe head length 13mm Probe length 1.5m, 3m Articulation angle right-left 180° Probe head material Stainless steel Probe material Outer braided Stainless steel Light source 5 x white LEDs 90° 1cm~10cm Button Boost, image rotation... -
Page 21: Cautions For Use
Cautions for Use • To avoid danger, do not put the insert tube into any flammable liquid or gas. • The insert tube contains a series of small wires that control the optics and electronics of the camera tip. To ensure reliability, do not bend the insert tube more than 90°, and always keep the insert tube in a large arc as possible for storage. - Page 22 Bending neck is composed with precision components, DO NOT put under heavy load on this. DO NOT rotate the wheel when it is at the maximum angle. Never use the bending neck as a HOOK.
- Page 23 Please straighten the bending neck every time before storage. NEVER bend the bending neck with hand, operate by control wheel only. Please keep the insert tube straight while in use. DO NOT bundle the insert tube less than a 15cm circle while not in use.
- Page 24 Liquid immersion passed: unleaded gasoine, diesel, machine oil, brake oil, transmission oil, and water. Use cleaning liquid and swab provided in the cleaning kit for camera head cleaning.
Need help?
Do you have a question about the HU23079 and is the answer not in the manual?
Questions and answers