Table of Contents
Advertisement
Quick Links
Hydroxyl Generator
Air Treatment System
HG1500
User Manual
IMPORTANT SAFETY INSTRUCTIONS
Carefully read the important safety and maintenance information.
Keep these instructions for future reference.
These instructions contain important safety and operating information for
your Newaire HG1500 Hydroxyl Generator. Please contact us directly with
questions you may have regarding the safe operation and/or maintenance.
Toll Free #: 1-877-646-9663
Advertisement
Table of Contents

Summary of Contents for Queenaire Technologies NewAire HG1500
- Page 1 Carefully read the important safety and maintenance information. Keep these instructions for future reference. These instructions contain important safety and operating information for your Newaire HG1500 Hydroxyl Generator. Please contact us directly with questions you may have regarding the safe operation and/or maintenance. Toll Free #: 1-877-646-9663...
-
Page 2: Table Of Contents
Table of Contents Important Safety Information ........................2 Handling and Disposal of Mercury ......................4 FAQs ................................ 5 Location of Controls ..........................6 Operation ..............................7 Replacing the Carbon Filters ........................8 Replacing the UV Bulbs .......................... 9 Cleaning ..............................11 Replacement Parts .......................... - Page 3 Important Safety Information Standard safety precautions must always be followed to 16. The AC mains plug is used as the power disconnect reduce the risk of fire, electric shock, and injury to persons, device and it should remain readily accessible and including the following: operable during intended use.
-
Page 4: Handling And Disposal Of Mercury
Handling and Disposal of Mercury Mercury is used in this device’s UV bulb and must be disposed of properly. There is no safety hazard as long as the bulb is intact because the mercury is contained within the fixture. If a bulb breaks, very little mercury could be released. This is different then liquid metallic mercury (like in a thermometer), which is hazardous due to its potential to release mercury vapor. -
Page 5: Faqs
Handling and Disposal of Mercury • After cleaning, open a window and use a fan to ventilate • Dispose of contaminated items properly! Mercury- the area to the outdoors for 24-48 hours before resuming contaminated items should not be placed in the regular normal use. -
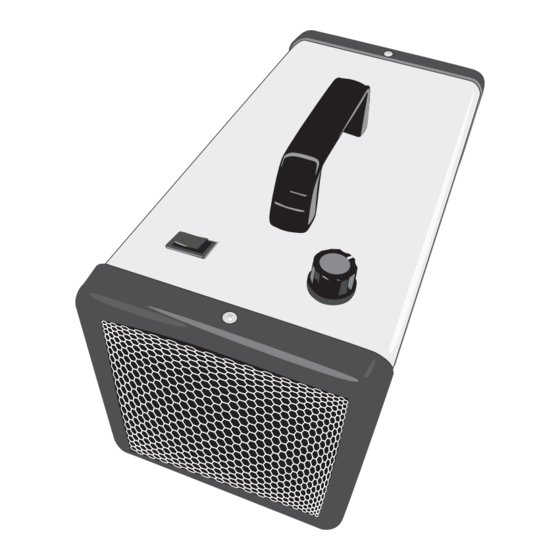
Page 6: Location Of Controls
Location of Controls Plastic End Cap Fuse (bottom of unit) Carrying AC Cord Handle (bottom of unit) Power Switch Timer Knob Plastic End Cap — 6 —... -
Page 7: Operation
Operation Timer Operation Press the Power Switch to On position; the Power switch will light red ands the Hydroxyl Generator will operate until the set timer time is reached. Plug into properly When the timer time has been reached, the fan and installed and UV bulbs will turn off. -
Page 8: Replacing The Carbon Filters
Replacing the Carbon Filters After approximately 60 days of use, both carbon filters should be replaced. The carbon filters are located at each end of the Hydroxyl Generator and can be purchased through your distributor. Replace carbon filters as follows: WITH THE UNIT UNPLUGGED, place the Hydroxyl Install the new carbon filter, then replace the screen and plastic end cap. -
Page 9: Replacing The Uv Bulbs
Replacing the UV Bulbs When one of UV bulbs blows, you must replace both at the same time. The UV bulbs can be purchased through your distributor. Replace UV bulbs as follows: WITH THE UNIT UNPLUGGED, place the Hydroxyl Remove three of the 8/32 screws holding the finger guard in its place and loosen the remaining screw. - Page 10 Replacing the UV Bulbs Gently pull the UV lamp socket vertically holding the Reconnect the power supply, then reinsert socket lamp by ceramic portion and disconnect the Quick head screws and gently tighten with 5/64 Allen key. Connect connector. Repeat process with the second UV lamp as they Replace the UV lamp with the new bulb by carefully should be replaced in pairs.
-
Page 11: Cleaning
Replacing the UV Bulbs Reinsert carbon filter, metal retaining screen, and plastic end cap, then secure with retaining screws. WARNING: • UV Bulbs MUST be disposed of properly, see pages 4 and 5 for details on removing the mercury containing UV bulbs. -
Page 12: Specifications
Specifications Power Source ...............................120 V, 60 Hz Power Consumption ............................43 Watts Fan Output ................................ 130 CFM Treatment Process .....................Carbon filter & twin hydroxyl chambers UV Lamp Type ........................UVC 254 nm germicidal lamp Reaction Surface ....................154 Square Inches, 25,000 Hour Life Room Capacity .............................1500 Square Feet Dimensions ........................13”... -
Page 13: Limited Warranty
PURCHASER MAY ALSO HAVE OTHER RIGHTS WHICH MAY VARY FROM STATE TO STATE OR PROVINCE TO PROVINCE. NO SELLER OR DEALER FOR QUEENAIRE TECHNOLOGIES OR FOR THE UNIT, HAS ANY AUTHORITY TO MAKE ANY REPRESENTATION OR PROMISE ON BEHALF OF QUEENAIRE TECHNOLOGIES OR TO ASSUME ANY LIABILITY FOR QUEENAIRE TECHNOLOGIES, OR TO MODIFY THE TEXT OF THE WARRANTY PROVIDED HEREIN. - Page 14 QUEENAIRE TECHNOLOGIES, INC 9483 State Highway 37 Ogdensburg, NY 13669 www.queenaire.com...
Need help?
Do you have a question about the NewAire HG1500 and is the answer not in the manual?
Questions and answers