Table of Contents
Advertisement
Quick Links
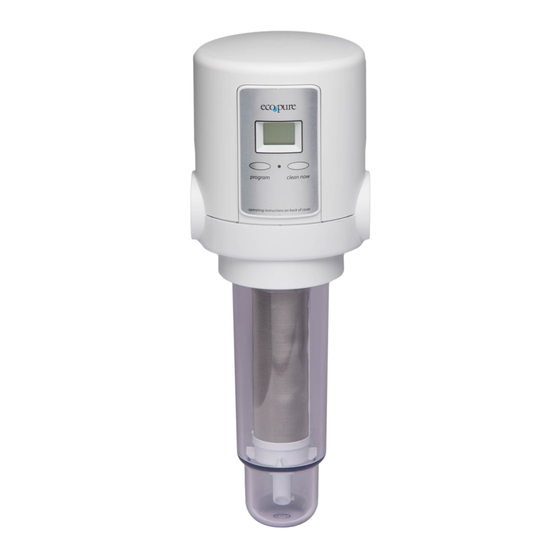
Model EP-ASF1
with filter screen
How to install, operate
and maintain your
Automatic Sediment Filter
If you have any questions or concerns when
installing, operating or maintaining your Auto-
matic Sediment Filter, call our toll free number:
1-800-693-1138
Monday- Friday, 7 AM - 6 PM CST
www.ecopurewaterproducts.com
or visit
When you call, please be prepared to provide the
model, date code and serial number of your product,
found on the rating decal, located inside the cover.
EP-ASF1
is tested and certified
by NSF International against
NSF/ANSI Standard 42 for structural
integrity and materials safety only.
Filter screen
is tested and
certified by NSF International against
NSF/ANSI Standard 42
for materials safety only.
COMPONENT
COMPONENT
Manufactured and warranted by
Ecodyne Water Systems
1890 Woodlane Drive
Woodbury, MN 55125
Printed on recycled paper
7301570 (Rev. K 10/7/11)
Advertisement
Table of Contents

Related Manuals for Eco Pure EP-ASF1


Summary of Contents for Eco Pure EP-ASF1
- Page 1 Model EP-ASF1 with filter screen How to install, operate and maintain your Automatic Sediment Filter If you have any questions or concerns when installing, operating or maintaining your Auto- matic Sediment Filter, call our toll free number: 1-800-693-1138 Monday- Friday, 7 AM - 6 PM CST www.ecopurewaterproducts.com...
-
Page 2: Table Of Contents
Table of Contents Before You Start ................2 Unpacking Dimensions . -
Page 3: Unpacking
Unpacking INSPECT SHIPMENT The Automatic Sediment Filter is shipped complete in items lost or damaged in shipment. If problems exist, one carton. Remove all items from the shipping carton call our toll free number: 1-800-693-1138, Monday - and check against the packing list below. Note any Friday, 7 AM - 6 PM CST Packing List Mounting Bracket &... -
Page 4: How The Automatic Sediment Filter Works
How the Automatic Sediment Filter Works The EcoPure Automatic Sediment Filter is designed to The unit has an electronic control that counts down the be plumbed into a home’s incoming water supply pipe, days until the next automatic flush of collected sedi- where it will capture particles of sediment from the ment particles. -
Page 5: Reversing The Faceplate
Planning the Installation ALWAYS INSTALL THE FILTER UPRIGHT To operate properly, the Automatic Sediment Filter must be installed with the sump pointed straight down. When possible, install the filter on a horizontal section of the household’s main incoming water pipe. If the available incoming main house water pipe runs verti- 10”... -
Page 6: Installation Requirements
Installation Requirements PLUMBING CODES VALVE DRAIN REQUIREMENTS All plumbing must be completed in accordance with Using the flexible drain hose (included), measure and national, state and local plumbing codes. cut to the length needed. Avoid drain hose runs longer than 10 feet. Make In the state of Massachusetts: The Commonwealth the valve drain line as short and direct as possible. -
Page 7: Installation Instructions
Installation - Type A INSTALLATION USING COMPRESSION FITTINGS NOTE for all types of Mounting Bracket installations may be used in all types of installations. Optional Shutoff Apply at least 4 wraps It is important to use Be sure to put it in Valve (2) of Teflon Tape an adequate amount... -
Page 8: Installation Using Soldered Copper Fittings
Installation - Type A (continued) 8. With the IN side of the water filter toward incoming water, spread the pipes apart and fit both pipe ends into the compression fittings. Move a ferrule and Fitting nut up to the fitting (See Figure 12). Then, turn on and tighten the nut. -
Page 9: Installation Using Threaded Pipe & Fittings
Installation - Type B (continued) 7. Turn a sweat adaptor fitting into the other side of the Apply at least 4 wraps filter head and hand tighten only. Using a tape of Teflon Tape measure or ruler, measure the distance “D” as shown in Figure 16. -
Page 10: Install Battery
Complete the Installation (all Installation types) INSTALL THE DRAIN HOSE Do the following before turning the water supply back 1. Measure, cut to needed length and connect the 3/8” Top Cover drain line (provided) to the Automatic Sediment Filter’s valve drain fitting (See Figure 8 on Page 6). Use a hose clamp to hold hose in place. -
Page 11: Programming The Electronic Controller
Programming the Electronic Controller POWER UP When the controller is powered up (by installing the battery or plugging in the optional AC adaptor), the dis- Moving dashes play will briefly show the software version (example indicate sedi- “1.0”), then the number of days until the next automatic ment flush is sediment flush. -
Page 12: Setting Number Of Days Between Automatic Sediment Flushes
Electronic Controller (continued) SETTING THE NUMBER OF DAYS BETWEEN AUTOMATIC SEDIMENT FLUSHES The ASF controller is shipped with a default value of 7 days between automatic sediment flushes. To change the number of days (between 1 and 30) or to turn this Two dashes feature off: (not moving) -
Page 13: Routine Maintenance
Routine Maintenance CLEANING THE FILTER SCREEN It may be necessary to manually clean the filter screen from time to time. On water supplies that contain sticky sediment including mud, silt and clay, you may have to remove the sump and clean the screen frequently. Also, if the ASF has not been automatically flushing for any reason, such as a dead battery, a larger amount of sediment than normal may have accumulated in the sump. -
Page 14: Troubleshooting Guide
Troubleshooting PROBLEM CAUSE CORRECTION Sediment flush 1. Battery is dead. Replace battery (See “Battery Replacement” on Page 12). does not initiate Low or no water 1. Filter is plugged. Manually clean filter screen (See Page 13). May be necessary to reduce flow through filter number of days between automatic sediment flushes (See Page 12). -
Page 15: Warranty
Warranty ONE YEAR LIMITED WARRANTY ON AUTOMATIC SEDIMENT FILTER Warrantor: Ecodyne Water Systems, 1890 Woodlane Drive, Woodbury, MN 55125 Warrantor guarantees, to the original owner, that the Automatic Sediment Filter, when installed and main- tained in accordance with the instructions, will be free from defects in materials and workmanship for a period of one (1) year from the date of purchase. -
Page 16: Repair Parts
Repair Parts Part No. Description 7298442 Top Cover 7295177 Electronic Control Board (PWA) 7298434 Faceplate (order decal below) 7300354 Decal, Faceplate, EcoPure 7300346 Screw, 6-19 x 1/2” (2 req.) 7301596 Solenoid 7301758 O-Ring, Solenoid 7300338 Screw, 10-16 x 1-1/4” (6 req.) 7298426 Valve Cover 7301520...
Need help?
Do you have a question about the EP-ASF1 and is the answer not in the manual?
Questions and answers