Table of Contents
Advertisement
Quick Links
Advertisement
Table of Contents

Related Manuals for Hanna Instruments HI97726


Summary of Contents for Hanna Instruments HI97726
- Page 1 HI97726 Nickel High Range Photometer...
- Page 2 If you need additional technical information, do not hesitate to e‑mail us at tech@hannainst.com or view our worldwide contact list at www.hannainst.com. All rights are reserved. Reproduction in whole or in part is prohibited without the written consent of the copyright owner, Hanna Instruments Inc., Woonsocket, Rhode Island, 02895, USA.
-
Page 3: Table Of Contents
TABLE OF CONTENTS 1. PRELIMINARY EXAMINATION ................4 2. SAFETY MEASURES ..................5 3. ABBREVIATIONS ................... 5 4. SPECIFICATIONS .................... 6 5. DESCRIPTION ....................7 5.1. GENERAL DESCRIPTION & INTENDED USE ..........7 5.2. FUNCTIONAL DESCRIPTION ..............8 5.3. PRECISION & ACCURACY ............... 9 5.4. -
Page 4: Preliminary Examination
1. PRELIMINARY EXAMINATION Remove the instrument and accessories from the packaging and examine it carefully. For further assistance, please contact your local Hanna Instruments Office or email us at tech@hannainst.com. Each HI97726C is delivered in a rugged carrying case and is supplied with: •... -
Page 5: Safety Measures
2. SAFETY MEASURES • The chemicals contained in the reagent kits may be hazardous if improperly handled. • Read the Safety Data Sheets (SDS) before performing tests. • Safety equipment: Wear suitable eye protection and clothing when required, and follow instructions carefully. •... -
Page 6: Specifications
4. SPECIFICATIONS Range 0.00 to 7.00 g/L (as Ni) Resolution 0.01 g/L Nickel HR Accuracy ±0.07 g/L ±4% of reading at 25 °C Method Adaptation of the Photometric Method Light source Light Emitting Diode Bandpass filter 575 nm Bandpass filter 8 nm bandwidth Measurement... -
Page 7: Description
With the CAL Check™ functionality, users are able to validate the performance of the instrument at any time and apply a user calibration (if necessary). Hanna Instruments CAL Check cuvettes are made with NIST traceable standards. -
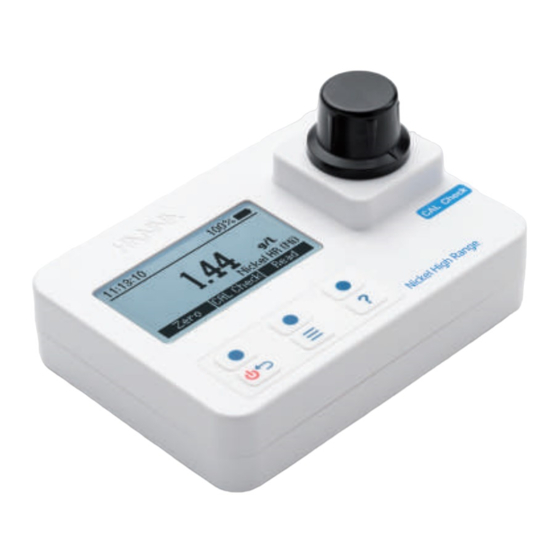
Page 8: Functional Description
5.2. FUNCTIONAL DESCRIPTION 1. ON/OFF power button 3. Liquid Crystal Display (LCD) 5. Indexing mark 2. Keypad 4. Cuvette holder 6. Battery cover Keypad Description The keypad contains 3 direct keys and 3 functional keys with the following functions: Press the functional key to perform the function displayed above it on the LCD. Press and hold to power off/on. -
Page 9: Precision & Accuracy
5.3. PRECISION & ACCURACY Precision is how closely repeated measurements are to one another. Precision is usually expressed as standard deviation (SD). Accuracy is defined as the closeness of a test result to the true value. Although good precision suggests good accuracy, precise results can be inaccurate. The figure explains these definitions. -
Page 10: Optical System
5.5. OPTICAL SYSTEM Instrument Block Diagram The internal reference system (reference detector) of the HI97726 photometer compensates for any drifts due to power fluctuations or ambient temperature changes, providing a stable source of light for your blank (zero) measurement and sample measurement. -
Page 11: General Operations
6. GENERAL OPERATIONS 6.1. METER VALIDATION: CAL CHECK & CALIBRATION Validation of the HI97726 involves verifying the concentration of the certified CAL Check standards. The CAL Check screen guides the user step-by-step through the validation process and user calibration (if necessary). -
Page 12: Glp
Check the certified value, expiration date and clean the outside of the cuvette. Repeat the CAL Check procedure. If this error continues contact your nearest Hanna Instruments Customer Service Center. 6.2. GLP key to enter the menu. Use the functional keys to select GLP and Press the press Select. -
Page 13: Logging Data & Log Recall
6.3. LOGGING DATA & LOG RECALL The instrument features a data autolog function to help users keep track of all measurements. Every time a measurement is made the data is automatically saved. The data log can hold 50 individual measurements. When the data log is full (50 data points) the meter will rewrite the oldest data point. -
Page 14: General Setup
6.4. GENERAL SETUP key to enter the menu. Use the functional keys to select Setup and Press the press Select. Use the functional keys to highlight desired option. Backlight Option: 0 to 100 % Press Modify to access the backlight intensity. Use the functional keys to increase or key to return to the Setup decrease the value. - Page 15 Date Format Press Modify to change the date format. Use the functional keys to select the desired key to return to the Setup menu without format. Press Accept to confirm or the saving the new format. Decimal Separator Option: Comma ( , ) or Period ( . ) Press the functional key to select the desired decimal separator.
-
Page 16: Reagents & Accessories
Reagents / Accessories and press Select to access a list of reagents and accessories. To exit press the key. 6.6. CONTEXTUAL HELP HI97726 offers an interactive contextual help mode that assists the user at any time. To access the help screen press the key. -
Page 17: Battery Management
The meter will perform an auto-diagnostic test when it is powered on. During this test, ® the Hanna Instruments logo will appear on the LCD. If the auto-diagnostic test was successful, the meter is ready for use. The battery icon on the LCD will indicate the battery status: •... -
Page 18: Photometer
7. PHOTOMETER 7.1. COLLECTING & MEASURING SAMPLES AND REAGENTS Proper Use of Powder Packet 1. Use scissors to open the powder packet. 2. Push the edges of the packet to form a spout. 3. Pour out the content of the packet. Proper Use of Dropper Bottle 1. - Page 19 In order to avoid reagent leaking and to obtain more accurate measurements, close the cuvette first with the supplied HDPE plastic stopper and then the black cap. Whenever the cuvette is placed into the measurement holder, it must be dry outside and free of fingerprints, oil or dirt.
-
Page 20: Method Procedure
8. METHOD PROCEDURE REQUIRED REAGENTS Code Description Quantity HI93726-0 Nickel HR Reagent 1 packet REAGENT SETS HI93726-01 Nickel HR Reagent - 100 tests HI93726-03 Nickel HR Reagent - 300 tests For other accessories see ACCESSORIES section. MEASUREMENT PROCEDURE Note: If tutorial mode is disabled follow the measurement procedure below. If the tutorial mode is enabled, press Measure and follow the messages on the screen. - Page 21 • Insert the cuvette into the holder and ensure that the notch on the cap is positioned securely in the groove. • Press Read and the show will display a 1 minute countdown prior to the measurement. To skip the timer, press Read twice. When the timer ends the meter will perform the reading.
-
Page 22: Warning & Error Descriptions
Ensure that the notch on the cap is positioned securely in the groove before performing any measurements. If the issue persists, please contact Hanna Instruments technical support. The sample and the zero cuvettes are inverted. Swap the cuvettes and repeat the measurement. - Page 23 English is the only available language. Help function is not available. Restart the meter. If the issue persists, please contact Hanna Instruments technical support. Battery level is too low for the meter to function properly. Replace the batteries with new ones.
-
Page 24: Battery Replacement
10. BATTERY REPLACEMENT To replace the instrument’s batteries, follow these steps: • Turn the instrument off by pressing and holding the key. • Remove the battery cover by turning it counterclockwise. • Remove the old batteries, replace them with three new 1.5V AA batteries. •... -
Page 25: Accessories
HI977xx and 2 CAL Check cuvettes HI731318 cloth for wiping cuvettes (4 pcs.) HI731331 glass cuvette (4 pcs.) HI731336N cap for glass cuvette (4 pcs.) HI93703-50 cuvette cleaning solution (230 mL) ® HI97726-11 CAL Check standards for Nickel HR - cuvette kit... -
Page 26: Certification
If the repair is not covered by the warranty, you will be notified of the charges incurred. If the meter is to be returned to Hanna Instruments, first obtain a Returned Goods Authorization (RGA) number from the Technical Service department and then send it with shipping costs prepaid. - Page 27 Hanna Instruments reserves the right to modify the design, construction or appearance of its products without advance notice.
- Page 28 World Headquarters Hanna Instruments Inc. Highland Industrial Park 584 Park East Drive Woonsocket, RI 02895 USA www.hannainst.com MAN97726 Printed in ROMANIA...
Need help?
Do you have a question about the HI97726 and is the answer not in the manual?
Questions and answers