
Subscribe to Our Youtube Channel
Summary of Contents for infobit iCam 200H
- Page 1 4K Ultra HD Camera with Auto Framing User Manual: Model iCam 200H www.infobitav.com info@infobitav.com...
- Page 2 English (V1.0) Copyright Notice All contents of this manual, whose copyright belongs to INFOBIT AV cannot be cloned, copied or translated without the permission of the company. Product specifications and information which were referred to in this document are for reference only. We may change, delete, or update any content at any time and without prior notice.
-
Page 3: Table Of Contents
Catalogue 1 Note ......................1 2 Supplied Accessories .................. 1 3 Quick Start ....................1 4 About Product....................1 4.1 Features ......................1 4.2 Product Specification ..................2 4.3 Interface and Button ..................3 4.4 Dimension....................... 4 4.5 Remote Control ....................4 5 Menu Settings ..................... -
Page 4: Note
Quick Start Note Please check connections are correct before Electric Safety starting. Installation and operation must accord with electric safety standard. Use Caution to Transport Avoid stress, vibration or soakage in transport, storage and installation. Careful Installation The product should be placed on smooth desktop. -
Page 5: Product Specification
Compression NV12 suitable for market 100% monitor, easy YUY2: installation, stable and reliable. 640x480 (default), 640x360, 960x540, 4.2 Product Specification 1280x720, 1920x1080 iCam 200H Model MJPEG: Resolution 4K Ultra HD Camera Name 3840x2160 (default), 160x120, 176x144, Camera 320x240, 352x288, 1/2.5'', CMOS,... -
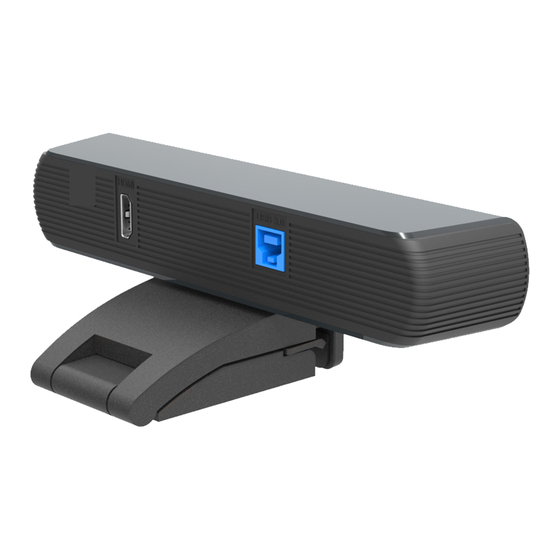
Page 6: Interface And Button
1024x768, Physical Parameter 1024x576, 960x540, Input Voltage 5V (USB Power Supply) 848x480, 800x600, Current 800x448, 640x360, 0.5A (Max) Consumption 480x272, 424x240, Operating -10°C ~ 40°C 320x180, Temperature (14°F ~ 104°F) 1920x1080 H.264: Storage -40°C ~ 60°C 1920x1080 (default), Temperature (-40°F ~ 140°F) 320x240, 352x288, Power 640x480, 720x576,... -
Page 7: Dimension
4.4 Dimension 4.5 Remote Control Key Description 1. Standby Key Press this button to enter standby mode. Press it again to enter normal mode. Note: Power consumption in standby mode is approximately half of the normal mode. 2. Number Key To set preset or call preset. - Page 8 4. Preset Key on near object). Set preset: Store a preset position. 10. Selection Key [SET PRESET] + Numeric button (0-9): Press the button corresponding Setting a corresponding numeric key camera you want to operate with the preset position. remote control. 5.
- Page 9 cancel this function, press backlight ON/OFF button. 17. PTZ Reset Key This function is only applicable to the PTZ cameras.
-
Page 10: Menu Settings
Mode: Optional items: Full Auto, Shutter Priority, Bright. Menu Settings Shutter: Optional items: 1/30s, 1/60s, 1/90s, 1/100s, 1/125s, 1/200s, 1/250s, 1/350s, 5.1 MENU 1/500s, 1/725s, 1/1000s, 1/1500s, 1/2000s, Press [MENU] button to display the main 1/3000s, 1/4000s, 1/6000s, 1/10000s menu on the normal screen, using arrow (Effective only in Shutter Priority mode). -
Page 11: Image
WB-Mode: White balance mode, optional Luminance: Brightness adjustment, optional items: Auto, Indoor, Outdoor, One Push, items: 0 ~ 14. Manual, VAR. Contrast: Contrast adjustment, optional AWB Sens: The white balance sensitivity, items: 0 ~ 14. optional items: Low, Normal, High. Sharpness: Sharpness adjustment, optional R Gain: Red gain, optional items: 0 ~ 255 items: Auto, 0 ~ 14. -
Page 12: Setting
5.8 INFORMATION NOISE REDUCTION 2D NR Close Move main menu cursor 3D NR [INFORMATION], and press [HOME] key Return enter the information page, as shown in the following figure. 2D NR: 2D noise reduction, optional items: Close, Auto, 1 ~ 5. INFORMATION 3D NR: 3D noise reduction, optional items: Version... -
Page 13: Maintenance And Troubleshooting
Troubleshooting Image Maintenance and Image have jitter when the camera lens Troubleshooting at max multiple 1) Check whether the camera installed Camera Maintains position be stabled. Use soft cloth or tissue to clean the 2) Check whether have vibrating camera cover. machinery or object near the camera. - Page 14 Contact Us INFOBIT AV PTE. LTD www.infobitav.com info@infobitav.com...
Need help?
Do you have a question about the iCam 200H and is the answer not in the manual?
Questions and answers