Table of Contents
Advertisement
Quick Links
Advertisement
Table of Contents

Related Manuals for Ecoplus ecoPLUS EP-600-UV


Summary of Contents for Ecoplus ecoPLUS EP-600-UV
- Page 1 OWNER’S MANUAL & INSTALLATION GUIDE ecoPLUS™ EP-600-UV PLEASE READ THIS MANUAL CAREFULLY BEFORE ATTEMPTING INSTALLATION. FAILURE TO FOLLOW THESE INSTRUCTIONS MAY AFFECT THE PERFORMANCE OF YOUR SYSTEM, VOID YOUR WARRANTY, AND RESULT IN PROPERTY DAMAGE.
- Page 2 To get maximum performance from your ecoPLUS™ system, we encourage to read this manual in its entirely before installation and operation of your filter.
-
Page 3: Table Of Contents
Table of Contents: GENERAL WARNINGS ………………………………………………………………………………………………………… OPERATING CONDITIONS …………………………………………………………………………………………….…... INSTALLATION ………………………………………………………………………………………………………….…..…..….. Step 1 – Pre-Installation Inspection ……………………………………………………………..……… Step 2 – Selecting an Installation Location ………………………………………………..…..Step 3 – Attach Mounting Bracket to Housing Cap ………………………………..……… Step 4 – Attach Housing Cap to Wall …………………………………………………………………. Step 5 –... -
Page 4: General Warnings
This water treatment system is designed specifically for the treatment of chlorinated city water supplies. ecoPLUS™ is not intended to be used to treat water from private wells or private surface water sources. -
Page 5: Operating Conditions
This water treatment system is designed specifically for the treatment of chlorinated city water supplies. ecoPLUS™ is not intended to be used to treat water from private wells or private surface water sources. If you are unsure of the status of your water supply, please contact your dealer for assistance. -
Page 6: Installation
INSTALLATION WE RECOMMEND THAT YOU READ THIS ENTIRE MANUAL BEFORE STARTING THE ACTUAL INSTALLATION. THE VIQUA UVMAX D4 PREMIUM (UV STERILIZER) OWNER’S MANUAL IS INTEGRAL TO THIS SYSTEM AND SHOULD BE READ IN DETAIL PRIOR TO INSTALLATION. THIS MANUAL IS ENCLOSED WITH YOUR UV STERILIZER. WHILE WE STRONGLY RECOMMEND THAT A LICENSED PLUMBER PERFORM ALL INSTALLATION WORK, A MECHANICALLY-INCLINED HOMEOWNER WITH SUITABLE PLUMBING KNOWLEDGE CAN INSTALL THIS SYSTEM. -
Page 7: Step 1 - Pre-Installation Inspection
Step 1. – Pre-Installation Inspection Inspect all of the components that you received with your unit. You should have received the following:... -
Page 8: Step 2 - Selecting An Installation Location
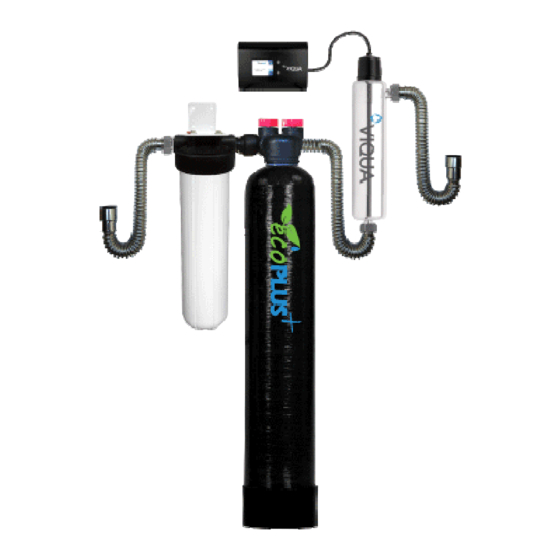
1. ecoPlus™ Media Tank and Valve Head 2. Cartridge Filter Housing Cap 3. Cartridge Filter Housing Sump 4. Sediment Pre-Filter (shipped inside #3) 5. Mounting Bracket 6. Bypass Assembly 7. Flexible Stainless Steel Connectors (1” Quick Connect to 1” NPT) 8. - Page 9 Depending on the configuration of your plumbing system, this is not always possible. ecoPLUS™ should be installed after your pressure tank and booster pump, if applicable, and before your hot water heater.
-
Page 10: Step 3 - Attach Mounting Bracket To Housing Cap
Step 4. – Attach Housing Cap to Wall 9 inches clearance to 19 inches left of bracket clearance to right of bracket 52 3/4 inches from floor to top of bracket Attach the cartridge filter housing cap and mounting bracket to your wall using the remaining four (4) lag bolts and washers as shown below. -
Page 11: Step 4 - Attach Housing Cap To Wall
level to ensure that the bracket is mounted level to the floor. You will need to ensure that there is adequate space on either side of the bracket to accommodate the system. Ideally, you should have approximately 9-12 inches on the left and 19-22 inches on the right, although installation in a smaller space is possible. -
Page 12: Step 7 - Connect The Bypass Assembly To Valve Head
Step 7. – Connect the Bypass Assembly to Valve Head Thread the bypass assembly on to the valve head on the ecoPlus™ media tank as shown. Again, note the position of the fitting stops. The threaded collars of the bypass assembly should thread right up to the fitting stops with no gap. -
Page 13: Step 9 - Connect The Bypass To The Inlet Assembly
Then, turn the collet to securely lock the fitting. Step 9. – Connect Bypass to Inlet Assembly Position the ecoPLUS™ media tank to align the bypass assembly with the inlet assembly attached to the cartridge filter housing cap. - Page 14 Note that the black base of the media tank is not permanently attached to the rest of the tank. If your tank appears to be crooked, the base has likely been knocked out of alignment during shipping. This can be correct by picking the tank up and tapping it on a hard surface while holding it perpendicular to the floor.
-
Page 15: Step 10 - Mount & Install Uv Sterilizer
Locate the 3/4” NPT to 1” NPT flexible stainless steel connector. Connect the 1” end (black) of the flexible stainless steel connector to the outlet assembly on the ecoPLUS™ tank’s bypass. It connects in the same way as a garden hose attaches to an outdoor faucet. Do not use Teflon®... -
Page 16: Step 12 - Connect The System To Inlet And Outlet Pipes
Following completion of the entire installation, restore the water flow by turning on the household main water valve and allow all air to be purged from the plumbing system before turning the power back on to your water heater. Step 12. – Connect System to Inlet and Outlet Pipes The 1 inch NPT stainless steel fitting on the inlet side of the cartridge filter housing cap should be plumbed to your incoming water supply pipe. -
Page 17: Step 13 - Leak Testing And Media Conditioning
Common Installation Configuration: Step 13 – Leak Testing and Media Conditioning Ensure that the bypass valve is in the “bypass” position (see next page for diagram). Turn on the main water supply. Open a cold water tap nearby and let the water run for a few minutes until the system is free of foreign material and air that may have resulted from the installation. - Page 18 INSPECT ALL PLUMBING CONNECTIONS AND THE INTERFACE BETWEEN THE MEDIA TANK AND ITS VALVE HEAD FOR LEAKS AND REPAIR ANY LEAKS FOUND BEFORE PROCEEDING. IN PARTICULAR, INSPECT THE BUSHING ON THE OUTLET OF THE UV STERILZER. WHILE THIS PART IS FACTORY INSTALLED, IT IS NOT LEAK TESTED DURING PRODUCTION.
-
Page 19: Step 14 - System Disinfection
Step 14 – System Disinfection Place the ecoPLUS™ bypass valve in the “bypass” position. Follow the instructions in the Viqua UVMax D4 Premium Owner’s Manual Section 3.2 “Disinfection Procedure” disinfect the UV sterilizer and downstream plumbing. -
Page 20: Maintenance
small black specs or a grey/black discoloration caused by carbon fines (dust). This is normal and will go away on its own. The carbon dust is not harmful. Air trapped in your water lines after installation can sometimes cause the water to appear milky. If you fill a glass of water and it appears milky at first, but clears relatively quickly, this is likely due to micro air bubbles. - Page 21 This is a unique multi-gradient 5 micron sediment filter with high dirt-holding capacity and improved water pressure performance. We strongly recommend the use of only genuine replacement filters in your system. While other filters may fit, they could compromise the performance of your system.
- Page 22 CAUSE DAMAGE TO THE UV CONTROLLER. SUCH DAMAGE IS NOT COVERED UNDER THE MANUFACTURER’S WARRANTY. Media Replacement The media in you ecoPLUS™ system is designed for a life of 5 years or 600,000 gallons, whichever comes first. The replacement media kit for your system is: EP-600-R...
-
Page 23: Validations
Canada. You can be assured that only the finest materials have gone into the manufacture of all ecoPLUS™ systems and that the materials used are safe for potable water contact. The following is a list of key system components:... -
Page 24: Satisfaction Guarantee
Subject the limitations noted below, all other components are warranted by HomePlus Products Inc. to be free of defects in material and workmanship for the following periods: ecoPLUS™ EP-600 Series Media: 600,000 gallons or 5 Years whichever comes first, Pro- rated*... - Page 25 *Note: ecoPLUS™ systems are designed to treat water supplied by a public water utility. The ecoPLUS™ and ecoTAC™ media warranties are void if supplied by untreated well or surface water, or if feed water falls outside of the specified operating conditions.
- Page 26 The original warranty period does not change in the event of part replacement by HomePlus Products Inc. This warranty is issued exclusively to the original consumer purchaser of record so long as the product remains installed in the original location of installation, and is not transferable. The provisions of the foregoing warranties are in lieu of any other warranty, whether expressed or implied, written or oral (including any warranty of merchantability or fitness for a particular purpose).
Need help?
Do you have a question about the ecoPLUS EP-600-UV and is the answer not in the manual?
Questions and answers