Advertisement
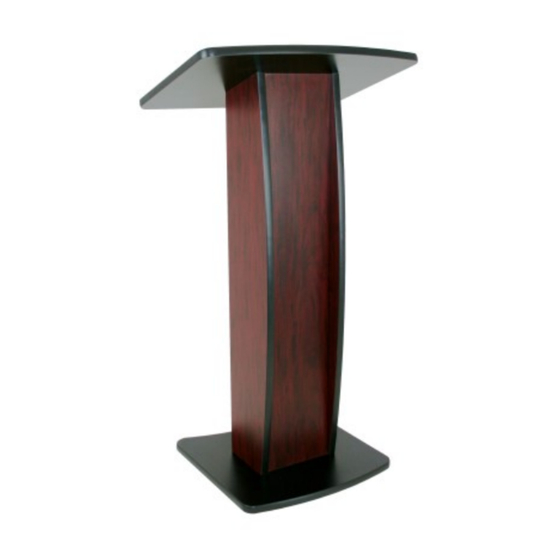
Thank you for choosing the Capri W360 Lectern from AmpliVox Portable Sound Systems.
We are excited in introducing this truly unique lectern. Our lectern combines flexibility with func-
tionality. Please refer to this user guide as you enjoy the unique capabilities of another quality
product from AmpliVox Portable Sound Systems.
We encourage you to visit our website www.ampli.com to register your product for its warranty
coverage, sign up to receive our newsletter, download our catalog, and learn more about the
complete line of AmpliVox audio visual products, including portable PA systems, and other lec-
terns.
GETTING STARTED:
Unpack all pieces. Save the packing and the box in case you need to return the lectern
for any reason. Make sure you have all the pieces and check for any damage.
Parts List
•
Reading Surface
•
Column
•
Base
TOOLS NEEDED: None
ASSEMBLY:
ATTACH COLUMN TO BASE:
Place the column on the floor laying on its
side (Fig.1). Bottom of column is flat, top is
angled. Backside is the low point of the top
angled surface. Take the base with the large
block facing the underside of column and
insert the block into column. Secure with
long thumb screw (Item 2) and
large washer (Item 3). Screw until tight.
STAND COLUMN UPRIGHT ON BASE
ATTACH READING TABLE:
The Reading Table has two wood blocks attached to
the bottom. The large block with the angle cut on one
side fits down into the large opening of the column. The
black wood block fits over the outside edge of column.
Position the reading table with the book stop at the low
point of column angle. Lower onto column. It is a close
fit for the two blocks. When you have the reading table
sitting flat on column, push the reading surface forward
until it stops. Take short thumb screw (Item 1) and go-
black wood block,
ing through hole in
sert until tight, securing reading table to column.
IF YOU HAVE ANY QUESTIONS OR PROBLEMS PLEASE CALL
OUR CUSTOMER SERVICE DEPARTMENT AT 1-800-267-5486
•
Reading Table Thumb Screw - Item 1
•
Long Thumb Screw - Item 2
•
Large Washer - Item 3
Top of column
screw into in-
Assembly Instructions
Capri W360
Ready to Assemble Lectern
1
3
Wood color in pictures may not match your lectern
Fig. 1
Bottom of column
Fig. 2
2
HARDWARE
2 & 3
Front
Base
CONTINUE
1
Advertisement
Table of Contents

Summary of Contents for AV Amplivox Capri W360
- Page 1 Capri W360 Ready to Assemble Lectern Thank you for choosing the Capri W360 Lectern from AmpliVox Portable Sound Systems. We are excited in introducing this truly unique lectern. Our lectern combines flexibility with func- tionality. Please refer to this user guide as you enjoy the unique capabilities of another quality product from AmpliVox Portable Sound Systems.
- Page 2 ASSEMBLY - CONTINUED • If assembled correctly, your new lectern should ● If you purchased the optional casters, look like this. SA360-01, please me careful when using lectern. Lectern can become unstable if leaned on. WARRANTY Limited Six (6) -Year Warranty AmpliVox warrants this product to be free from defects in materials and workmanship (subject to the terms set forth below) for a period of six (6) years from the date of purchase (“Warranty Period”).
Need help?
Do you have a question about the Capri W360 and is the answer not in the manual?
Questions and answers