Table of Contents
Advertisement
MULTITRACK CASSETTE RECORDER
Owner's Manual
1
GAIN
GAIN
LINE
MIC
LINE
HIGH
HIGH
–12
+12
–12
FREQ
FREQ
250
5k
250
MID
MID
–12
+12
–12
LOW
LOW
–12
+12
–12
AUX
AUX
1
1
0
10
AUX
AUX
2
2
0
10
CUE
CUE
P
A
N
L
R
L
E
V
E
L
0
10
MIC/
MIC/
TAPE
LINE
LINE
TAPE
FLIP
MIC/
TAPE
LINE
PAN
PAN
L
R
ODD
EVEN
ODD
GROUP ASSIGN
GROUP ASSIGN
1
2
3
4
1
PEAK
SIGNAL
10
10
9
9
8
8
7
7
6
6
5
5
4
4
3
3
2
2
1
1
0
0
1
2
3
4
5
6
GAIN
GAIN
MIC
LINE
MIC
LINE
MIC
HIGH
HIGH
HIGH
HIGH
HIGH
+12
–12
+12
–12
+12
–12
+12
–12
+12
FREQ
FREQ
FREQ
FREQ
FREQ
5k
250
5k
250
5k
250
5k
250
5k
MID
MID
MID
MID
MID
+12
–12
+12
–12
+12
–12
+12
–12
+12
LOW
LOW
LOW
LOW
LOW
+12
–12
+12
–12
+12
–12
+12
–12
+12
AUX
AUX
AUX
AUX
AUX
1
1
1
1
1
0
10
0
10
0
10
0
10
0
10
AUX
AUX
AUX
AUX
AUX
2
2
2
2
2
0
10
0
10
0
10
0
10
0
10
CUE
CUE
CUE
CUE
CUE
P
P
P
P
P
A
A
A
A
A
N
N
N
N
N
L
R
L
R
L
R
L
R
L
R
L
L
L
L
L
E
E
E
E
E
V
V
V
V
V
E
E
E
E
E
L
L
L
L
L
0
10
0
10
0
10
0
10
0
10
MIC/
MIC/
TAPE
TAPE
TAPE
LINE
TAPE
LINE
TAPE
LINE
LINE
LINE
FLIP
MIC/
TAPE
FLIP
MIC/
TAPE
FLIP
MIC/
TAPE
FLIP
LINE
TAPE
FLIP
LINE
TAPE
LINE
LINE
LINE
PAN
PAN
PAN
PAN
PAN
L
R
L
R
L
R
L
R
L
R
EVEN
ODD
EVEN
ODD
EVEN
ODD
EVEN
ODD
EVEN
ODD
GROUP ASSIGN
GROUP ASSIGN
GROUP ASSIGN
GROUP ASSIGN
GROUP ASSIGN
2
3
4
1
2
3
4
1
2
3
4
1
2
3
4
1
2
3
4
PEAK
PEAK
PEAK
PEAK
PEAK
SIGNAL
SIGNAL
SIGNAL
SIGNAL
SIGNAL
10
10
10
10
10
9
9
9
9
9
8
8
8
8
8
7
7
7
7
7
6
6
6
6
6
5
5
5
5
5
4
4
4
4
4
3
3
3
3
3
2
2
2
2
2
1
1
1
1
1
0
0
0
0
0
2
3
4
5
6
7
8
9-10
11-12
13-14
ST-INPUT
ST-INPUT
ST-INPUT
HIGH
–12
+12
–12
+12
0
10
0
10
0
10
FREQ
1
2
1
2
1
2
250
5k
250
5k
MID
3
4
3
4
3
4
–12
+12
–12
+12
LOW
GROUP
MASTER
TAPE IN
–12
+12
–12
+12
AUX
1
0
10
0
10
0
10
0
10
AUX
MIX LEVEL
GROUP
1
TO
2
MONITOR
TO
STEREO
0
10
0
10
TAPE IN
CUE
1
3
P
P
A
A
GROUP
N
N
0
10
GROUP
2
2
4
L
R
L
R
L
L
E
E
V
V
E
E
L
L
STEREO
0
10
0
10
TAPE
LINE
TAPE
0
10
CUE
GROUP
3
MONITOR
FLIP
LINE
FLIP
TAPE
LINE
SELECT
PAN
MIN
MAX
L
R
L
R
0
10
MONITOR LEVEL
EVEN
ODD
EVEN
GROUP
4
GROUP ASSIGN
ON
CUE MIX
TO STEREO
OFF
1
2
3
4
1
2
3
4
PEAK
PEAK
SIGNAL
SIGNAL
10
10
10
9
9
9
8
8
8
7
7
7
6
6
6
5
5
5
4
4
4
3
3
3
2
2
2
1
1
1
0
0
0
7
8
STEREO
NOISE REDUCTION SYSTEM
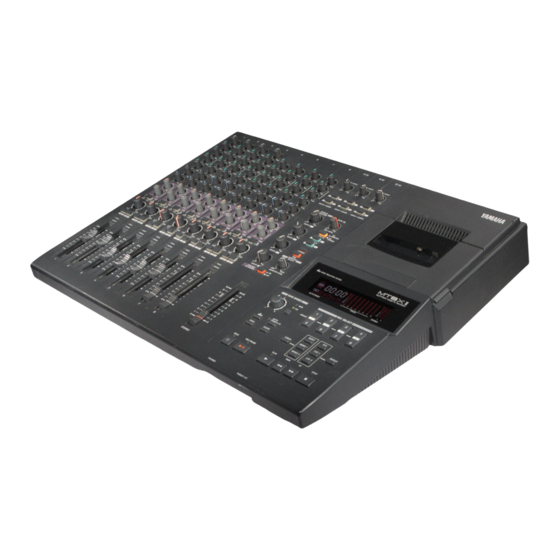
MULTITRACK CASSETTE RECORDER
+9
+9
+6
+6
+3
+3
0dB
0dB
–3
–3
–6
–6
1
–10
–10
dbx
IN
TAPE
MEMO
REPEAT
–20
–20
L
R
SYNC
OUT
2
REC
1
2
3
4
5
6
7
8
AUTO PUNCH
STEREO
TRACK
TAPE SPEED
REC SELECT
0
VARI
1
2
3
4
FIX
GROUP
1
2
3
4
5
6
7
8
–
+
AUTO
PUNCH I/O
RESET
RTZ
SYNC
CLEAR
CHECK
MEMO 1
LOC 1
REPEAT
MEMO 2
LOC 2
REHE
REC/PAUSE
PLAY
REW
FF
STOP
PHONES
PUNCH I/O
E
Advertisement
Table of Contents

Related Manuals for Yamaha MT8XII


Summary of Contents for Yamaha MT8XII
- Page 1 MULTITRACK CASSETTE RECORDER Owner’s Manual GAIN GAIN GAIN GAIN LINE LINE LINE LINE HIGH HIGH HIGH HIGH –12 –12 –12 FREQ FREQ FREQ FREQ –12 –12 –12 –12 –12 –12 MIC/ MIC/ MIC/ MIC/ TAPE TAPE TAPE LINE LINE LINE LINE TAPE FLIP...
- Page 2 1. IMPORTANT NOTICE: DO NOT MODIFY THIS UNIT! This product, when installed as indicated in the instructions contained in this manual, meets FCC requirements. Modifications not expressly approved by Yamaha may void your authority, granted by the FCC, to use the product.
- Page 3 C A U T I O N RISK OF ELECTRIC SHOCK DO NOT OPEN CAUTION: TO REDUCE THE RISK OF ELECTRIC SHOCK, DO NOT REMOVE COVER (OR BACK). NO USER-SERVICEABLE PARTS INSIDE. REFER SERVICING TO QUALIFIED SERVICE PERSONNEL. SAFETY INSTRUCTIONS Read Instructions —...
- Page 4 fire and electrical shock hazard. • If you plan not to use MT8XII for a long period of time (such as when you are on vacation), remove the AC power cord from the AC outlet. Leaving MT8XII connected is a fire hazard.
- Page 5 If interference does occur, relocate the affected equipment. Copyright © 1996 Yamaha Corporation. All rights reserved. No part of the MT8XII software or this Owner’s Manual may be reproduced or distributed in any form or by any means without the prior written authorization of Yamaha Corporation. Trademarks The dbx noise reduction system is manufactured based on a patent license from THAT Corporation.
-
Page 6: Table Of Contents
MT8XII Features ..........1 Buying Cassette Tapes for the MT8XII ......2 MT8XII Recording Format . - Page 7 9. The MT8XII & MIDI ....40 Using the MT8XII in a MIDI System ....... 40 SYNC Signal Formats .
-
Page 8: Welcome To The Mt8Xii
Thank you for choosing the Yamaha MT8XII Multitrack Cassette Recorder. The MT8XII is a high-quality, easy-to-use multitrack cassette recorder that will allow you to capture your music at a very high level of quality. To take best advantage of your MT8XII, read this Owner’s Manual thoroughly. -
Page 9: Buying Cassette Tapes For The Mt8Xii
If you turn over an MT8XII cassette you’ll hear the tracks play backwards. This is because the MT8XII uses the full width of the tape to record eight tracks. The tape speed is also different. Normal cassette recorders run at 4.8 cm/second. Whereas the MT8XII runs at 9.5 cm/second, providing greater sonic performance. -
Page 10: Touring The Mt8Xii
Touring the MT8XII This chapter takes you on a tour of the MT8XII, identifying the various parts to help you become familiar with your new recorder. Topside View GAIN GAIN GAIN GAIN LINE LINE LINE LINE HIGH HIGH HIGH HIGH HIGH –12... -
Page 11: Input Channels
Touring the MT8XII Input Channels GAIN This rotary control adjusts the sensitivity of the MIC/LINE input so that both microphone and line-level signals can be handled with ease. LINE HIGH These rotary controls are used to boost and cut the high, middle, and low fre- quency bands independently. -
Page 12: Stereo Inputs
4. The Stereo input signals could be the stereo output signals from another mixer or external effects processor. Note that the Stereo input signals are always sent to the Stereo bus for mixing regardless of these switch settings. Stereo Inputs MT8XII—Owner’s Manual... -
Page 13: Master Section
Touring the MT8XII Master Section GROUP TAPE IN MASTER MIX LEVEL GROUP MONITOR STEREO TAPE IN GROUP GROUP STEREO GROUP MONITOR SELECT MONITOR LEVEL GROUP CUE MIX TO STEREO STEREO MT8XII—Owner’s Manual GROUP MASTER level controls These rotary controls adjust the levels of the group signals that are fed to the tracks. -
Page 14: Display
TAPE indicator This indicator light up when a tape is loaded into the MT8XII. If you press a transport button when no tape is loaded, the tape indicator flashes, indicating that no tape is loaded. Track record indicators These indicators show which tracks are selected for recording. -
Page 15: Transport Section
This button is used to turn on and off the dbx noise reduction system. The dbx indicator on the display lights up when dbx is turned on. The dbx system is turned on automatically each time the MT8XII is turned on. AUTO PUNCH I/O button and indicator This button is used to turn on and off the Auto Punch In/Out function. - Page 16 MEMO 1, MEMO 2—These button are used to store the Memo 1 and Memo 2 locate points. The respective memo indicator on the display flashes three times and then lights up continu- ously when a memo point is stored. Memo points are not stored when the MT8XII is turned off. Tape transport buttons REHE—This button is used to enter Rehearse Pause mode.
-
Page 17: Rear Panel Connectors
The processed signals can then be mixed into the MT8XII stereo mix or recorded to tracks. POWER ON/OFF switch This switch is used to turn on and off the MT8XII. AC IN Connect the supplied power cord here. - Page 18 These phono jacks are used to send the tape playback signals or group signals to another mixer. This is useful when you use the MT8XII in conjunction with a sub mixer. Connect them to the line inputs on the other mixer. When the MT8XII is not recording or playing, the group signals...
-
Page 19: Front Connectors
A pair of stereo headphones can be connected here for monitoring. The headphone signal is the same as the MONITOR OUT signal. PUNCH I/O An optional footswitch, such as the Yamaha FC5, can be connected here for foot-controlled punch in/out. MT8XII—Owner’s Manual... -
Page 20: The First Session
The First Session This chapter explains how to record and mix your first MT8XII session. If this is your first time with a multitrack recorder, we recommend that you start with this chapter and follow all the procedures closely. When you’ve completed this chapter, have a look at subsequent chapters, which explain more advanced MT8XII functions and require a basic knowledge of the MT8XII and multitrack recording techniques. -
Page 21: Quick-Start System
The microphones, synthesizer, guitar, and drum box are examples of the kind of sound sources that can be connected to the MT8XII. For monitoring, you can use either headphones or a mon- itor amp and speakers. Alternatively, you could use your hi-fi amp and speakers. The master recorder is required for mixdown. -
Page 22: Recording The First Track
Recording the First Track Destination Track Track 1 or Track 5 Track 2 or Track 6 Track 3 or Track 7 Track 4 or Track 8 Destination Group Group 1 Group 3 EVEN Group 2 Group 4 EVEN MT8XII—Owner’s Manual... -
Page 23: Listening To The First Track
flashing and lights up continuously. The MT8XII waits in Record Pause mode. The MT8XII is now ready to record. All you have to do to start recording is press the [PLAY] button. So make sure that your music source is ready to go. If you want to cancel Record Pause mode, press the [STOP] button. - Page 24 14. Press the [REC/PAUSE] button. The REC/PAUSE indicator lights up. The circle around the number of the selected track stops flashing and lights up continuously. The MT8XII waits in Record Pause mode. Note: You could press the [REHE] button instead to rehearse the overdub.
-
Page 25: Mixdown
Apply Effects—Use the AUX SENDs to patch in external effects processors. See Using Effects on page 33 for more information. 9. Record the final mix to your stereo master recorder. That’s it! You’ve completed your first session with the MT8XII. MT8XII—Owner’s Manual... -
Page 26: Multi-Source Mixing
MT8XII input. If you are using the MIC/LINE inputs to connect MIDI-controlled instru- ments, such as tone generators, synthesizers, and samplers, you can use the EQ and effects func- tions built into these devices. -
Page 27: An Overview Of Multitrack Recording
Ping-Pong—This technique allows you to mix and record several tracks onto another track. This is often used to free up tracks for more recording. So although the MT8XII is an eight-track recorder, you can actually record more than eight tracks using the ping-pong technique. You can also combine ping-pong with overdub recording. -
Page 28: About Monitoring
STEREO OUT signals and is typically used during mixdown. It can also be used to monitor signals that are not going to be recorded by the MT8XII, such as a MIDI tone generator that is controlled by a MIDI sequencer. In this case, the tone generator is only monitored while other sounds are recorded on the MT8XII. -
Page 29: Punch In/Out Recording
Punch in/out techniques allows you to rerecord specific sections of a track. This can be used to correct mistakes or record something new into silent sections of a track. The MT8XII allows you to perform punch in/outs manually or automatically. Manual punch in/out can be per- formed using a footswitch, leaving your hands free. -
Page 30: Manual Punch In/Out
Through the CUE monitor (i.e., [FLIP] switch in the up position) you’ll hear the existing sound playback. 6. Press the [STOP] button to stop playback. The following illustration shows how punch in/out works with the [REC/PAUSE] button. SELECT PLAY Manual Punch In/Out Out Point In Point Play Record Play REC/PAUSE PLAY STOP MT8XII—Owner’s Manual... -
Page 31: Using The Rec Select Buttons
Instead of pressing the [PLAY] button you could have pressed the [REC SELECT] button to punch out. In this case, the MT8XII remains in Play Record Wait mode, so you can punch in again using the [REC SELECT] buttons. -
Page 32: Using A Footswitch
Through the CUE monitor (i.e., [FLIP] switch in the up position) you’ll hear the existing sounds playback. 8. Press the [STOP] button to finish. The following illustration shows how punch in/out works with a footswitch. SELECT Record Pause REC/PAUSE Using a Footswitch In Point Out Point Play Record Play MT8XII—Owner’s Manual STOP... -
Page 33: Auto Punch In/Out
You can rehearse the punch in/out repeatedly until you are ready to perform the punch in/out for real. An optional footswitch can be connected to the PUNCH I/O jack on the MT8XII for use with the Auto Punch In/Out function. Setting the Punch In/Out Points 1. -
Page 34: Rehearsing Auto Punch
Auto Punch In/Out for real. If you pressed the [REPEAT] button in Step 1, the MT8XII will rehearse the Auto Punch In/Out repeatedly until you press the [STOP] button. Pressing the [STOP] button at anytime during the punch in/out sequence stops the tape, and rewinds back to the pre-roll point. -
Page 35: Performing Auto Punch For Real
Playback continues up to the post-roll point. Then the tape rewinds back to the pre-roll point. Press the [PLAY] button to audition the punch in/out. The following illustration shows the Auto Punch Record sequence. SELECT REC/PAUSE MT8XII—Owner’s Manual Punch-in Pre-roll point point... -
Page 36: Ping-Pong Recording
Those tracks are then used for further recording. Although the MT8XII is a eight-track recorder, effectively you can record more than eight tracks using this technique. The only drawback is that once several tracks have been bounced, you can- not adjust the individual sounds. -
Page 37: Preparing For Ping-Pong
The REC/PAUSE indicator lights up and the circle flashes around the corresponding track indi- cator stops flashing and lights up continuously. 13. Press the [PLAY] button to start recording. Recording starts and the PLAY indicator lights up. 14. When the song has finished, press the [STOP] button. MT8XII—Owner’s Manual... -
Page 38: Checking The Ping-Pong Operation
Track 2 Track 1 Track 1 Track 8 Track 8 Track 7 Track 7 Track 6 Track 6 Track 5 Track 5 Track 4 Track 4 Track 3 Track 3 Track 2 Track 2 Track 1 Track 1 MT8XII—Owner’s Manual... -
Page 39: Ping-Pong With Overdub
6. Use the ASSIGN switches and PAN control to assign the signal to the desti- nation track. 7. Continue with Preparing for Ping-Pong on page 30. During rehearsal, balance the level of the new source with the existing tracks. MT8XII—Owner’s Manual Source Tracks GAIN... -
Page 40: Using Effects
The input channel AUX controls are used to send signals to the effects processors. The processed signal is returned to the MT8XII through a ST INPUT and mixed with the original, unprocessed signal to achieve a balance before being recorded to an MT8XII track, or the master recorder during mixdown. -
Page 41: Applying Effects At Mixdown
Use the input channel fader to adjust the level of the unprocessed signal. Set the MONITOR SELECT to GROUP to monitor both signals. With the balance set, you’re ready to perform the ping-pong operation. MT8XII—Owner’s Manual... -
Page 42: Patching In Signal Processors
The INSERT I/O connections, which use TRS (Tip, Ring, Sleeve) phone jacks, are two-way con- nections, with the tip carrying the output signal from the MT8XII to the external processor and the ring carrying the output signal from the external processor back into the MT8XII. You need special insert cables to do this. -
Page 43: Tape Speed & Mixing Tips
MT8XII. Then record the solo at the slower speed and pitch. When you play back the recording at normal pitch, you have a super-fast guitar solo that’s in tune with everything else. -
Page 44: Mixing Tips
Mixing Tips This section provides tips and techniques for achieving the perfect MT8XII mix. • Inputs—for mixdown, the [FLIP] switches are set to the down position and the eight input channels feed the tape signals to the Stereo bus for mixing. Combined with the ST INPUTs, which can be used to connect external effects processors, this provides 14 input sources. -
Page 45: Quick Locate & Repeat Playback
When the memo point is located, the MT8XII stops. If you want the MT8XII to start playback as soon as the memo point is located, press the [PLAY] button while the memo point is being located. The PLAY indicator flashes and playback starts as soon as the memo point is located. -
Page 46: Repeat Playback
The MT8XII locates the Memo 1 point and starts repeated playback between the two memo points. The REPEAT indicator appears on the display. Playback is repeated 16 times. Then the MT8XII locates the Memo 1 point and stops. You can stop playback at anytime by pressing the [STOP] button. Pressing the [REPEAT] button during repeat playback cancels the Repeat function, the MT8XII continues normal playback. -
Page 47: The Mt8Xii & Midi
MIDI sequencer, but only the MIDI sequencer will respond. The SYNC signal is recorded and played back on Track 8 of the MT8XII, so you cannot use this track for recording. You can, however, still use Input Channel 8 as an input channel. Although, it’s best to keep the [FLIP] switch on channel 8 in the up position and the CUE LEVEL control... -
Page 48: Connecting The Mt8Xii To A Midi System
In this system, an FSK/MIDI converter, such as the Yamaha YMC10, is used to generate the FSK signal that is recorded onto Track 8 of the MT8XII. During playback, the FSK signal is converted to a MIDI Clock signal. When the drum box and synthesizer with onboard sequencer receive the MIDI Clock signal, they both playback in synchronization. - Page 49 In this system, a SMPTE/MIDI converter is used to generate the SMPTE timecode that is recorded onto Track 8 of the MT8XII. It has a MIDI merge function that merges the MIDI Clock information derived from the SMPTE timecode with the MIDI performance data from the syn- thesizer.
-
Page 50: Striping The Tape
The SYNC indicator lights up for FSK operation or flashes for SMPTE timecode operation. It’s important that you set the MT8XII to work with the SYNC signal format that you are using, and use the same setting for synchronized playback. -
Page 51: Mt8Xii Applications
A stereo pair of headphones is used for monitoring. The MT8XII provides four-track simultaneous recording. So there are two options for one-take recording: 1) mix and record all inputs to four tracks. 2) Record the four backing tracks first, then record the remaining tracks while monitoring the backing tracks. -
Page 52: Midi Home Studio
In the following MIDI home studio system example, all instruments are recorded to the MT8XII. Recording the MIDI instruments could be left until the final mixdown, since the MIDI sequencer provides repeatable playback and is synchronized to the MT8XII using SMPTE time- code. -
Page 53: Multi-Source Mixing
MT8XII Applications Multi-Source Mixing This example shows how multiple sound sources can be mixed on the MT8XII. To start, an SMPTE SYNC signal is recorded on Track 8. This is used to synchronize the MIDI sequencer that in turn controls the MIDI instruments, which are permanently connected to the MT8XII and are recorded to tape only at mixdown. -
Page 54: Using The Tape Out/Group Outs
The TAPE OUT/GROUP OUT connectors can be used to send the tape playback signals or group signals to other equipment. The MT8XII has four groups buses. So up to four group sig- nals can be output simultaneously. During playback, the eight tape signals are output. -
Page 55: Troubleshooting
Troubleshooting Troubleshooting If you’re having difficulty operating MT8XII or it doesn’t seem to work as expected, look up the symptoms in the following table and follow the advice provided. Symptom MT8XII cannot be turned on! Cannot listen to a connected... -
Page 56: Appendix
10 hours of use, whichever comes first. For easy access to the tape heads and other parts, MT8XII features a Maintenance mode. In this mode, the tape heads are raised just like when a cassette is inserted. To enter Maintenance mode: 1. - Page 57 Caution: Turn off the MT8XII before demagnetizing the record–play head. The demagnetizer should be turned on away from the MT8XII, passed slowly across the face of the record–play head, and then drawn away slowly from the MT8XII and turned off.
-
Page 58: Specifications
80 dB/IHA-F (at 3% distortion level, dbx NR on) 2% (400 Hz, –10 dB) 60 dB (1 kHz, –10 dB, dbx NR on) 55 dB (1 kHz, 0 dB) dbx NR (SYNC position: TR8 = off) Specifications (Bias: HIGH, EQ: 70 s) MT8XII—Owner’s Manual... - Page 59 GROUP OUT 1–8 SYNC OUT 0 dB is referenced to 0.775 V r.m.s. Specifications are subject to change without notice. MT8XII—Owner’s Manual Local AC Current 46 W 530 x 132.6 x 416.4 mm (20.8" x 5.2" x 16.4") 7.6 kg (16.7 lbs) AC power cord, Owner’s Manual, cleaning kit...
-
Page 60: Block Diagram
Block Diagram Block Diagram HIGH HIGH HIGH FREQ FREQ FREQ MT8XII—Owner’s Manual... -
Page 61: Dimensions
Appendix Dimensions W:530 MT8XII—Owner’s Manual... -
Page 62: Glossary
Clipping—The unwanted distortion effect of overloading an audio circuit with a signal that is too large. Care must be taken when setting the MT8XII GAIN controls so as not to overload the recording circuits. See Recording the First Track on page 15 for more information. - Page 63 Post Fader—A point in the signal path after a fader. The signals for the MT8XII AUX controls are sourced post-fader. So as well as turn up the AUX control, you must also raise the fader. This has the advantage that the level of the processed signal from the external effects processor is con- trolled in unison with the unprocessed signal that is controlled by the fader.
- Page 64 MIDI sequencer. You can record a FSK or SMPTE timecode SYNC signal onto MT8XII Track 8. This should be done before recording anything else. Tracking—The process of recording sounds to tracks on a audio recorder. Also know as laying down tracks and just plain simple recording.
- Page 65 STEREO TAPE IN GROUP GROUP STEREO LINE TAPE GROUP MONITOR TAPE FLIP LINE SELECT MONITOR LEVEL EVEN GROUP GROUP ASSIGN CUE MIX TO STEREO PEAK SIGNAL STEREO Session Info Title: Date: Step: Process: Notes: YAMAHA CORPORATION P.O.Box 1, Hamamatsu, Japan...
Need help?
Do you have a question about the MT8XII and is the answer not in the manual?
Questions and answers