
Summary of Contents for MeshNetworks MEA PWR6300
- Page 1 Portable Wireless Router User’s Guide Version 3.0 Copyright 2003-2004, MeshNetworks, Inc. All Rights Reserved...
- Page 3 MeshNetworks’ products and technology are protected by US and international patent and patent pending technology. This document represents the current MEA design; the contents are subject to change at any time at the discretion of MeshNetworks, Inc. MEA, MeshTray, and MeshNetworks’ logo are trademarks or registered trademarks of MeshNetworks, Inc.
-
Page 5: Table Of Contents
PWR User’s Guide Table of Contents PORTABLE WIRELESS ROUTER ..................1 Introduction......................... 1 What’s in the Box ....................... 1 INSTALLATION REQUIREMENTS..................1 Portable Wireless Router (PWR) ................1 2.1.1 Equipment ......................2 Record MAC Address of the PWR6300 ..............3 PWR6300 Assembly .................... - Page 6 MeshNetworks 3.1.5 Restoring Factory Defaults Normal Operations..........18 3.1.6 Changing the Web Password ................20 3.1.7 Upgrading the Device Firmware ..............22 External Device Provisioning .................. 24 3.2.1 Connecting to the Ethernet Port ..............25 Infrastructure Requirements ................... 25 3.3.1 PWR MAC Addresses ..................
- Page 7 PWR User’s Guide List of Figures Figure 2-1 PWR6300 Identification Label ................3 Figure 2-2. PWR External Connection Point ...............3 Figure 3-1. Enter Network Password Initial Web Page Authentication Dialog ....7 Figure 3-2. MEA Device Administration Redirecting Web Page.........8 Figure 3-3. MEA Device Administration Home Page (Super User Login)......9 Figure 3-4.
-
Page 9: Portable Wireless Router
IP devices via its built-in RJ45 Ethernet port. The PWR efficiently combines the functionality of a MeshNetworks Wireless Router and client modem in to a single cost-effective wireless network component. This makes it easy for any Ethernet ready device to access a MeshNetworks Enabled Architecture (MEA™) mobile broadband network. -
Page 10: Equipment
Wireless Modem Card into a single device. By adding an Ethernet port to a Wireless Router, MeshNetworks enables video cameras, computers or any other Ethernet-capable device to get high-speed access to the MEA wireless broadband network, without the need to purchase a separate Wireless Modem Card. -
Page 11: Record Mac Address Of The Pwr6300
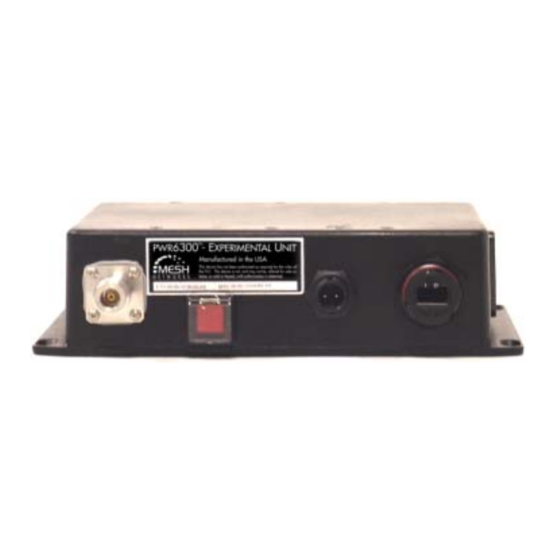
PWR User’s Guide Record MAC Address of the PWR6300 The transceiver and SBC (Ethernet) MAC addresses are recorded on the label located on front side of the PWR unit. Record these numbers in the PWR MAC Addresses table, because they will be required later to configure and provision the device. -
Page 12: Deployment
MeshNetworks Mount the PWR in a traffic cabinet or kiosks. The device is not waterproof. The device should be reasonable protected from moisture and other exposed outdoor environments. Refer to the mounting procedure in the assembly section of this document. -
Page 13: Testing
PWR User’s Guide Maximize chance of a direct line of sight connection to other devices. The antenna supplied is designed to be mounted vertically. 2.3.3 Testing Verify the operation of the PWR6300 using the following procedure: 1. Apply power to the PWR6300 – power reset button will be illuminated to red. 2. -
Page 14: Installing The Mea Portable Wireless Router
MeshNetworks 3 Installing the MEA Portable Wireless Router Device Administration: Configuring the PWR Devices The PWR provides network access to one or more IP devices connected to the Ethernet port of the PWR. In order for the PWR to provide service to the IP devices, some configuration must be set up prior to connecting the IP devices. -
Page 15: Figure 3-1. Enter Network Password Initial Web Page Authentication Dialog
PWR User’s Guide Once the web browser is directed to the web page of the PWR, you will be prompted for a username and password. A dialog box similar to the following should show up if you are using Internet Explorer: Figure 3-1. -
Page 16: Figure 3-2. Mea Device Administration Redirecting Web Page
MeshNetworks After the login authentication has been completed, the web browser will display a redirecting page, and your browser will automatically transition to the home web page for MEA Device Administration. Figure 3-2. MEA Device Administration Redirecting Web Page... -
Page 17: Figure 3-3. Mea Device Administration Home Page (Super User Login)
PWR User’s Guide Figure 3-3. MEA Device Administration Home Page (Super User Login) The MEA Device Administration home page provides you with some basic information about the device, including the IP addresses assigned to the device, the MAC addresses of the device, the firmware revision number, and the reported link quality for the link to the IAP. -
Page 18: Configuring The Device
MeshNetworks 3.1.2 Configuring the Device Once you have accessed the MEA Device Administration home page, click on the Configuration tab to display the IP address configuration. Figure 3-4. EWR (PWR) Device Administration Configuration Page (Super User Login) The EWR (PWR) Device Administration (Super User Login) page will allow you to change the configuration of the PWR. -
Page 19: Device Addressing
PWR User’s Guide Field Name Field Description Field Default Value RDATE Server IP The IP address of the RDATE server. This is 172.31.0.20 Address usually MiSC when operating infrastructure mode. RDATE server provides the current date to the EWR. The EWR can operate without an RDATE server. -
Page 20: Statically Provisioned Scheme
MeshNetworks The server may be configured by the operator to hand out temporary or static leases. The user must associate and acquire an address from the network before establishing communications. Once a lease has been granted, the address may be dragged out of network coverage for the remainder of the lease or, if a static lease was granted, until the next power cycle. -
Page 21: Setting The User Supplied Ip Address
PWR User’s Guide manager. The network manager can also limit the user-selectable schemes or force a specific scheme. Devices in each of these schemes can interoperate and communicate with each other, so long as the assigned addresses do not conflict and are mutually routable. 3.1.2.5 Setting the User Supplied IP Address In order to set the user-supplied IP address for the EWR, the User-Supplied radio button must... -
Page 22: Figure 3-6. System Update Save Completed Web Page
MeshNetworks Figure 3-6. System Update Save Completed Web Page After the settings have been saved, click the Finished button. Your web browser should return to the MEA Device Administration home page. A reboot of the device is not required for the... -
Page 23: Resetting The Pwr
PWR User’s Guide 3.1.3 Resetting the PWR Although you should not have to reset the PWR device, the device can be commanded to reset via the web pages. In order to reset the device, return to the MEA Device Administration home page, and click on the Reset the Device link in the Device Management panel. -
Page 24: Figure 3-8. Device Reset In Progress Web Page
MeshNetworks Figure 3-8. Device Reset in Progress Web Page NOTE: After the completion of the reset, you may experience a significant delay when bringing up another web page. Please be patient. -
Page 25: Restoring Factory Settings - User Supplied Mode Limitations
PWR User’s Guide 3.1.4 Restoring Factory Settings – User Supplied Mode Limitations NOTE: In Release 3.0, there is a known issue that arises if the selected device addressing mode is User-Supplied when the user restores the factory default settings for the PWR. -
Page 26: Restoring Factory Defaults Normal Operations
MeshNetworks 3.1.5 Restoring Factory Defaults Normal Operations When the Restore Factory Defaults function is selected from the EWR (PWR) Device Administration Home Page, the device will present the following web page: Figure 3-9. Restore Factory Settings Web Page The Restore Factory Defaults function allows the operator to return the device to factory defaults. -
Page 27: Figure 3-10. Confirm Changes Window For Restore Factory Settings
PWR User’s Guide Figure 3-10. Confirm Changes Window for Restore Factory Settings The Factory Settings Restored page will be displayed. Figure 3-11. Factory Settings Restored Web Page Click on the Finished button to complete the reset procedure. -
Page 28: Changing The Web Password
MeshNetworks 3.1.6 Changing the Web Password When the Change Admin Password function is selected from the PWR Device Administration Home Page by the administrator, or the Change User Password function is selected, the device will present the following web page: Figure 3-12. -
Page 29: Figure 3-13. Confirm Changes Window For Enter New Password
PWR User’s Guide Figure 3-13. Confirm Changes Window for Enter New Password When the operator confirms the change, the new password will be stored in flash, and the device will present a status screen indicating that the change was successful. Figure 3-14. -
Page 30: Upgrading The Device Firmware
MeshNetworks 3.1.7 Upgrading the Device Firmware The web interface for the device also provides the ability to upgrade the firmware on-site. To use this feature, you must have an upgrade file from a released upgrade package. When the Upgrade Device Firmware function is selected from the EWR (PWR) Device Administration Home Page, the device will present the following web page: Figure 3-15. -
Page 31: Figure 3-17. Firmware Upload Progress Web Page
PWR User’s Guide Once the filename has been confirmed, the web browser will transmit the file to the device, and the device will present an upgrade progress screen. This page will indicate the current stage in the upgrade process. Figure 3-17. Firmware Upload Progress Web Page Once the upgrade is completed, the device must be reset. -
Page 32: External Device Provisioning
MeshNetworks External Device Provisioning Figure 3-18. External Device Provisioning Table The External Device Provisioning table is used to configure addresses for the attached nodes on the local ethernet segment. Up to three addresses are provisioned. The Enable checkbox indicates this row contains a valid address. Any address can be disabled by clearing the checkbox. -
Page 33: Connecting To The Ethernet Port
PWR User’s Guide The IP addresses default to values based on the transceiver MAC address of the device. The derivation is described below. By default, only the first IP address is enabled (for local-DHCP), and no addresses are reserved for specific MAC addresses. Please make sure to check the checkbox for the client IP addresses you have entered. - Page 34 MeshNetworks configuration and management of these devices. PWR MAC Address PWR ETH MAC Address 00-05-12-0A-xx-yy 00-05-12-30-xx-yy...
-
Page 35: License And Warranty Information
You must reproduce on the backup copy the MeshNetworks’ copyright notice and any other proprietary legends that were on the original copy of the Software. - Page 36 You assume responsibility for the selection of the appropriate applications program and associated reference materials. MeshNetworks makes no warranty or representation that the Software will meet your requirements or work in combination with any hardware or applications software products provided by third parties, that the operation of the Software will be uninterrupted or error free, or that all defects in the Software will be corrected.
-
Page 37: Fcc Regulatory Information
PWR User’s Guide 5 FCC Regulatory Information FCC Information This VMM is an experimental Unit. This device has not been authorized as required by the rules of the FCC. This device is not, and may not be, offered for sale or lease, or sold or leased, until authorization is obtained.
Need help?
Do you have a question about the MEA PWR6300 and is the answer not in the manual?
Questions and answers