Table of Contents
Advertisement
Available languages
Available languages
Quick Links
DS-500
12 Volt – 24 Volt DC / 220 VoltAC
GE A C H T E GE B R U I K E R
HARTELIJK DANK VOOR DE AANKOOP VAN ONS PRODUCT.
VO OR EEN SNELL E IN STALLATIE KUNT U G EBRU IK MAKE N VAN
DE ME EGELEVE RDE SNE LST ARTG IDS .
VO OR U ITGEBRE ID E UIT LEG KUNT U DE ZE HANDLE ID IN G RAADPLEGEN.
LEES T U HET AANDAC HT IG DOOR V OOR DE BESTE WERKING EN DE
HOOGSTE VEILIGHEID.
Advertisement
Chapters
Table of Contents

Related Manuals for Denson DS-500

Summary of Contents for Denson DS-500
- Page 1 DS-500 12 Volt – 24 Volt DC / 220 VoltAC GE A C H T E GE B R U I K E R HARTELIJK DANK VOOR DE AANKOOP VAN ONS PRODUCT. VO OR EEN SNELL E IN STALLATIE KUNT U G EBRU IK MAKE N VAN DE ME EGELEVE RDE SNE LST ARTG IDS .
-
Page 3: Table Of Contents
Inhoudsopgave Inhoudsopgave ............................3 Bijzonderheden ............................4 Veiligheidsinstructies..........................5 Voorkant Ontvanger..........................6 Achterkant Ontvanger ..........................6 Knoppen Afstandsbediening ........................7 Veiligheidsvoorschriften m.b.t. batterijen ....................8 Gereedmaken van de afstandsbediening ....................9 Werkingsruimte van de afstandsbediening ..................... 9 Gebruiksvoorschriften..........................9 Systeem connectie..........................10 Inschakelen ............................ -
Page 4: Bijzonderheden
Bijzonderheden Conditional Access Mediaguard Embedded System ► Canal Digitaal Fast Scan ► Multi Mode auto zoeken satelliet programma’s (AUTO/FTA/NIT/TP) ► Opslaan van 100 Satellieten, 2000 Transponders en 3000 Kanalen ► 4 Favorieten groepen met gebruiksvriendelijke kanaal aanpassing functie. ► Teletekst op OSD ►... -
Page 5: Veiligheidsinstructies
Veiligheidsinstructies ► Lees de volgende instructies zorgvuldig door ► Overlaad de gebruikte stopcontacten of verlengsnoeren niet, aangezien dit kan resulteren in een risico op vuur of een elektrische schok. ► Zorg ervoor dat er geen vloeistoffen, sprays of ander materiaal binnen in de ontvanger kan komen ►... -
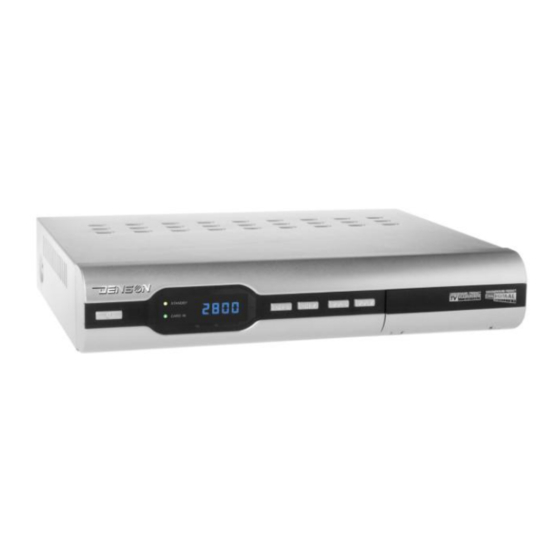
Page 6: Voorkant Ontvanger
Voorkant Ontvanger Standby knop LED display / status indicator / sensor voor de afstandsbediening Kanaalkeuze (omhoog) Kanaalkeuze (omlaag) Volumeknop harder Volumeknop zachter Afsluitkapje kaartslot Achterkant Ontvanger Aansluitpunt extra infrarood sensor Aansluitpunt voor updatekabel Audio Rechts uit Audio Links uit Video uit Scart aansluiting Antenne doorvoer uitgang Antenne ingang... -
Page 7: Knoppen Afstandsbediening
Knoppen Afstandsbediening Het is aanbevolen om het apparaat te bedienen via de knoppen op de afstandsbediening. Lees de uitleg van de knoppen op de afstandsbediening hieronder goed door om te begrijpen waar de knoppen voor dienen. Knop Omschrijving Niet in menu: geluid dempen Niet beschikbaar, Gereserveerd voor toekomstige aanpassingen. -
Page 8: Veiligheidsvoorschriften M.b.t. Batterijen
Niet in menu: weergeven van de huidige status helderheid, contrast, kleur en wijzigen Niet in menu: Ondertiteling weergeven Niet in menu: weergeven van de opgeslagen kanalenlijst, menu mode: bevestigen Niet in menu: Teletekst weergeven Niet in menu: audio kanaal selecteren Niet in menu: de status van het beeld veranderen tussen stil en bewegend. -
Page 9: Gereedmaken Van De Afstandsbediening
Gereedmaken van de afstandsbediening Plaats de batterijen in de daarvoor bestemde groeven in de afstandsbediening, daarna kunt u de afstandsbediening gebruiken. 1. verwijder de afdekplaat 2. plaats de batterijen (AAA type) en zorg ervoor dat de anode en kathode van de batterij corresponderen met de polariteitaanduiding op de afstandsbediening 3. -
Page 10: Systeem Connectie
Systeem connectie ► Plaats de TV Scart of de video/audio kabels met de corresponderende ingangen op de ontvanger en televisie. ► Pas de richting van de schotel aan naar de signaal sterkte weergegeven op het scherm ► Plaats aan beide kanten van de coax kabel een F connector (voor zover niet aanwezig. Sluit 1 connector aan op de LNB en de andere op de “ANT IN”... -
Page 12: Installatie
Installatie Druk op de MENU knop. U ziet dan ziet u het scherm zoals hiernaast te zien is Druk op de [rode knop] om de taal van het menu te wijzigen Verplaats de cursor naar Installatie menu optie en druk op de OK knop, u ziet dan het beeld zoals hiernaast is weergegeven F A S T... - Page 13 Attentie: LNB Power: Single Mode: laat de status op “on” staan Doorlus situatie: laat de status van de machine die aangesloten is op de LNB op “on”staan en de anderen op “off” Druk op de EXIT knop om terug te gaan naar de FAST SCAN modus Na het instellen van de LNB Parameter, verplaats de cursor naar de instructie [Start Scan] en druk op de [OK]...
- Page 14 Scannen voltooien, als het kanaal opgeslagen is, zal het beeld terug gaan naar het beeldweergave. SMATV SCAN Ga naar het SMATV Instellingen submenu, het beeld zal het volgende weergeven: SMATV verlangd dat meerdere gebruikers dezelfde schotel delen. Verbind de machine met het SMATV netwerk en geef de symbool ratio van de transponder aan.
- Page 15 Wijzigen: Druk op de groene knop, het dialoog venster met Satelliet aanpassen” zal verschijnen. Markeer de “ Satelliet regel, druk op de OK knop om het soft keyboard weer te geven (gebruik) Druk op de Ÿ / ź , >/< knoppen om de cursor te verplaatsen en druk op de OK knop om de invoer te bevestigen Gebruik de CAPS instructie om te schakelen tussen...
- Page 16 parameter waarde van Frequentie en Symbool Ratio in te vullen, of gebruik de >/< knop om de Polarisatie te wijzigen. Druk op de OK knop bij de Ok instructie om de wijzigingen op te slaan Toevoegen: druk op de Gele Knop om het dialoog venster weer te geven met “Transponder Toevoegen”.
- Page 17 G E B R U I K E R S I N S T E L L I N G E N Ga terug naar het INSTALLATIE scherm, Markeer de 2e regel en ga naar het submenu Markeer de Taal Instelling en druk op de OK knop om naar het submenu te gaan Markeer de Lokale Tijd Instelling en ga naar het submenu:...
-
Page 18: Kanaal Aanpassen
Weergave infobalk: gebruik de >/< knop om 2 tot 7 seconden, altijd enz. te selecteren; de grootte van de waarde geeft tijd infobalk het scherm blijft wanneer wisselt kanaal. Altijd: deze optie houd in dat de infobalk op het scherm blijft tot u op de EXIT knop drukt na het wisselen van het kanaal Transparantie: gebruik de >/<... -
Page 19: Kinderslot
3. Verplaatsen: Markeer het Verplaatsen symbool, druk op de knop om één kanaal te selecteren, druk op de OK knop om te dimmen, druk op de knop om te verplaatsen naar de gewenste locatie en druk nogmaals op de OK knop om de zender los te laten. -
Page 20: Systeem Informatie
Menu Vergrendelen: zie Ontvanger Vergrendelen. Als het menu vergrendeld is zal de ontvanger bij het openen van het menu om de PIN Code vragen Systeem informatie Weergave van de informatie van de ontvanger. Model, software versie, etc. Conditional access Bij deze optie kunt u gerelateerde informatie over de Canal Digitaal kaart weergeven. -
Page 21: Uitgebreid Menu
Uitgebreid menu Druk op de [EPG] knop om het menu van de [EPG INFO] weer te geven. Druk op de Ÿ ź Ż Ź knoppen om een kanaal te selecteren. Druk op de rode knop om de info van het huidige programma weer te geven. -
Page 22: Termen (Referentie)
Termen (referentie) DiSEqC (Digital Satellite Equipment Control) Een standaard waardoor het mogelijk is om een DiSEqC compatibel ontvanger een signaal te laten versturen via de RF Kabel naar een apparaat die switcht tussen verschillende LNB’s of Schotels. De DiSEqC gebruikt de 22KHz signaal om het apparaat aan te sturen. -
Page 23: Specificaties
Specificaties Tuner Input Frequency 950-2,150 MHz Signal Level -25dBm to -65dBm (75 LNB Control DiSEqC1 .0/1.2 22KHz LNB Power & Polarization 13V/18V (Max. 400mA) Channel Decode Demodulation QPSK (SC PC, MCPC) Input Symbol Rate 2-40MSPS Video Profile Level MPEG-II M P @ Output System NTSC / PAL Output Terminal... - Page 24 Inhoud Verpakking Onderdelen Aantal Controle DIGITALE SATELLIET ONTVANGER GEBRUIKERSHANDLEIDING SNELSTART GIDS AFSTANDSBEDIENING SCART KABEL BATTERIJ STROOMADAPTER (OPHANG)BEUGEL VOOR INBOUW OF ONDERBOUW INFRAROOD SENSOR MET KABEL NOT I TIE: Elke modificatie zal niet vooruit bekend gemaakt worden. Ons bedrijf reserveert de rechten voor de verklaring over de verschillen.
- Page 25 DS-500 12 Volt – 24 Volt DC / 220 VoltAC DEAR CONSUMER GREAT APPRECIATION FOR PURCHASING OUR PRODUCT; TO SECURE THE BEST PERFORMANCE AND THE HIGHEST SAFETY, PLEASE READ THE FOLLOWING EXPLANATION CAREFULLY PLEASE READ THIS MANUAL WITH SUFFICIENT CAREFULNESS AND...
- Page 26 CONTENT Feature................................1 Safety Instruction ............................2 Front Panel..............................3 Rear Panel ..............................3 Remote controller ............................4 Useful prompt..............................6 System Connection ............................7 Power On ...............................7 Menu Tree ..............................8 Installation ..............................9 Edit channel..............................15 Parental lock .............................. 16 System information ............................17 Conditional Access ............................17 Extended menu .............................18 Terms ................................
-
Page 27: Feature
FEATURE >>> Conditional Access Mediaguard Embedded System >>> Canal Digital Fast Scan >>> Multi-mode auto search satellite programs (AUTO/FTA/NIT/TP) >>> Storage of 100 satellites, 2000 transponders, 3000 channels >>> 4 Favorite groups with user-friendly channel editing function >>> Teletext on OSD >>>... -
Page 28: Safety Instruction
SAFETY INSTRUCTION Please read the following instructions carefully! Do not overload the following wall outlets, extension cords or integral convenience receptacles as this can „ result in a risk of fire or an electrical shock Never allow liquids, sprays or other material to be exposed with the inside of the STB „... -
Page 29: Front Panel
FRONT PANEL 1. key standby. To instruct the receiver to the standby state or the normal state when the power is being inserted 2. LED-displaying board/ status indicator/ remote sensor 3. 4. channel turning/ cursor movement 5. 6. volume adjustment/ parameter adjustment 7. - Page 30 REMOTE CONTROL KEYS It's recommended to operate each function of the STB by using the key on the remote control. Please read this section to lend itself to advance your understanding of the function of the STB SAT/VCR Non-menu: to mute the audio output To instruct the unit to enter the standby mode Non-menu: to display the menu of FAVORITE CHANNEL Fav n (if existing)
- Page 31 Non-menu: to select the audio channel Non-menu: to display the caption (subtitle) of the present channel (if existing) Non-menu: to show the stored channel list, menu mode: to confirm the operation Non-menu: to instruct the scene between the active and the inactive (only on the TV status is effective) (still) Non-menu: to display the information of graphics context (teletext) Non-menu: to adjust volume...
-
Page 32: Remote Controller
PREPARATION OF REMOTE CONTROLLER Load the batteries to the groove of the remote controller and then enable you to operate the native Open the lid Load the batteries (AAA type) and attend whether the anode and cathode of battery are corresponding to the polarity indicated on the remote controller Close the lid OPERATION SCOPE OF THE REMOTE CONTROLLER... -
Page 33: System Connection
SYSTEM CONNECTION Connect the TV Scart interface or the video terminal of this machine with the corresponding interface or terminal of TV set. Note that these two connections shouldn't be adopted the same time. I.e. one type one time Adjust the direction of the dish according to the antenna signal level of infor bar displaying on the screen ... -
Page 34: Menu Tree
MENU TREE... -
Page 35: Installation
INSTALLATION Press the MENU key on non-menu mode and the image shows as Press the [red key] repeatedly to alternate the type of language Press green key to switch program type between favorite and all Press yellow key to copy all program into favorite program Move the cursor to the Installation menu tape and press the OK key, the image shows as FAST SCAN... - Page 36 Attention LNB Power: Single mode: keep the status on “on” Loop situation: keep the status of the machine which connected satellite signal on the “on” and others on the “off” Press the EXIT key to return to the FAST SCAN interface After setting the LNB parameter, move the cursor onto the instruction [Start Scan], press the key [OK] to commence the process of scanning.
- Page 37 Finish scanning, if the channel has been stored then the interface returns program- watching's SMATV SCAN Enter SMATV Setting submenu, the image shows as: SMATV refers that several users share the same antenna. Connect the machine to the SMATV network and input the symbol rate of the transponder.
- Page 38 press [green dialog with “Edit Edit: key], Satellite” appears. Light the Satellite instruction, press the OK key to display the soft-keyboard (usage) Press the Ʒͩ , </> key to move the cursor and the OK key to confirm the input Use pressing the CAPS instruction to switch the letter state between capital and lowercase pressing...
- Page 39 UPGRADE SOFTWARE BY OTA [ADVANCED INSTALLATION] menu, highlight the instruction [Upgrade Software by OTA], press the [OK] key to enter its submenu shows as right side the data that most user would use have set already. What do most user need to do is just highlighting the instruction [Start Upgrade] directly and then press the key [OK] to commence the process of updating Note, after starting upgrade, the machine would...
- Page 40 USER SETTING Return to the INSTALLATION interface, light the second tape and enter its sub-menu Light the Language Setting and press the OK key to enter its sub-menu, the picture shows Besides, Audio & Subtitle Language can be set Light the Local Time Setting and enters its sub-menu: GMT: the Greenwich Meantime-central Europe time Selected Time Zone: to choose the appropriate location Summer Time: daylight saving time...
-
Page 41: Edit Channel
Delay Time: use the </> key to select 2-7second, always etc.; the magnitude of value decide the length of time of channel info tape to stay on the screen when switching the channel. Always: the instruction means the info strip will stay on the screen until press the EXIT key when switching Transparency: use the </>... -
Page 42: Parental Lock
Move: when the Move character is highlighted, press the Ʒͩ k ey to light one channel, press the OK key to dim it, press the Ʒͩ key to move the channel to the suitable location and press the OK key once more to release Skip: when the Skip character is highlighted, press the Ʒͩ... -
Page 43: System Information
Lock Menu: same as above-described. When the menu has been locked, shifting from program-watching to menu status needs code input SYSTEM INFORMATION To show the information of unit model, software version. And so on. CONDITIONAL ACCESS To enter the menu showing the related information about CANAL + card 1. -
Page 44: Extended Menu
EXTENDED MENU On the program-enjoying status, press the key [EPG] to display the menu of [EPG INFO] press the key [UP/DOWN/LEFT/ RIGHT] to select one channel press the [red key] to display the present information, press [green key] to display the information of the next time- section. -
Page 45: Terms
TERMS (reference) DiSEqC (Digital Satellite Equipment Control) A standard through which it is possible to let a DiSEqC compatible receiver send a signal via the RF cable to a switching device to switch between different LNBs or dishes. The DiSEqC uses the 22KHz signal to control the switching device. -
Page 46: Specification
SPECIFICATION Tuner Input Frequency 950-2,150 MHz Signal Level -25dBm to -65dBm (75) LNB Control DiSEqC1.0/1.2 22KHz LNB Power & Polarization 13V/18V (Max. 400mA) Channel Decode Demodulation QPSK (SCPC, MCPC) Input Symbol Rate 2-40MSPS Video Profile Level MPEG-II MP@ ML Output System NTSC / PAL Output Terminal TV Scart / RCA... - Page 48 PACKING LIST ITEMS Qty. REMARK DIGITAL SATELLITE RECEIVER INSTRUCTION MANUAL REMOTE CONTROL SCART CABLE CELL ADAPTOR INFRARED SENSOR and the LINE SHEET of FAST INSTALLATION GUIDE NOTE: Any modification will not be noticed in advance. Our company reserves the rights for the explanation to the discrepancy...
Need help?
Do you have a question about the DS-500 and is the answer not in the manual?
Questions and answers