Advertisement
Electronic
Solutions, Inc.
ABMHZ v1+1— Quick Setup
Version 1
•
Compatible with other Z-wave™ enabled devices.
•
Mechanical motor limits must be set before performing the sequences below.
•
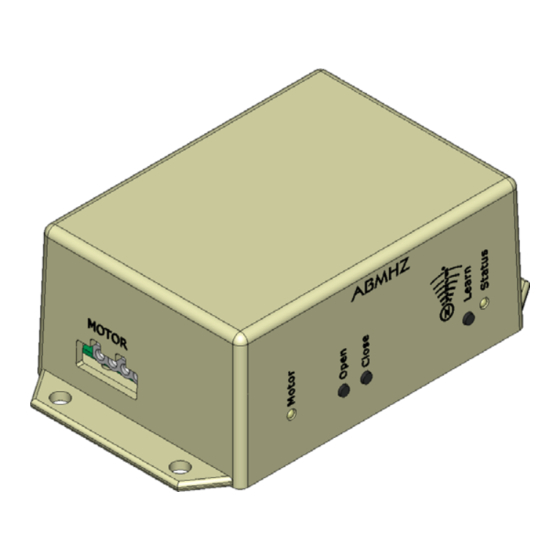
If the Motor LED is red, the unit has not been calibrated and will not respond correctly.
•
Verify OPEN button opens shade and CLOSE botton closes shade. If directions are
swapped, see "Toggle Direction" below.
Calibration Procedure
1.
Simultaneously press and hold both
OPEN and CLOSE for at least 10
seconds until Motor LED turns solid
green.
2.
Release both OPEN and CLOSE.
3.
Within 10 seconds press and release
CLOSE to start the calibration
sequence. (Press and release OPEN
instead to "Toggle Direction" and
start the calibration sequence.)
The calibration sequence will run the
motor from one limit to the other and
end with the shade closed, motor off,
and Motor LED off.
•
Unit is ready for use.
Optional Z-Wave Include/Exclude
For "Include", place the primary controller into the INCLUDE mode and do a quick press
of the LEARN button (Z-Wave LED will fl ash green). For "Exclusion", place the primary
controller into the EXCLUDE mode and do a quick press of the LEARN button (Z-Wave LED
will fl ash green).
230VAC Unit:
115VAC Unit:
L: 5.25"
L: 133.4mm
© 2007, Electronic Solutions, Inc.
Ratings
230VAC
5A
1/2HP
115VAC
8A
1/3HP
Mechanical
W: 3.14"
H: 2.0"
W:79.8mm
H: 50.8mm
Electronic Solutions, Inc.
1355 Horizon Avenue
Lafayette, CO 80026
VOX +1 303.469.9322
FAX +1 303.469.5129
www.elec-solutions.com
11 June 2007
Advertisement
Table of Contents

Related Manuals for Electronic Solutions ABMHZ v1+1


Summary of Contents for Electronic Solutions ABMHZ v1+1
- Page 1 Electronic Solutions, Inc. ABMHZ v1+1— Quick Setup Version 1 11 June 2007 • Compatible with other Z-wave™ enabled devices. • Mechanical motor limits must be set before performing the sequences below. • If the Motor LED is red, the unit has not been calibrated and will not respond correctly.
- Page 2 Connect the equipment into an outlet on a circuit different from that to which the receiver is connected. • Consult the dealer or an experienced radio/TV technician for help. WARNING! Changes or modifi cations not expressly approved by Electronic Solutions, Inc. could void the user’s authority to operate the equipment.
Need help?
Do you have a question about the ABMHZ v1+1 and is the answer not in the manual?
Questions and answers