Advertisement
Quick Links
Kit´s PREMIUM of Power Transmission (36@12Vdc)
KIT-TT4PVTURBOX
Features
Real-time transmission over UTP cat5e/6
Compatible with all HD-TVI/CVI/AHD/CVBS analog cameras
Provides camera power while receiving video signal
Please refer to "Video Transmission Distance Chart" Part to find out
distance of 720P/960P/1080P/3MP/4MP/5MP/4K cameras
Female BNC connector and RJ45 Jack
Full Channel Support OSD (On-Screen Display) with high quality image
Centralized power supply, reducing the use of engineering cables
Exceptional interference rejection
Built-in solid state TVS for surge protection & ground loop isolation
Installation and Operation
Before permanently securing the unit for final installation of cabling
behind walls or ceilings, test for proper operation of the unit and the
cables in your system.
Camera End:
Connect transmitter to the camera's video and
DC power connector. Insert UTP cat5e/6 into RJ 45
of transmitter.
Power
Video
Transmitter: convert 36VDC to regulated 12VDC at camera
End
DVR
:
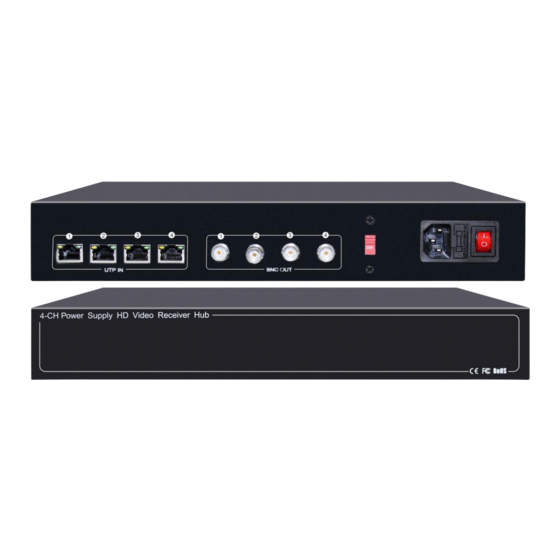
There're RJ45 jack labeled "UTP In" and Female BNC
connectors labeled "BNC out" on the receiver hubs.
UTP IN
Insert one end of coaxial patch cord into Female BNC connectors of receiver'
hub and the other end into Female BNC connectors of DVR.
60cm Coaxial cable
Receiver
Terminate the incoming UTP cat5e/6 cable from t
your RJ45 jack of 4/8/16 Video & Power Receiver hubs.
and Video (HD-TVi)
KIT-TT8PVTURBOX
j
ack
RJ45
BNC OUT
DVR
ransmitter
into
Wave Filter Design, Anti-Static Design
Lightning protection design Grade:
Black galvanized housing
Rack, wall mountable and desk installation with 4 rubber feet
Transmitter
Receiver Hub
Switch on the Video & Power Receiver Hub using the on/offf switch.
Quick Setup Guide
Step 1: Begin with all input/output devices turned off with power cables removed.
Step 2: Connect video source and
Step 3: Connect video display and/or DVR to "BNC output" of Receiver Hub
Step 4: Terminate the incoming UTP cat5e/6 cable into your RJ45
jack "UTP In" (See RJ 45
Step 5: Power on all input/output devices
Application Example
Transmitter +Receiver Hub(36VDC)
Video
Power
12VDC Camera
Video
Power
12VDC Camera
Power Supply HD Video Receiver Hub
KIT-TT16PVTURBOX
DVR
UTP cat
e
5
/6 cabling to transmitter
jack
Pin Assignment)
Advertisement

Subscribe to Our Youtube Channel
Summary of Contents for epcom TITANIUM KIT-TT4PVTURBOX
- Page 1 Kit´s PREMIUM of Power Transmission (36@12Vdc) and Video (HD-TVi) KIT-TT4PVTURBOX KIT-TT8PVTURBOX KIT-TT16PVTURBOX Features Wave Filter Design, Anti-Static Design Real-time transmission over UTP cat5e/6 Lightning protection design Grade: Compatible with all HD-TVI/CVI/AHD/CVBS analog cameras Black galvanized housing Provides camera power while receiving video signal Rack, wall mountable and desk installation with 4 rubber feet Please refer to “Video Transmission Distance Chart”...
- Page 2 Wiring Scheme Video & Power Distance Char t Video Distance Chart: Notes: 1. You can use either T568A or T568B cables, Make sure that both transmitter and receiver ends use the same wiring. Camera Type HD-TVI HD-CVI HD-AHD 2. The maximum cable length is 1000ft(305m). For voltage drops over 720P camera 250m(820ft) 440m(1443ft)
Need help?
Do you have a question about the KIT-TT4PVTURBOX and is the answer not in the manual?
Questions and answers