Table of Contents
Advertisement
Quick Links
This ensures that all parts of the head are clearly
EnGlISH
visible and within easy reach.
Introduction
2
Comb the hair in the direction of growth (Fig. 7).
Congratulations on your purchase and welcome to
3
Put the cutting element on the handle (see
Philips! To fully benefit from the support that Philips offers,
section 'Attaching/detaching attachments' in chapter
register your product at www.philips.com/welcome.
'Preparing for use').
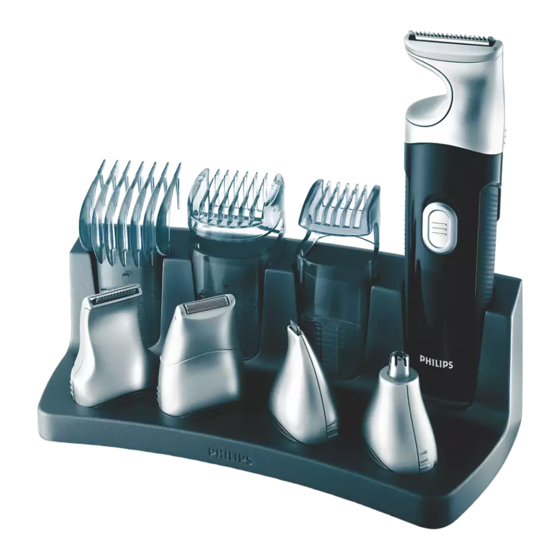
General description (Fig. 1)
Clipping with hair clipping comb
A Handle
B Setting indicator
1
Slide the hair clipping comb into the guiding
C On/off switch
grooves on both sides of the handle ('click') (Fig. 8).
D Socket for appliance plug
E Micro shaver
2
Press the setting selector upwards or downwards
F Hair clipping comb
to set the desired setting (Fig. 9).
G Setting selector
The setting indicator on the back of the appliance
,
H Nose/ear hair trimmer
shows the selected setting. (Fig. 10)
I Precision timmer
The table shows how long the hair will be after clipping at
J Precision comb
the different settings.
K Micro trimmer
When you clip for the first time, start at the highest
L Cutting element
setting (9) to familiarise yourself with the appliance.
M Beard trimming comb
Settings of hair clipping comb
N Cleaning brush
O Adapter
Setting
1
2
3
4
P Appliance plug
Hair length after
Q Charging light
4
6
8
10
clipping(mm)
R Stand
Tip: Write down the hair length settings you have used to
Important
create a certain hairstyle as a reminder for future clipping
Read this user manual carefully before you use the
sessions.
appliance and save it for future reference.
3
Switch on the appliance.
Danger
4
Move the appliance through the hair slowly.
-
Make sure the adapter does not get wet.
-
To clip in the most effective way, move the appliance
Warning
against the direction of hair growth.
-
Check if the voltage indicated on the adapter and on
-
Since all hair does not grow in the same direction,
the appliance corresponds to the local mains voltage
you need to move the appliance in different
before you connect the appliance.
directions (upward, downward or across) (Fig. 11).
-
The adapter contains a transformer. Do not cut
-
Make sure that the flat part of the comb is always
off the adapter to replace it with another plug, as
fully in contact with the scalp to obtain an even
this causes a hazardous situation.
result.
-
This appliance is not intended for use by persons
-
Make overlapping passes over the head to ensure
(including children) with reduced physical, sensory
that you cut all the hair that needs to be cut.
or mental capabilities, or lack of experience and
-
To achieve a good result with curly, sparse or long
knowledge, unless they have been given supervision
hair, use a comb to guide the hair towards the
or instruction concerning use of the appliance by a
appliance.
person responsible for their safety.
-
Children should be supervised to ensure that they
5
Regularly remove cut hair from the comb.
do not play with the appliance.
If a lot of hair has accumulated in the comb, remove the
comb from the appliance and blow and/or shake the hair
Caution
out of it.
-
Use, charge and store the appliance at a temperature
between 15°C and 35°C.
Contouring without hair clipping comb
-
Only use the adapter supplied to charge the
You can use the appliance without hair clipping comb to
appliance.
clip hair very close to the skin (0.6mm) or to contour the
-
If the adapter is damaged, always have it replaced
neckline and the area round the ears.
with one of the original type in order to avoid a
Be careful when you clip without comb because the
hazard.
cutting element removes every hair it touches.
-
Do not use the appliance when one of the
1
Press the setting selector upwards and pull the
attachments or combs is damaged or broken as this
comb off the handle. (Fig. 12)
may cause injury.
-
Be careful with hot water. Always check if the water
2
Before you start to contour the hairline round the
is not too hot, to prevent your hands from getting
ears, comb the hair ends over the ears.
burnt.
-
This appliance is only intended for clipping human
3
Tilt the appliance in such a way that only one edge
scalp hair and for trimming and grooming the human
of the cutting element touches the hair ends when
beard, moustache, sideburns, nose hair, ear hair and
you shape the contours round the ears (Fig. 13).
eyebrows. Do not use it for another purpose.
Only cut the hair ends. The hairline should be close to
-
Never try to trim your eyelashes.
the ear.
-
If the appliance is subjected to a major change in
4
To contour the neckline and sideburns, turn the
temperature, pressure or humidity, let the appliance
appliance and make downward strokes (Fig. 14).
acclimatise for 30 minutes before you use it.
Move the appliance slowly and smoothly. Follow the
Compliance with standards
natural hairline.
-
The appliance complies with the internationally
Cutting shapes with micro trimmer
approved IEC safety regulations and can be safely
used in the bath or shower and cleaned under the
You can use the micro trimmer to cut shapes in scalp hair.
tap (Fig. 2).
It cuts hair very close to the skin (0.6mm).
-
This Philips appliance complies with all standards
Be careful when you use the micro timmer because it
removes every hair it touches.
regarding electromagnetic fields (EMF). If handled
properly and according to the instructions in this
1
Put the micro trimmer on the handle (see section
user manual, the appliance is safe to use based on
'Attaching/detaching attachments' in chapter
scientific evidence available today.
'Preparing for use').
Preparing for use
2
Make careful and controlled movements with the
Charging
micro trimmer.
Charge the appliance for at least 10 hours before you use
-
To achieve a good cutting result, move the trimmer
it for the first time and after a long period of disuse.
against the direction of hair growth.
When the appliance is fully charged, it has a cordless
-
Always make sure the micro trimmer is fully in
operating time of up to 35 minutes. Do not charge the
contact with the skin.
appliance for more than 24 hours.
Trimming
The appliance does not run from the mains.
Preparing for trimming
You cannot charge the appliance in the stand.
Make sure that the appliance is fully charged before you
1
Insert the appliance plug into the socket of
start trimming.
the appliance and put the adapter in the wall
It is not possible to run the appliance from the mains.
socket (Fig. 3).
The charging light on the adapter goes on to
1
Comb the hair to be trimmed (beard, moustache,
,
indicate that the appliance is charging (Fig. 4).
sideburns, eyebrows) with a fine comb.
Note: The charging light does not change colour and does
2
Put the cutting element on the handle (see section
not go out when the appliance is fully charged.
'Attaching/detaching attachments' in chapter
Optimising the lifetime of the rechargeable
'Preparing for use').
battery
Beard trimming with beard trimming comb
-
Remove the adapter from the wall socket when the
battery is fully charged (which takes 10 hours).
1
Slide the beard trimming comb into the
-
Do not leave the appliance plugged into the wall
guiding grooves on both sides of the handle
socket for more than 24 hours.
('click') (Fig. 15).
-
Discharge the battery completely twice a year
2
Press the setting selector upwards or downwards
by letting the motor run until it stops. Then fully
to set the desired setting (Fig. 16).
recharge the battery.
,
The setting indicator on the back of the appliance
Attaching/detaching attachments
shows the selected setting.
The table shows how long the hair will be after trimming
All attachments (cutting element, precision trimmer, micro
at the different settings.
trimmer, micro shaver and nose/ear hair trimmer) can be
When you trim for the first time, start at the highest
attached and detached in the same way.
setting (9) to familiarise yourself with the appliance.
1
To attach the attachment, push it onto the
Settings of beard trimming comb
handle (Fig. 5).
Settings
1
2
3
4
2
To detach the attachment, pull it off the
handle. (Fig. 6)
Hair length after
2
4
6
8
trimming(mm)
Hair clipping
Preparing for hair clipping
3
Switch on the appliance.
Make sure that the appliance is fully charged when you
4
Move the appliance through the hair slowly (Fig. 17).
start clipping.
-
To trim in the most effective way, move the appliance
It is not possible to run the appliance from the mains.
against the direction of hair growth.
Only use the appliance on clean, dry hair. Do not use it
-
Since all hair does not grow in the same direction,
on freshly washed hair.
you need to move the appliance in different
1
Make sure that the head of the person whose hair
directions (upward or across).
you intend to cut is at the same level as your chest.
-
Make sure that the flat part of the comb is always
fully in contact with the skin to obtain an even result.
Use the micro trimmer to shape and define eyebrows
5
Regularly remove cut hair from the comb.
and to remove single facial hairs
If a lot of hair has accumulated in the comb, remove the
comb from the appliance and blow and/or shake the hair
Never trim your eyelashes. Never come too close to
out of it.
your eyes.
Do not use micro trimmer too close to a mirror.
Trimming at the 'stubble look' setting
1
To create a 'stubble look', trim with the beard
1
trimming comb set to hair length setting 1. (Fig. 18)
Beard trimming without beard trimming
comb
2
Use the beard trimmer without the beard trimming comb
to contour your beard and to remove single hairs.
3
Cutting without comb results in a very short stubble
beard (0.6mm).
-
1
Press the setting selector upwards and pull the
-
beard trimming comb off the handle (Fig. 19).
2
Make careful and controlled movements with
the beard trimmer. Touch the hair lightly with the
5
6
7
8
9
cutting element.
Use the micro shaver to create smooth, well-defined
12
14
16
18
20
Beard trimming with precision trimmer
contours.
and precision comb
Before you use the micro shaver, always check it for
damage or wear. If the foil or cutter is damaged or
Use the precision trimmer with the precision comb to
trim smaller areas and to create designer beards.
worn, do not use the micro shaver, as injury may occur.
If the foil is damaged, replace the top part of the micro
1
Put the precision trimmer on the handle (see
shaver and if the cutter is damaged, replace the whole
section 'Attaching/detaching attachments' in chapter
attachment before you use the micro shaver again.
'Preparing for use').
1
2
Slide the precision comb into the guiding grooves
on both sides of the handle ('click') (Fig. 20).
3
Press the setting selector upwards or downwards
2
to set the desired setting. (Fig. 21)
,
The setting indicator on the back of the appliance
shows the selected setting.
The table shows how long the hair will be after trimming
3
at the different settings.
When you trim for the first time, start at the highest
setting (4) to familiarise yourself with the appliance.
Do not press too hard.
Settings of precision comb
Setting
1
2
3
4
Never use compressed air, scouring pads, abrasive
cleaning agents or aggressive liquids such as petrol or
Hair length after trimming (mm)
2
4
6
8
acetone to clean the appliance.
Beard trimming with precision trimmer but
Note: The appliance does not need any lubrication.
without precision comb
Clean the appliance every time you have used it.
Use the precision trimmer without the precision comb to
1
shape your moustache and sideburns, to define contours
and to remove single hairs.
2
1
Press the setting selector upwards and pull the
precision comb off the handle (Fig. 22).
3
2
Hold the appliance upright and trim the desired
areas (Fig. 23).
The shaving foil is very delicate. Handle it carefully.
Grooming facial hair (nose hair, ear hair and
Replace the top part of the micro shaver if the shaving
eyebrows)
foil is damaged.
Trimming nose hair
Do not clean the shaving foil with the brush, as this may
cause damage.
1
Put the nose/ear hair trimmer on the handle (see
section 'Attaching/detaching attachments' in chapter
4
'Preparing for use').
2
Make sure your nostrils are clean.
5
3
Switch on the appliance and insert the tip of the
trimmer into one of your nostrils. (Fig. 24)
6
Do not insert the tip more than 0.5cm into your nostril.
4
Slowly move the tip in and out while turning it
Keep the adapter dry.
round at the same time to remove unwanted hair.
To reduce the tickling effect, make sure that you press the
side of the tip firmly pressed against the skin.
Store the appliance and attachments in the charging stand
Trimming ear hair
to prevent damage.
1
Put the nose/ear hair trimmer on the handle (see
section 'Attaching/detaching attachments' in chapter
If the adapter is damaged, always have it replaced with
'Preparing for use').
one of the original type in order to avoid a hazard.
Only replace damaged or worn attachments or combs
2
Clean the outer ear channel. Make sure it is free
with original Philips replacement attachments or combs
from wax.
Philips replacement attachments, combs and adapters are
3
Switch on the appliance and move the tip softly
available from your Philips dealer and authorised Philips
round the ear to remove hairs that stick out
service centres.
beyond the rim of the ear. (Fig. 25)
If you have any difficulties obtaining an adapter or
replacement attachments and combs for the appliance,
4
Carefully insert the tip into the outer ear
contact the Philips Customer Care Centre in your
channel. (Fig. 26)
country (you find its phone number in the worldwide
Do not insert the tip more than 0.5cm into the ear
guarantee leaflet).
channel as this could damage the eardrum.
Trimming eyebrows with precision trimmer
-
and precision comb
Use the precision trimmer with the precision comb to
trim entire eyebrows to a uniform length.
-
Never trim your eyelashes. Never come too close to
your eyes.
1
Comb the eyebrows in the direction of hair
growth (Fig. 27).
2
Put the precision trimmer on the handle (see
section 'Attaching/detaching attachments' in chapter
'Preparing for use').
3
Slide the precision comb into the guiding grooves
on both sides of the handle ('click') (Fig. 20).
4
Press the setting selector upwards or downwards
Only remove the battery when it is completely empty.
to set the desired setting. (Fig. 21)
The setting indicator on the back of the appliance
1
,
shows the selected setting.
The table shows how long the hair will be after trimming
2
at the different settings.
5
6
7
8
9
When you trim for the first time, start at the highest
3
setting (4) to familiarise yourself with the appliance.
10
12
14
16
18
Settings of precision comb
4
Setting
1
2
3
4
5
Hair length after trimming (mm)
2
4
6
8
6
5
Move precision trimmer over the eyebrow from
the outer tip of the eyebrow towards the base of
the nose. (Fig. 28)
Do not connect the appliance to the mains again after
you have removed the battery.
Contouring eyebrows/removing single facial
Guarantee & service
hairs with micro trimmer
If you need service or information or if you
have a problem, please visit the Philips website at
www.philips.com or contact the Philips Consumer Care
Centre in your country (you find its phone number in
the worldwide guarantee leaflet). If there is no Consumer
Care Centre in your country, go to your local Philips
dealer.
Put the micro trimmer on the handle (see section
'Attaching/detaching attachments' in chapter
'Preparing for use').
POlSkI
When you contour eyebrows, stretch the skin of
the eyelid (Fig. 29).
Wprowadzenie
Make careful and controlled movements with the
micro trimmer.
Gratulujemy zakupu i witamy wśród użytkowników
Always move the micro trimmer against the direction
produktów Philips! Aby w pełni skorzystać z oferowanej
of hair growth.
przez firmę Philips pomocy, zarejestruj swój produkt na
Always make sure the micro trimmer is fully in
stronie www.philips.com/welcome.
contact with the skin.
Opis ogólny (rys. 1)
Shaving
A Uchwyt
Shaving with the micro shaver
B Wskaźnik ustawienia
C Wyłącznik
D Gniazdo do podłączenia zasilacza
E Minigolarka
F Nasadka grzebieniowa do strzyżenia włosów
G Przełącznik ustawień
H Trymer do przycinania włosów w nosie i uszach
I Precyzyjny trymer
J Precyzyjny grzebień
K Minitrymer
Pre-trim the contours you want to shave with the
L Element tnący
cutting element without comb or the precision
M Nasadka grzebieniowa do przycinania brody
trimmer without comb.
N Szczoteczka do czyszczenia
O Zasilacz
Put the micro shaver on the handle (see
P Wtyczka zasilacza
section 'Attaching/detaching attachments' in chapter
Q Wskaźnik ładowania
'Preparing for use').
R Stojak
Gently press the micro shaver onto the skin
Ważne
and shave along contoured edges to remove any
Przed pierwszym użyciem urządzenia zapoznaj się
stubble.
dokładnie z jego instrukcją obsługi i zachowaj ją na
wypadek konieczności użycia w przyszłości.
Niebezpieczeństwo
Cleaning
-
Zabezpiecz zasilacz przed możliwością zamoknięcia.
Ostrzeżenie
-
Przed podłączeniem urządzenia upewnij się, czy
napięcie podane na zasilaczu i urządzeniu jest zgodne
z napięciem w sieci elektrycznej.
-
Zasilacz sieciowy zawiera transformator. Ze
względów bezpieczeństwa nie wymieniaj wtyczki
Make sure the appliance is switched off and
zasilacza na inną.
disconnected from the socket.
-
Urządzenie nie jest przeznaczone do użytku przez
Remove any comb and/or attachment from the
osoby (w tym dzieci) z ograniczonymi zdolnościami
appliance.
fizycznymi, sensorycznymi lub umysłowymi, a
także nieposiadające wiedzy lub doświadczenia w
If you have used the micro shaver, separate its top
użytkowaniu tego typu urządzeń, chyba że będą one
part from its body (Fig. 30).
nadzorowane lub zostaną poinstruowane na temat
korzystania z tego urządzenia przez opiekuna.
-
Nie pozwalaj dzieciom bawić się urządzeniem.
Uwaga
-
Używaj, ładuj i przechowuj urządzenie w
temperaturze od 15°C do 35°C.
-
Do ładowania urządzenia używaj wyłącznie
Blow and/or shake out any hair that has
dołączonego zasilacza.
accumulated in the attachments and/or combs.
-
W przypadku uszkodzenia zasilacza wymień go
Clean the attachments, the combs and the
na nowy tego samego typu w sieci punktów
appliance with lukewarm water or with the cleaning
serwisowych współpracujących z Philips Polska Sp z
brush.
o.o.
-
Nie korzystaj z urządzenia w przypadku uszkodzenia
Clean the adapter with the cleaning brush or a dry
nasadki lub grzebienia, ponieważ może to
cloth.
spowodować skaleczenia.
-
Uważaj na gorącą wodę. Zawsze należy sprawdzić jej
temperaturę, aby nie poparzyć rąk.
Storage
-
Niniejsze urządzenie przeznaczone jest wyłącznie
do strzyżenia włosów na głowie, a także przycinania
brody, wąsów, bokobrodów, włosów w nosie, uszach
oraz brwi.
Replacement
-
Nigdy nie próbuj przycinać rzęs.
-
Jeśli urządzenie było narażone na duże zmiany
temperatury, ciśnienia lub wilgotności, przed użyciem
należy je aklimatyzować przez 30 minut.
Zgodność z normami
-
Urządzenie spełnia międzynarodowe normy
bezpieczeństwa IEC i może być używane w
kąpieli i pod prysznicem oraz może być myte pod
wodą (rys. 2).
-
Niniejsze urządzenie firmy Philips spełnia wszystkie
normy dotyczące pól elektromagnetycznych. W
przypadku prawidłowej obsługi zgodnie z zaleceniami
zawartymi w instrukcji urządzenie jest bezpieczne
Environment
w użytkowaniu, co potwierdzają badania naukowe
Do not throw away the appliance with the normal
dostępne na dzień dzisiejszy.
household waste at the end of its life, but hand it in
-
Poziom hałasu: Lc = 64 dB [A]
at an official collection point for recycling. By doing
Przygotowanie do użycia
this, you help to preserve the environment (Fig. 31).
The built-in rechargeable battery contains substances
Ładowanie
that may pollute the environment. Always remove
Przed pierwszym użyciem lub po długim okresie
the battery before you discard and hand in the
nieużywania urządzenie należy ładować co najmniej przez
appliance at an official collection point. Dispose of
10 godzin.
the battery at an official collection point for batteries.
W pełni naładowane urządzenie może działać
If you have trouble removing the battery, you can
bezprzewodowo do 35 minut. Nie ładuj akumulatora
also take the appliance to a Philips service centre.
dłużej niż 24 godziny.
The staff of this centre will remove the battery for
Urządzenie to nie ma możliwości podłączenia do sieci
you and will dispose of it in an environmentally safe
elektrycznej.
way. (Fig. 32)
Urządzenia nie można ładować na podstawce.
Disposal of the battery
1
Włóż wtyczkę zasilacza do gniazda w urządzeniu, a
zasilacz do gniazdka elektrycznego (rys. 3).
,
Na zasilaczu zapali się wskaźnik ładowania
Disconnect the appliance from the mains and let
informujący o ładowaniu urządzenia (rys. 4).
the appliance run until the motor stops.
Uwaga: Po całkowitym naładowaniu urządzenia wskaźnik
Remove any comb and/or attachment from the
ładowania nie zmienia koloru ani nie gaśnie.
appliance.
Optymalizacja okresu eksploatacji
Remove the top part of the appliance with a
akumulatora
screwdriver (Fig. 33).
-
Po całkowitym naładowaniu akumulatora, które trwa
Pull the inner part out of the appliance (Fig. 34).
10 godzin, wyjmij zasilacz z gniazdka elektrycznego.
-
Nie pozostawiaj urządzenia podłączonego do
Pry open the inner part and pull out the
gniazdka elektrycznego na dłużej niż 24 godziny.
battery (Fig. 35).
-
Dwa razy w roku całkowicie rozładuj akumulator,
Cut the wires close to the battery with a pair of
pozwalając, by urządzenie działało, aż do
household scissors.
samoczynnego zakończenia pracy. Następnie naładuj
go.
Zakładanie i zdejmowanie nasadek
Wszystkie nasadki (element tnący, precyzyjny trymer,
minitrymer, minigolarka i trymer do przycinania włosów w
nosie i uszach) zakłada się i zdejmuje w ten sam sposób.
F
E
1
Aby założyć nasadkę, dociśnij ją do uchwytu (rys. 5).
G
2
Aby zdjąć nasadkę, ściągnij ją z uchwytu. (rys. 6)
Strzyżenie włosów
Przygotowanie do strzyżenia
H
I
J
Przed rozpoczęciem strzyżenia sprawdź, czy urządzenie
jest w pełni naładowane.
G
Nie ma możliwości zasilania urządzenia z sieci
elektrycznej.
Używaj urządzenia wyłącznie na czystych i suchych
L
K
włosach. Nie używaj go na świeżo umytych włosach.
1
Przed rozpoczęciem strzyżenia zwróć uwagę,
M
aby głowa osoby strzyżonej znajdowała się na
wysokości torsu strzygącego. Zapewnia to dobrą
G
widoczność i łatwą dostępność wszystkich stron
głowy.
C
2
Rozczesz włosy zgodnie z kierunkiem ich
A
B
wzrostu (rys. 7).
3
Załóż element tnący na uchwyt (patrz część
„Zakładanie i zdejmowanie nasadek" w rozdziale
D
„Przygotowanie do użycia").
Strzyżenie z nasadką grzebieniową do
strzyżenia włosów
1
Wsuń nasadkę grzebieniową do strzyżenia
2
Załóż element tnący na uchwyt (patrz część
włosów w rowki po bokach urządzenia (usłyszysz
„Zakładanie i zdejmowanie nasadek" w rozdziale
„kliknięcie") (rys. 8).
„Przygotowanie do użycia").
2
Wybierz żądane ustawienie, przesuwając w górę lub
Przycinanie brody z nasadką grzebieniową
w dół przełącznik ustawień (rys. 9).
,
Wybrane ustawienie jest pokazywane przez
1
Wsuń nasadkę grzebieniową do przycinania
wskaźnik z tyłu urządzenia. (rys. 10)
brody w rowki po bokach urządzenia (usłyszysz
Tabela przedstawia długość włosów po strzyżeniu z
„kliknięcie") (rys. 15).
różnymi ustawieniami.
2
Wybierz żądane ustawienie, przesuwając w górę lub
W przypadku strzyżenia po raz pierwszy ustaw na
w dół przełącznik ustawień (rys. 16).
początek maksymalne ustawienie (9), aby zapoznać się z
,
Wybrane ustawienie jest pokazywane przez
urządzeniem.
wskaźnik z tyłu urządzenia.
Ustawienia nasadki grzebieniowej do
Tabela przedstawia długość włosów po przycinaniu z
strzyżenia włosów
różnymi ustawieniami.
W przypadku przycinania po raz pierwszy ustaw na
Ustawienie
1
2
3
4
5
6
7
8
9
początek maksymalne ustawienie (9), aby zapoznać się z
urządzeniem.
Długość włosów po
4
6
8
10
12
14
16
18
20
strzyżeniu(mm)
Ustawienia nasadki grzebieniowej do
Wskazówka: Zanotuj ustawienia długości włosów dla danej
przycinania brody
fryzury, tak aby można ich było użyć w przyszłości.
Ustawienia
1
2
3
4
3
Włącz urządzenie.
Długość włosów po
2
4
6
8
4
Powoli przesuwaj urządzenie po włosach.
przycięciu(mm)
-
Przesuwaj urządzenie w kierunku przeciwnym do
3
Włącz urządzenie.
wzrostu włosów, aby uzyskać najlepsze efekty.
-
W związku z tym, że nie wszystkie włosy rosną
4
Powoli przesuwaj urządzenie po włosach (rys. 17).
w tym samym kierunku, zmieniaj kierunek
-
Przesuwaj urządzenie w kierunku przeciwnym do
przesuwania urządzenia (pod włos, z włosem lub pod
wzrostu włosów, aby uzyskać najlepsze efekty.
kątem) (rys. 11).
-
W związku z tym, że nie wszystkie włosy rosną w
-
Zwróć uwagę na to, aby płaska część nasadki
tym samym kierunku, zmieniaj kierunek przesuwania
grzebieniowej zawsze dotykała głowy. Pozwoli to na
urządzenia (pod włos lub pod kątem).
równe strzyżenie włosów.
-
Zwróć uwagę na to, aby płaska część nasadki
-
Strzyż włosy pasmami, aby objąć wszystkie partie
grzebieniowej zawsze dotykała głowy. Pozwoli to na
wymagające przycięcia.
równe strzyżenie włosów.
-
W przypadku włosów kręconych, rzadkich lub długich
do skierowania włosów w stronę urządzenia użyj
5
Regularnie usuwaj ścięte włosy z nasadki
nasadki grzebieniowej.
grzebieniowej.
Jeśli w nasadce zgromadzi się dużo włosów, zdejmij ją z
5
Regularnie usuwaj ścięte włosy z nasadki
urządzenia i wydmuchaj lub wytrząśnij włosy.
grzebieniowej.
Jeśli w nasadce zgromadzi się dużo włosów, zdejmij ją z
Przycinanie z użyciem ustawienia
urządzenia i wydmuchaj lub wytrząśnij włosy.
„kilkudniowy zarost"
Strzyżenie bez nasadki grzebieniowej do
1
Aby uzyskać efekt „kilkudniowego zarostu",
strzyżenia włosów
użyj nasadki grzebieniowej do przycinania brody
ustawionego na długość 1. (rys. 18)
Aby obciąć włosy na bardzo krótkie (0,6 mm) lub
przystrzyc włosy na karku i wokół uszu, z urządzenia
Przycinanie brody bez nasadki grzebieniowej
należy zdjąć nasadkę grzebieniową.
Użycie trymera do brody bez nasadki grzebieniowej
Podczas strzyżenia bez nasadki grzebieniowej należy
pozwala przystrzyc krawędź brody i usunąć pojedyncze
zachować szczególną ostrożność, gdyż w takim
włosy.
przypadku przycinany jest każdy włos.
Przycinanie bez nasadki grzebieniowej pozwala uzyskać
1
Przesuń przełącznik ustawień w górę i zdejmij
bardzo krótki zarost (0,6 mm).
grzebień z uchwytu. (rys. 12)
1
Przesuń przełącznik ustawień w górę i zdejmij
2
Przed przycięciem włosów wokół uszu uczesz
nasadkę grzebieniową do przycinania brody z
końce włosów nad uszami.
uchwytu (rys. 19).
3
Nachyl urządzenie w taki sposób, aby tylko jedna
2
Podczas przycinania brody wykonuj spokojne
krawędź elementu tnącego dotykała końców
i kontrolowane ruchy i lekko dotykaj włosy
włosów podczas strzyżenia włosów wokół
elementem tnącym.
uszu (rys. 13).
Przycinanie brody z precyzyjnym trymerem
Przycinaj tylko same końce włosów. Linia włosów powinna
i precyzyjnym grzebieniem
znajdować się blisko uszu.
Precyzyjny trymer wraz z precyzyjnym grzebieniem
4
W celu przycięcia włosów na karku i baków
pozwala przycinać mniejsze obszary i uzyskać fantazyjne
odwróć urządzenie i wykonuj ruchy w dół (rys. 14).
kształty brody.
Ruchy urządzeniem powinny być wolne i płynne.
Wystarczy podążać za naturalną linią włosów.
1
Załóż precyzyjny trymer na uchwyt (patrz część
„Zakładanie i zdejmowanie nasadek" w rozdziale
Kształtowanie za pomocą minitrymera
„Przygotowanie do użycia").
Minitrymer przycina włosy bardzo blisko skóry (0,6 mm),
2
Wsuń precyzyjny grzebień w rowki po bokach
co pozwala nadać odpowiedni kształt linii włosów na
urządzenia (usłyszysz „kliknięcie") (rys. 20).
głowie.
Podczas korzystania z minitrymera należy zachować
3
Wybierz żądane ustawienie, przesuwając w górę lub
szczególną ostrożność, gdyż w takim przypadku
w dół przełącznik ustawień. (rys. 21)
przycinany jest każdy włos.
,
Wybrane ustawienie jest pokazywane przez
wskaźnik z tyłu urządzenia.
1
Załóż minitrymer na uchwyt (patrz część
Tabela przedstawia długość włosów po przycinaniu z
„Zakładanie i zdejmowanie nasadek" w rozdziale
różnymi ustawieniami.
„Przygotowanie do użycia").
W przypadku przycinania po raz pierwszy ustaw na
2
Wykonuj minitrymerem spokojne i kontrolowane
początek maksymalne ustawienie (4), aby zapoznać się z
ruchy.
urządzeniem.
-
W celu uzyskania najlepszych rezultatów przesuwaj
Ustawienia precyzyjnego grzebienia
trymer w kierunku przeciwnym do kierunku wzrostu
włosów.
Ustawienie
-
Pamiętaj, aby minitrymer zawsze dotykał skóry całą
powierzchnią.
Długość włosów po przycięciu (mm)
Przycinanie
Przycinanie brody z precyzyjnym trymerem
Przygotowanie do przycinania
bez precyzyjnego grzebienia
Przed rozpoczęciem przycinania należy sprawdzić, czy
Za pomocą precyzyjnego trymera, bez użycia
urządzenie jest w pełni naładowane.
precyzyjnego grzebienia, można nadać odpowiedni kształt
Nie ma możliwości zasilania urządzenia z sieci
i kontury wąsom i bokobrodom oraz usuwać pojedyncze
elektrycznej.
włosy.
1
Za pomocą gęstego grzebienia rozczesz włosy,
1
Przesuń przełącznik ustawień w górę i zdejmij
które mają być przycinane (brodę, wąsy, bokobrody,
precyzyjny grzebień z uchwytu (rys. 22).
brwi).
1
QG3193, QG3190
N
P
O
Q
R
4203.000.5883.2
2
3
4
5
6
7
5
6
7
8
9
10
12
14
16
18
8
9
10
11
12
13
14
15
16
17
18
19
20
21
22
23
24
25
26
27
28
29
30
31
32
33
34
1
2
3
4
2
4
6
8
35
Advertisement
Table of Contents

Related Manuals for Philips QG3190/00


Summary of Contents for Philips QG3190/00
- Page 1 If a lot of hair has accumulated in the comb, remove the Put the cutting element on the handle (see Philips! To fully benefit from the support that Philips offers, comb from the appliance and blow and/or shake the hair section ‘Attaching/detaching attachments’...
- Page 2 Załóż trymer do przycinania włosów w nosie i nowy tego samego typu w sieci punktów serwisowych O Переходник-адаптер uszach (patrz część „Zakładanie i zdejmowanie współpracujących z Philips Polska Sp z o.o. P Штекер адаптера nasadek” w rozdziale „Przygotowanie do użycia”). Uszkodzone lub zużyte nasadki lub grzebienie należy Q Индикатор...
Need help?
Do you have a question about the QG3190/00 and is the answer not in the manual?
Questions and answers