Table of Contents
Advertisement
Quick Links
北京智能佳科技有限公司
Content
1.Introduction ..................................................................... 2
2.Specifications..................................................................2
3.Layout............................................................................. 3
4.Connecting OpenCM9.04 .............................................. 4
5.Power Circuit Connection.............................................. 6
6.EXP Board Programming...............................................7
7.Button & LED ................................................................ 9
8.Downloads.................................................................... 10
www.bjrobot.com
第 1 页 共 10 页
Advertisement
Table of Contents

Summary of Contents for Robotis OpenCM 485
-
Page 1: Table Of Contents
北京智能佳科技有限公司 Content 1.Introduction ..............2 2.Specifications..............2 3.Layout................3 4.Connecting OpenCM9.04 ..........4 5.Power Circuit Connection..........6 6.EXP Board Programming..........7 7.Button & LED ..............9 8.Downloads..............10 www.bjrobot.com 第 1 页 共 10 页... -
Page 2: Introduction
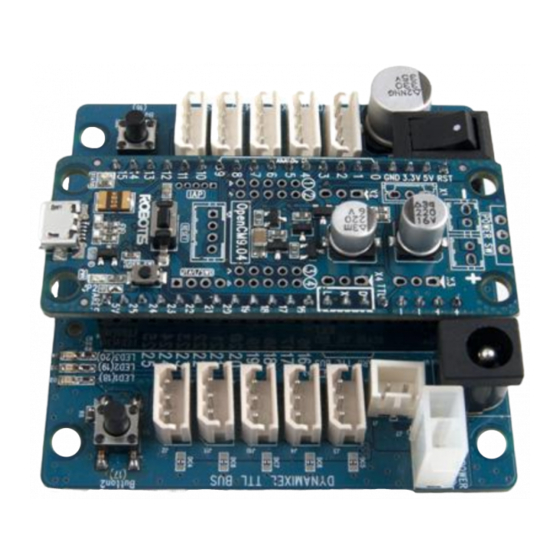
北京智能佳科技有限公司 OpenCM 485 Expansion Board OpenCM 485 Expansion Board 1.Introduction 2.Specifications Item Description Input voltage 5~30V Power SMPS, LiPo, DXL PRO 24V Power Switch Dynamixel Port 4Pin x 5, 3Pin x 5 Button Size 68 mm X 66.5 mm Weight www.bjrobot.com... -
Page 3: Layout
Does not disconnect the power received via USB cable. JP1 Jumper : Jumper that determines whether the power inputted onto OpenCM 485 EXP will be supplied to OpenCM9.04 board or not. WARNING: Check the pinout! The pinout of Dynamixel can differ from the pinout of connector manufacturer. -
Page 4: Connecting Opencm9.04
北京智能佳科技有限公司 4.Connecting OpenCM9.04 Prepare OpenCM 485 EXP and OpenCM9.04 boards. Any version of OpenCM9.04 is compatible. Solder the header onto the OpenCM9.04. OpenCM9.04 is mounted onto OpenCM 485 EXP as shown below. CAUTION : The orientation of the connection must be correct. - Page 5 北京智能佳科技有限公司 Connect the USB cable onto OpenCM9.04 board. Connect Dynamixel and 12V SMPS adapter onto OpenCM 485 EXP board. www.bjrobot.com 第 5 页 共 10 页...
-
Page 6: Power Circuit Connection
北京智能佳科技有限公司 5.Power Circuit Connection A power circuit block diagram of the OpenCM 485 EXP and OpenCM9.04, once mounted, is shown below. OpenCM 485 EXP supplies 5V from OpenCM9.04 as default. JP1 can be used to determine if VDD power from OpeCM 485 EXP board is supplied to OpenCM9.04. -
Page 7: Exp Board Programming
北京智能佳科技有限公司 OpenCM9.04 & OpenCM 485 EXP Bus Connections 6.EXP Board Programming Support.robotis.com -> Software Help -> ROBORIS_OpenCM (MUST use V 1.0.1 or later). Extract OpenCM IDE and execute ROBOTIS_OpenCM.exe file. www.bjrobot.com 第 7 页 共 10 页... - Page 8 北京智能佳科技有限公司 OpenCM 485 EXP’s 485 Bus sends and receives communication packets from OpenCM9.04’s Serial3(USART3). Dynamixel Class variable MUST be set to 3 once it has been declared. Dynamixel Dxl(3); //Dynamixel on Serial3 (USART3). Needs to be set as 3 to used USART3 on OpenCM 485 EXP.
-
Page 9: Button & Led
北京智能佳科技有限公司 7.Button & LED OpenCM 485 EXP board has 2 buttons and 3 LED’s that are connected to OpenCM9.04 I/O pins. The OpenCM9.04 I/O pin numbers for the buttons and LED’s are indicated below. OpenCM9.04 I/O Button1 Button2 LED1 LED2 LED3 www.bjrobot.com... -
Page 10: Downloads
北京智能佳科技有限公司 8.Downloads PCB Schematic Download PDF © 2018 ROBOTIS. Powered by Jekyll & Minimal Mistakes. www.bjrobot.com 第 10 页 共 10 页...
Need help?
Do you have a question about the OpenCM 485 and is the answer not in the manual?
Questions and answers