
Related Manuals for Pinty HM01-08VR

Summary of Contents for Pinty HM01-08VR
- Page 1 Crazy Fit Massager Thank you for purchasing the Crazy Fit Massager HM01-08VR Please read this manual carefully to ensure optimum performance and safety.
- Page 2 • Use this massager only according to the instructions providedin this manual. Do not use it for any purpose other than exercise. • To prevent damage, do not place this product on a woodpaneled floor. Do not shift or drag the unit over any surfacethat is vulnerable to scratching or staining. •...
-
Page 3: Precautions During Use
When disconnecting the power plug from the wall outlet, grip the plug itself, rather than tugging on the cord. • Do not crush the power cord with heavy objects. Stop using the unit if any of the following conditions appear. Turn offpower immediately, disconnect the power plug from the wall outlet, andcontact an authorized repairman: •... -
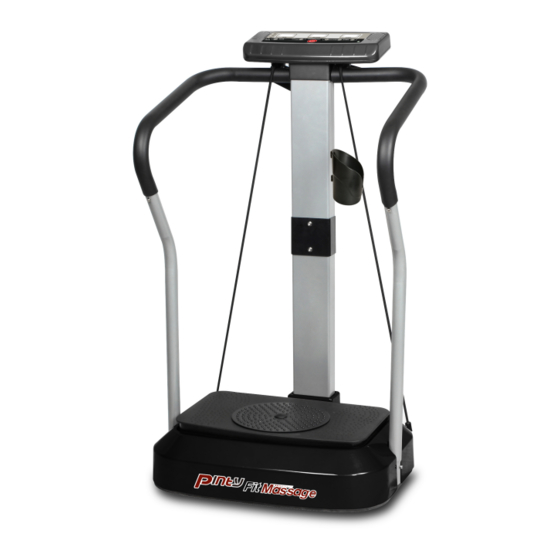
Page 4: Part Names
Part Names Control Panel Armrest Stand Resistance Bands Step Plate Footplate • Base Plates (3) • Allen Wrench • M6x14 hexagonal screws (11) • Audio Line (1) • M6x20 hexagonal screws (2) • screws (2) -
Page 5: Setup Installation
Setup Installation STEP 1 Before installation, check the parts and accessories. Insert the upper part of stand into the lower part. STEP 2 Please Use 2xM6*14 hexagonal screw and 2 base plates with 5#Allen Wrench to lock the back tube. Then Please Use 1xM6*14 hexagonal screw and 1 base plates with 5#Allen Wrench to lock the front tube. - Page 6 STEP 5 Use the Allen wrench and two M6x20 hexagonal screws to fasten. STEP 6 Place the bottom ends of the armrest into the casing holes into the right and left sides of the aluminum casing. Making sure that the screw holes are all aligned in a straight one, press down on the entire armrest.
- Page 7 STEP 9 Use the Allen wrench and M6*14 hexagonal screws to fasten. STEP 10 Installation of the main parts are finished. STEP 11 Use hand to move the metal parts (with hole) at the right and left sides to the outside, connect the holes with the resistance bands.
- Page 8 Setup Installation Time Display Speed Display Calorie Display SPEED TIME DOWN MODE SPEED POWER CALORIE Power key: Press this key to start operation. Press this key again to turn off. Mode key: Press this key for Automatic or Manual Mode. Manual mode: Adjust your desired time and speed during operation.
- Page 9 Operating Instructions 1. Connect the power plug to an electrical outlet. Flip the power switch on the back end of the unit’s casing. To turn on the unit, press the key. Pressing this key a second time will put the unit in its “standby” mode. 2.
-
Page 10: Additional Exercises
Additional Exercises BASIC Stand with both feet on the platform. Grip its handles with your hands. Balance yourself as the platform moves. LUNGES Stand with both feet on the platform. Grip its handles with your hands. Place one foot on the center of the platform and shift your weight onto one foot. -
Page 11: Troubleshooting
Additional Exercises VIBRATION TWIST Place your feet onto the circular center of the step plate, while keeping your knees slightly bent. For support, hold on to the armrests with your hands. While keeping your footsoles in their fixed positions on the plate, twist your feet from side to side. Troubleshooting PROBLEM POSSIBLE CAUSE... -
Page 12: Product Maintenance
Product Maintenance • Before daily cleaning, be sure to switch the unit off and disconnect the power plug from the electrical outlet. • Never use alcohol or other harsh chemicals to clean the unit. • To clean the power switch and the circumference of the control panel, use a cloth that is soft and dry, rather than wet.
Need help?
Do you have a question about the HM01-08VR and is the answer not in the manual?
Questions and answers