
Subscribe to Our Youtube Channel
Related Manuals for Pulse ROIP-400

Summary of Contents for Pulse ROIP-400
- Page 1 RADIO OVER IP GATEWAY ROIP-400 Version 6.0.0.1 Operation Manual Package Contents: 1. Radio Over IP Gateway (ROIP-400) 2. Ethernet Cable 3. Radio Interface Cable 4. Power Adapter 9V DC 5. Quick Startup Guide...
-
Page 2: Table Of Contents
WAN IP Locator ………………………………………..20 Cross and Straight Cable Connections …………….……21 RADIO CONFIGURATION ………………………………...…..22 Interface Cable Connections …………………...…...…...22 Connecting to Motorola GM338 ………………………...22 Radio Programming ……………………………………..23 QUICK TROUBLESHOOT ………………………………...….…24 DTMF COMMANDS ……………………………………………..25 Copyright 2017@ Pulse Communication Systems Pvt. Ltd. -
Page 3: Basic Installation
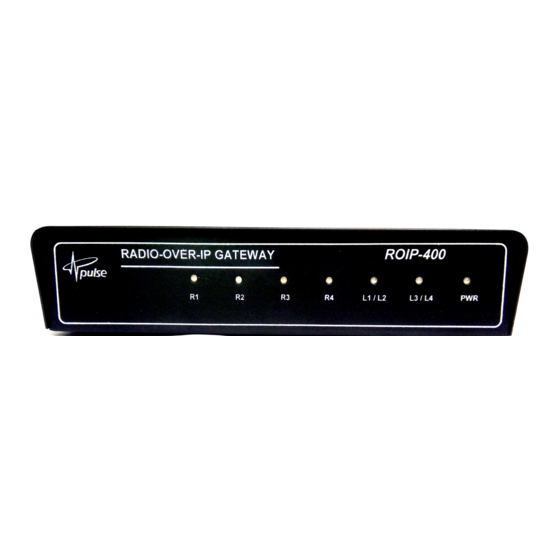
DC power supply to ROIP Ethernet (RJ45) LAN interface LAN port provides LAN con- nectivity with other ROIP or Computers. Radio connector Radio interface Radio connector to interface (RJ45) with Radio Set Hardware Front Overview Copyright 2017 @ Pulse Communication Systems Pvt. Ltd. - Page 4 Fast Blinking Not connected to L4-Green Server ON (constant) Connected to Server Radio Set Connected R1/R2 (PTT) is Transmitting Au- R3/R4 GREEN Radio Set Connected (CSQ) is Receiving Audio * L1/L2/L3/L4 are dual LED's Copyright 2017 @ Pulse Communication Systems Pvt. Ltd.
-
Page 5: Roip Quick Setup
CSQ Led R1 (green color) at the front of the ROIP should glow. Similarly speak from the mic of the Radio Set –1, walkie talkie-1 should receive the signal. Setup another ROIP and Radio’s and Walkie Talkie’s in the similar way. Copyright 2017 @ Pulse Communication Systems Pvt. Ltd. -
Page 6: Settings Configuration
SETTINGS CONFIGURATION Computer IP Configuration to configure ROIP Go to Control Panel-> Network and Internet-> Network and Sharing Center Click on Local Area Connection/ Wireless Network Connection. Click “Properties” Copyright 2017 @ Pulse Communication Systems Pvt. Ltd. - Page 7 ROIP-400 Operation Manual Select “Internet Protocol Version 4 TCP/IPv4” and Click “Properties” Copyright 2017 @ Pulse Communication Systems Pvt. Ltd.
- Page 8 (x is any value from 1 to 254 other than 80) Enter Subnet Mask. If ROIP is in default mode, enter “255.255.255.0” Enter Default Gateway. If ROIP is in default mode, enter “192.168.1.1” Click Ok to save settings. Copyright 2017 @ Pulse Communication Systems Pvt. Ltd.
-
Page 9: Factory Default Roip Settings
Enter the Local IP address of the ROIP on the address bar of web browser as shown below (factory default: “192.168.1.80”: A Login page will appear as shown below. Enter login password and press Login (factory default: admin). Copyright 2017 @ Pulse Communication Systems Pvt. Ltd. -
Page 10: Local Ip Settings Configuration
Local IP: Ip Address of the ROIP in the local area network Subnet Mask: Subnet Mask of the local area network Gateway: Ip Address of the gateway of local area network Copyright 2017 @ Pulse Communication Systems Pvt. Ltd. -
Page 11: Change Login Password
A Change Login Password Page will open as shown below. Enter “Old Password” , “New Password”, Re-Enter “New Password” Click on Save to change password Reset Power of ROIP for changes to take effect.. Copyright 2017 @ Pulse Communication Systems Pvt. Ltd. -
Page 12: Radio Settings Configuration
Vox Delay: Vox Delay value in millisecond, applicable only when Vox mode is enabled. Vox Threshold: Minimum threshold audio level below which receive signal will not be triggered in Vox mode. (Range: 0 to 255). Copyright 2017 @ Pulse Communication Systems Pvt. Ltd. -
Page 13: Radio Group Configuration
None : No audio shared in group Permanent Shared : Audio permanent shared to every member of group. On DTMF Command only: Audio is shared in group only when you provide the command. Copyright 2017 @ Pulse Communication Systems Pvt. Ltd. -
Page 14: Server Settings Configuration
Wan Dynamic IP: Tick Checkbox if the Wan IP of Router is dynamic. Health Time Out: Time Interval, in second, after which a health request is sent. Copyright 2017 @ Pulse Communication Systems Pvt. Ltd. -
Page 15: Reset Roip To Factory Default
Press the button for 5-6 seconds while the ROIP is powered on, till all led at the front panel blinks twice. Reset Power of ROIP for changes to take effect. Copyright 2017 @ Pulse Communication Systems Pvt. Ltd. -
Page 16: System Configuration
Port (mentioned in ROIP IP Settings), if blocked. Also ask forward Port Address (Local Port) to IP Address of ROIP (IP1 or IP2) Using Port Forward (NAT) feature or DMZ Host feature available at Router or Server’s Settings Page. Copyright 2017 @ Pulse Communication Systems Pvt. Ltd. -
Page 17: Two Systems At Same Location
If connecting ROIPs back to back with a single LAN Cable, then use a Cross Cable. If connecting to a switch/hub use a straight cable. When both ROIP’s connected to each other then link LED’s L1/L2 & L3/L4 are constantly glowing. Copyright 2017 @ Pulse Communication Systems Pvt. Ltd... -
Page 18: Roip Server Configuration
Gateway LAN IP Address (say GW1), and subnet mask of LAN (say SM1). Open “Server IP Configure” setting page Remote IP: Server Static IP at all Conn Port * Server must be ON. Copyright 2017 @ Pulse Communication Systems Pvt. Ltd. -
Page 19: Vox Mode Configuration
ROIP, use Vox Mode. Configuration for the same is men- tioned below: Open “Radio Configuration Page”. Tick Checkbox of “Vox Mode” Enter “Vox Delay” as 100 Enter “Vox Threshold” as 5 Copyright 2017 @ Pulse Communication Systems Pvt. Ltd. -
Page 20: Wan Ip Locator
In the address bar enter “www.whatismyip.com” and press enter. A screen will be shown as below: IP Address Highlighted is the WAN IP Address of the network or router/ Server. Copyright 2017 @ Pulse Communication Systems Pvt. Ltd. -
Page 21: Cross And Straight Cable Connections
(to be used while connecting ROIP to Computer, Laptop, Hub ,Switch) Cross Cable Connections (to be used while connecting one ROIP to other ROIP back to back using a single Lan Cable) Copyright 2017 @ Pulse Communication Systems Pvt. Ltd. -
Page 22: Radio Configuration
GM-338 employs 20 pin accessory connector, while supplied connector is 16 pin connector. use central 16 pin for the connection as depicted below ( View from back side of the radio ) Copyright 2017 @ Pulse Communication Systems Pvt. Ltd. -
Page 23: Radio Programming
IN ACCESSORY CONFIGURATION RX AUDIO TYPE FILTERED AUDIO EXT. PTT AUDIO EXT MIC AUDIO IN ACCESSORY PIN ACCESSORY PAKAGE DEFAULT PIN NO. 3 EXT MIC PTT (INPUT ) PIN NO. 8 CSQ DETECT Copyright 2017 @ Pulse Communication Systems Pvt. Ltd. -
Page 24: Quick Troubleshoot
Check Radio Settings. Radio not transmitting ROIP’s CSQ Connection Break Check LAN Connection. Led glowing but Check Ping status of other ROIP’s both IP. PTT Led not Check ROIP IP glowing Configuration. Copyright 2017 @ Pulse Communication Systems Pvt. Ltd. -
Page 25: Dtmf Commands
(Group ID are pre defined Group 1 ID is 1, Group 2 ID is 2, Group 3 ID is 3 and Group 4 ID is 4) Note: Make groups Using ROIP web page “Radio Group Config” Copyright 2017 @ Pulse Communication Systems Pvt. Ltd. - Page 26 ROIP-400 Operation Manual Copyright 2017 @ Pulse Communication Systems Pvt. Ltd.
Need help?
Do you have a question about the ROIP-400 and is the answer not in the manual?
Questions and answers