Table of Contents
Advertisement
Quick Links
NEW APPROVAL SHEET
DATE
PART NO
DESCRIPTION
MODEL
REV.
VENDOR
REMARK
oApproved by NHRD
LINKO
FIC-SZ
NEI-HU
WORLD WIDE
MANAGER
楊 博 丞
2003.04.24
Form update:2002/11/1
First International Computer, Inc.
□
FIC PRODUCT
▓
MANUAL
□
P.C.B
POWER SUPPLY
□
2003.04.24
25-10439-03
MANU VGA CARD A92 MULTINATIONAL LANGUAGE USER'VA0 W/ ENVELOPE
A 92
騏
耀
□ DCC
▓ DCH
□ QA2
□ RDCC
□ FIC-TX □ FIC-BZ
LEADER
張 新 政
2003.04.24
□
COMPONENT
□
MECHANICAL
□
PURCHASE
□
SOFTWARE
▓ Approved by FIC-SZ
□ QA
□ PMC
▓ VENDOR
□ R&D
□ IE
□ VENDOR □ FAE
□ FIC-CZ
CHECK
高 三 支
2003.04.24
RELEASE FROM:FIC R&D
FILE NO.
25-10439-03
□ CSD
▓ QA1
□ CE
□ FIC-GZ
INITIAL
高 三 支
2003.04.24
QP-R705-F02
Advertisement
Chapters
Table of Contents

Subscribe to Our Youtube Channel
Related Manuals for Radeon 9200 Series

Summary of Contents for Radeon 9200 Series
- Page 1 First International Computer, Inc. FILE NO. 25-10439-03 NEW APPROVAL SHEET □ □ FIC PRODUCT COMPONENT ▓ □ MANUAL MECHANICAL □ □ P.C.B PURCHASE □ POWER SUPPLY SOFTWARE □ DATE 2003.04.24 PART NO 25-10439-03 DESCRIPTION MANU VGA CARD A92 MULTINATIONAL LANGUAGE USER'VA0 W/ ENVELOPE MODEL A 92 REV.
- Page 2 FIRST COMPONENT INTERNATIONAL APPROVAL COMPUTER SHEET PART NUMBER 25-10439-03 APPLICANT MANU VGA CARD A92 MULTINATIONAL LANGUAGE USER'VA0 W/ ENVELOPE DESCRIPTION WHERE USED 騏 耀 BRAND VENDOR MODEL(S) MARK P/N 張 均 寶 CONTACT PHONE (0769) 5595420 COMPONENT OK NG COMMENTS: ¨...
- Page 3 東 莞 騏 耀 彩 印 有 限 公 司 ******************************************** 承 認 書 SPECIFICATION FOR APPROVAL ******************************************** 5. 客戶 才眾電腦 CUSTOMER 6. 品名 DESCRIPTLON MANUAL 7. 料號 PART NO 25-10439-03 8. 色號 封面 4+0,內文 B+B COLOR 材質 封面 200G 銅西,內文 70G 模造 MATERIAL 6.
- Page 4 品名 manual 機種 ______________ 料號 ____25-10439-03___ 封面 200G 銅西 材質 內文 70g 模造 封面 印色 內文 上光種類 單面上光膠 裝訂方式 騎馬釘 完成尺寸 150*210mm(± 2) 客戶確認 ______ 制定 張均寶...
- Page 5 9200 Series...
- Page 6 GRAPHIC CARD USER MANUAL For any driver updates, please refer to websites: www.ati.com and www.fic.com.tw Rev. Date :3, 2003 Part No. : 25-10439-03...
- Page 7 Notice Handling Precautions Warning: Static electricity may cause damage to the integrated circuits on the electric device. Before handling any card outside of its protective packaging, ensure that there is no static electric charge in your body. Observe the following basic precautions when handling the card or other computer components: n Wear a static wrist strap which fits around your wrist and is connected to a natural earth ground.
-
Page 8: Table Of Contents
Table of Contents Chapter 1 Overview The Card ..............1-1 1.1 Performance ............1-3 1.2 Software Compatibility .......... 1-3 1.3 Monitor Compatibility ........... 1-3 Chapter 2 Installation 2.1 What’s Included In the Package......2-1 2.2 Installing the Card..........2-1 2.3 Card Layout ............2-3 Chapter 3 Software Utility 3.1 Installing on Windows 95/98/ME ...... - Page 9 GRAPHIC CARD USER MANUAL This Page Left Blank for Note...
-
Page 10: Chapter 1 Overview
HYPER Z™ II technology conserves memory bandwidth for improved in demanding applications and boosts effective bandwidth by over 25% • PIXEL TAPESTRY™ II, the RADEON 9200/9200 Pro™ 3D rendering engine, power an incredible 1.2 Gigatexels per second for the highest fill rates in 32-bit at high resolutions... - Page 11 GRAPHIC CARD USER MANUAL • VIDEO IMMERSION™ II technology enables integration of industry-leading digital video features, including advanced deinterlacing algorithms for unprecedented vi deo quality and integrated digital TV decode capability • Integrated Transformation, Clipping and Lighting • Twin Cache Architecture •...
-
Page 12: Performance
640 by 480. When the card is used in VGA, backward compatibility, 16-color AGP modes, or the graphics engine of the ATI RADEON 9200/9200 Pro card is not used. The speed in these modes will be comparable to the fastest type of standard VGA card. - Page 13 GRAPHIC CARD USER MANUAL Super VGA monitors can support IBM standard VGA plus the 800x600 extended mode used by most VGA cards, and the 1024x768 interlaced mode used by most VGA cards and the IBM 8514A. Multisync monitors are more expensive and will work at all Super VGA resolutions plus additional higher resolutions or refresh rates.
-
Page 14: Chapter 2 Installation
Chapter 2 Installation 2.1 What’s Included in the Package The VGA card package includes the following: VGA card accelerator card Software diskettes which contain the necessary files This manual 2.2 Installing the Card 1. Unplug the computer and remove the cover. Shut down the computer and turn off any attached equipment (such as a monitor or printer). - Page 15 GRAPHIC CARD USER MANUAL Note: If the computer has a graphics chip soldered down on the motherboard, refer to the manual for the system or motherboard for information on how to disable it. 3. Insert the Graphics Accelerator card. Locate the empty AGP socket on the motherboard and use the following instructions to insert the Graphics Accelerator reference card into that...
-
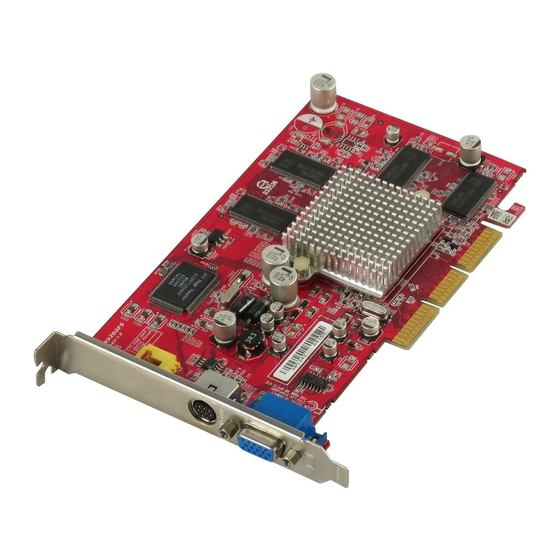
Page 16: Card Layout
Installation Caution! Before you turn on your system, you have to be sure the VGA card is setup already and all the cables are connected. DO NOT connect / disconnect TV-out cable when your TV or PC is Power On. 2.3 Card Layout... - Page 17 GRAPHIC CARD USER MANUAL This Page Left Blank for Note 2- 4...
-
Page 18: Software Utility
Chapter 3 Software Utility The card is 100% VGA compatible and as such needs no special display drivers to run application software correctly at standard VGA resolutions and color depths. However, enhanced display drivers are supplied with the VGA card because they provide accelerated performance, higher color depths and higher resolutions for software applications. -
Page 19: Installing On Windows 95/98/Me
GRAPHIC CARD USER MANUAL 3.1 Installing on Windows 95/98/ME General Installation Notes: • If your motherboard does not support Intel processor, please install the AGP Driver provided by the motherboard company before you install VGA Driver. • Before installing our user-friendly VGA configuration utility, please set up the VGA display as ”standard PCI Graphics Adapter”... - Page 20 Software Utility When the Welcome box appears. Click on the "Next" button to go to the next step. The License Agreement dialog box appears. Click on “ ” button.
- Page 21 GRAPHIC CARD USER MANUAL 7. When the Windows SETUP has completed copying the files to the computer. Windows will prompt you to restart Windows with the “Yes” option. Then click on “Finish” button. 3- 4...
-
Page 22: Installing On Windows 2000
Software Utility 3.2 Installing on Windows 2000 Start Windows. When Windows detects your graphics card, the Found New Hardware Wizard dialog box appears. Click Cancel to enter the Windows desktop. Insert the CD installation disc into your CD-ROM drive. The CD should autorun and the following screen will appear. - Page 23 GRAPHIC CARD USER MANUAL When the Welcome box appears. Click on the "Next" button to go to the next step. The License Agreement dialog box appears. Click on “ ” button. 3- 6...
- Page 24 Software Utility The “Digital Signature Not Found” dialog box appears. Click on “ ” button. When the Windows SETUP has completed copying the files to the computer. Windows will prompt you to restart Windows with the “Yes” option. Then Click “Finish” button.
-
Page 25: To Enable/Disable A Display Device
GRAPHIC CARD USER MANUAL WARNING: Some games written for older DirectX versions may not work properly under DirectX 8.1. Make sure that your applications or games support DirectX 8.1 before installing the DirectX 8.1 runtime libraries. 3.3 To enable/disable a display device To make sure if your installation is successful, you can Right-click the Windows desktop and click Properties. -
Page 26: To Adjust Your Monitor Screen Size
Software Utility Note: • At least one of your display devices must be enabled. • At least one of your display devices must be set to the primary displays mode. 3.3.1 To adjust your monitor screen size Click the “Monitor” button. Your monitor must be enabled before you can change its display properties. -
Page 27: To Adjust Your Monitor Synchronization
GRAPHIC CARD USER MANUAL 3.3.2 To adjust your monitor synchronization Click here to view Display Properties at the Settings tab. Click the “Advanced” button. Click the “Displays” tab. If you are running an extended desktop, you must first select the video adapter whose display properties you want to change. -
Page 28: Dual Display Device Options
Software Utility 3.4 Dual Display Device Options The following are sample display combinations for the card: • • One RGB monitor and one One RGB monitor and one TV (S-Video) • One RGB monitor and one TV (Composite) 3-11... -
Page 29: Using The Crt/Tv Features
GRAPHIC CARD USER MANUAL 3.5 Using the CRT/TV Features (TV-out function optional) 3.5.1 How to use TV-out cables correctly Caution! Before you turn on your system, you have to be sure the VGA card is setup already and all the cables are connected. DO NOT connect / disconnect TV-out cable when your TV or PC is Power On. - Page 30 Software Utility 1. Click here to view Display Properties at the Settings tab. 2. Click the Advanced button. 3. Click the Displays tab. If you are running an extended desktop, you must first select the video adapter whose display properties you want to change. 4.
- Page 31 GRAPHIC CARD USER MANUAL 6. In the S-Video Sharpness box, select a value from the list. 7. Click OK or Apply to save the changes you have made. 3- 14...
- Page 32 Software Utility To select your TV broadcast format by country 1. Click here to view Display Properties at the Settings tab. 2. Click the Advanced button. 3. Click the Displays tab. If you are running an extended desktop, you must first select the video adapter whose display properties you want to change.
- Page 33 GRAPHIC CARD USER MANUAL To add/remove color correction control points Click here to view Display Properties at the “Settings” tab. Click the “Advanced” button. Click the “Color” tab. In the Color Curve area, click the radio button corresponding to the desired color component (Red, Green or Blue) To add a control point, hold the “SHIFT”...
- Page 34 Software Utility Verifying Driver Installation From the Windows 9x desktop, click on "My Computer", then "Control Panel", and then, finally, "System". You should be in the "System Properties" window. Click on the "Device Manager" tab. From here, go down to "Display Adapter" and click.
- Page 35 GRAPHIC CARD USER MANUAL This Page Left Blank for Note 3- 18...
-
Page 36: Using Hydravision
Chapter 4 Using HydraVision Using HydraVision for Windows 2000 HydraVision software is specifically designed for use with Windows ® 2000. HydraVision installation enables the Desktop Manager and creates a Windows program group for HydraVision display management ® software. HydraVision and the Desktop Manager are activated whenever Windows ®... - Page 37 GRAPHIC CARD USER MANUAL Desktop Management Controls The Desktop Management dialog lets you to determine the behavior of pop-up windows and dialog boxes in a multiple monitor environment. Dialog control: Enable dialog repositioning- Toggles dialog control on and off. When it is checked, you can choose to have dialog boxes appear on the parent application’s monitor.
- Page 38 Using HydraVision Max child windows- Keeps windows generated by parent applications from splitting across monitors (A child window is a window residing within a parent application windows.) The ability to keep child windows on a single monitor when maximized is extremely useful for editing multiple documents side by side in parent application.
- Page 39 GRAPHIC CARD USER MANUAL Note: MultiDesk will not reload automatically when Windows restarts. You will need to reload MultiDesk from the Desktop Manager dialog box. Load/Unload MultiDesk- This button restores or removes multiple desktop functionality. Note: MultiDesk will not reload automatically when Windows restarts. You will need to reload MultiDesk from the Desktop Manager dialog box.
- Page 40 Using HydraVision Note: ATI recommends that a modifier key be used with any function key (F1, F2, etc.) assigned as a hot key. This will prevent interference with the function of these keys in individual applications. To delete a hot key from the Assigned hot keys list box, highlight it, click Remove, and then click Apply.
- Page 41 GRAPHIC CARD USER MANUAL MultiDesk HydraVision software supports multiple desktops. With MultiDesk, one active desktop will always be visible, while up to eight active desktop scan reside in the background. When MultiDesk is running, the MultiDesk icon in the system tray displays the number assigned to the current desktop. Note: MultiDesk is installed with HydraVision...
-
Page 42: Appendix A Specifications
Video Connector CRT Monitor: 15-pin VGA connector S-video and composite connector LCD standard 24-pin DVI (Digital Video Interface) Graphics Accelerator ATI RADEON™ 9200/9200 Pro Display Memory 64/128MB DDR SDRAM Monitor Compatibility All VGA, Super VGA and Multisync. The resolutions upto 2048x1536 and 1920x1440 require a multisync monitor with a 96 and 90K Hz maximum horizontal scan rate, respectively. -
Page 43: Programming Information
GRAPHIC CARD USER MANUAL A.2 Programming Information The card supports all VGA modes. This is the default configuration of the VGA BIOS. The extended VGA graphics mode is invoked by the normal INT 10 mode call. All the VGA extended modes can be invoked with the VESA defined select extended mode BIOS call. - Page 44 Appendix A The following table shows the resolutions for TV-Out: GRAPHICS COLOR FRAME RESOLUTION DEPTH BUFFER SIZE 640x480 8bpp 16bpp 32bpp 32MB 64MB 800x600 8bpp 16bpp 32bpp 32MB 64MB 1024x768 8bpp 16bpp 32bpp 32MB 64MB LCD resolutions and color depth table for RV280. GRAPHICS COLOR FRAME...
- Page 45 GRAPHIC CARD USER MANUAL This Page Left Blank for Note A- 4...
- Page 46 图形加速卡 使用手册 文件编号 : M01904 版 本 : A0 日 期 : 11, 2001 料 号 : 25-12094-00...
- Page 47 注意 预防措施 警告: 静电可能损坏图形加速卡的集成电路。将图形加速卡从保护包装 取出前须确定身体不带静电。 使用图形加速卡或其它电脑组件,需遵守以下基本预防措 施: 配戴静电手环,手环要自然接地。 碰一下接地或防静电物品,如水管。 避免扩展卡、图形加速卡和模组上的零件与插在扩展槽内 的“金手指”接口相接触。最好通过其装载托架处理电脑 组件。 以上方法可防止静电产生,及正确释放静电。 商标™ 本手册提及的商标仅为标识之用,涉及的产品名称可能是也 可能不是其所属公司的注册商标或版权。 版权© 未经本公司书面授权,除用户因个人需求存档外,不得对本 手册的任何部分(包括本印刷品及其档案)以任何形式任意 进行复制、传阅、改写、储存于检索系统或转释成任何语 言。 本手册若有修改,恕不事先通知。本公司不对本手册作任何 明示或暗示之保证,包括但不局限于保险契约、销售状况或 意图适宜性。在任何情况下,即使因本手册或产品某些不当 或错误之处而引起某些不良后果,如利益损失,生意失败, 用途或资料丢失,业务中断,或间接、特殊、意外或严重损 失等,本公司不负任何责任。本手册若有修改,恕不另行通 知。...
- Page 48 目录 前言 ........1-1 第一章 硬件安装 ........ 2-1 第二章 产品内容 ......2-1 如何安装显示卡 ....2-1 软件安装 ........ 3-1 第三章 Windows 95 与 Windows 95 OSR2.0/2.1 3-1 安装 Windows 95/98/ME 驱动程序 ..3-2 安装 Windows 2000 驱动程序 ..3-5 激活/关闭显示器装置 ....3-8 3.4.1 调整监视器的最高重新整理速率...
- Page 49 图形加速卡使用手册 此页空白留作笔记...
- Page 50 第一章 前言 此绘图加速卡使用 ATI RADEON 9200/9200 Pro 加速芯片,除了 具有高效能 2D/3D 绘图能力,另配置 DVI 或电视输出端口,可同 时双屏幕显示,发挥您的计算机上绝佳的绘图能力。以下介绍它 的规格。 • 高整合度 128 位元的 2D/3D ATI RADEON 9200/9200 Pro 绘 图运算器(GPU;Graphics Processing Unit),最大解析度为 2048x1536。 • 支援 TRUFORM、SMARTSHADER、SMOOTHVISION、HYPER Z II 技 术。 • 几 何 转 换 、 裁 剪 及 光 源 (TC&L; Transformation, Clipping and Lighting)整合。...
- Page 51 图形加速卡使用手册 • 多重材质贴图(Single pass multi-texturing)。 • 材质压缩(Texture Decompression)。 • 8 位元模板缓冲区(Stencil Buffer)。 • AGP 通用型汇流排;可相容 AGP 2X/4X/8X 系统。 • 提供 Microsoft Direct 8.1 与 OpenGL 1.3 ICD 全硬体加 速。 • 支援双萤幕与视讯输出。 提供 S-Video 输出埠,可直接输出到 PAL 电视或 NTSC 电视。 支 援 电 视 输 出 标 准 : NTSC(1024x768x60Hz)/PAL(1024x768x 50Hz)。...
-
Page 52: 硬件安装
第二章 硬件安装 2.1 产品内容 收到本公司显示卡产品包装后,请检视下列内容,若有任何问 题,请速联络您的经销商。 VGA 绘图加速卡。 驱动程式光碟片。 本产品使用手册。 2.2 如何安装显示卡 关掉电源并把所有接头拔 掉。 拆开机壳。 主机板上如有安装其它显示卡,请先将其拔除,再将新的显 示卡小心插入 AGP 插槽上。 确认介面卡已装妥。 盖回机壳,重新接回所用周边设备的接头。 然后将萤幕的讯 号插头插到显示卡上的 DB-15 接头上。 如有 TV-Out 功能者,可接上您的 AV 输出端子或 S-Video 输 出埠,接到电视机上方可。(注:假如要启动 TV-Out 功能, 请将电视机接线和显示卡连接上,并打开电视机电源,并重 新启动您的电脑)。... - Page 53 图形加速卡使用手册 本页空白留作笔记 2- 2...
-
Page 54: 软件安装
第三章 软件安装 3.1 Windows 95 与 Windows 95 OSR2.0/2.1 此显示卡必须搭配 Windows 95 OSR2.1 或以后版本才能正常工 作,所以您的操作系统是 Windows 95 或 OSR2.0,请先升级到 OSR2.1 以后再安装 RV2S/RV2A 显示卡。 “要如何安装成 Windows 95 OSR2.1?”,必须先安装 OSR2.0 然后 再安装 USBSUPP.EXE 升级程序而成为 OSR2.1(注:中文 Windows 95 OSR2.0 必须安装中文版的 USBSUPP.EXE)。 请执行 REGEDIT.EXE,来查询您的 Windows 95 版本。 HKEY_LOCAL_MACHINE\SOFTWARE\Microsoft\Windows\CurrentVersion\Version HKEY_LOCAL_MACHINE\SOFTWARE\Microsoft\Windows\CurrentVersion\VersionNumb 注意... -
Page 55: 安装 Windows 95/98/Me 驱动程序
图形加速卡使用手册 3.2 安装 Windows 95/98/Me 驱动程序 由于 Windows 95/98/Me 具有随插即用(Plug and Play)功能,会自动 读取硬件资料。请将您的显示卡安装于您的主机接口槽后,激活 Windows 95/98/Me。屏幕上会出现〝找到新的硬件〞的讯息窗 口,这表示系统没有这个卡的内建驱动程序。请依下列步骤安 装。 注意 : 首 次 安 装 Windows 95/98/Me 时 , 显 示 卡 型 号 请 选 择 〝 Standard PCI Graphics Adapter (VGA)〞。 假如您购买的主机板非... - Page 56 软件安装 接下来,请在这个画面中按下【完成】键开始安装显示卡驱 动程序。请告诉程序到 Windows 95/98 底下的 System 子目录 中寻找驱动程序来安装。 此阶段完成后,〝变更系统设定值〞对话盒最后会出现,请 按【是】回答下列问题〝现在想重新激活计算机?〞 将显示卡驱动程序光盘片放入光驱中。 选择开始/执行,根据安装光盘片位置输入适当路径。 请选择【ATI 简易安装】进行安装。...
- Page 57 图形加速卡使用手册 当档案复制完成时,会出现〝欢迎〞窗口,然后按下【下一 步】键。 然后出现〝软件许可证权协议〞窗口,按下【是】按钮。 驱动程序安装完毕后,会出现安装完成对话框,选取【是, 我 。 现在要重新激活我的计算机】选项,再按下【完成】键 3- 4...
-
Page 58: 安装 Windows 2000 驱动程序
软件安装 警告 : 有些应用程序或游戏是用旧版本的 DirectX 链接库来撰写, 这些游 戏与 DirectX 8.1 并不兼容. 请确认您的用程序或游戏必须使用 DirectX 8.1 链接库才安装 DirectX 8.1. 3.3 安装 Windows 2000 驱动程序 激活 Windows 2000 系统。 当 Windows 2000 侦测到系统中显示卡时,会出现〝寻找新增 硬件精灵〞对话盒在屏幕上。... - Page 59 图形加速卡使用手册 请按下【取消】键,并回到桌面。 将显示卡驱动程序光盘片放入光驱中。 请选择【ATI 简易安装】进行安装。 当档案复制完成时,会出现〝欢迎〞窗口,然后按下【下一 步】键。 然后出现〝软件许可证权协议〞窗口,按下【是】按钮。 出现〝找不到数字签章〞对话盒,请按【是】键,进行下一 步骤安装。 假如出现下面画面,请按下【是】键继续安装。 3- 6...
- Page 60 软件安装 驱动程序安装完毕后,会出现安装完成对话框,选取【是, 我 现在要重新激活我的计算机】选项,再按下【完成】键。 为了确定安装是否成功,您可以在 Windows 2000 系统,按鼠标右 键,选取【内容】,出现【显示器 内容】窗口,选取【设定】 卷,按下【进阶… 】按钮,出现如下画面。 在 Windows 2000 系统,选择〝适配卡〞卷标页,按下【列出所有 模式】键,可以调整显示卡扫描频率。...
-
Page 61: 激活/关闭显示器装置
图形加速卡使用手册 3.4 激活/关闭显示器装置 在 Windows 系 统 , 按 鼠 标 右 键 , 选 取 【 内 容 】 , 出 现 【RV280 内容】窗口,选取【显示】卷标页,出现如下画 面。 对于支持多显示装置的 ATI 双控制器图形加速器,ATI 驱动程序 使用两种模式(延伸桌面或复制模式)简化了多显示器桌面的设 定。使用 ATI 显示器卷标上的控制,可以只选择一个显示器作为 主要显示器(至少选择一个),其余显示器工作在下面一种模式 下: 延伸桌面 产生一个跨越多个显示器的无缝桌面,就像在一台大的 显示器上显示一样。采用延伸桌面模式,可以选择将桌面延伸到 主要显示器桌面的右面或下面。为正确工作,两台显示装置均须 设为同一分辨率或颜色深度。但每台显示器的重新整理速率可以... - Page 62 软件安装 警告: 当您要切换 FPD(数字平面显示器)输出时,请关闭你的系统,将 接线连接到 FPD,确定 FPD 输出线接妥,再开启 FPD 电源并激活 计算机。(假如在计算机激活下,接上 FPD 输出线,这会容易造 成显示卡零件烧毁) 按一下「监视器」字标。 如果您在执行延伸桌面,您一定要先选择要变更其显示器内容的 影像配接卡。 按一下开∕关按钮 来激活∕关闭显示器装置。 当按钮在“开”的位置时,桌面影像会出现在其显示器装置图 标上。 按一下「确定」或「套用」来储存您所做的变更。 注意 : 您一定要激活一个显示器装置才能对其显示器内容做变更。 您至少一定要激活四个显示器装置中的一个。...
-
Page 63: 调整监视器的最高重新整理速率
图形加速卡使用手册 3.4.1 调整监视器的最高重新整理速率 按一下「监视器」按钮。 按一下「属性」字标。 您一定要先激活监视器才能变更其显示器内容。 如果您的监视器有显示数据频道 (DDC) ,按一下「使用 DDC 信息」按钮。否则,请到下一步骤。 在「最高整理速率」方块中,选取您所喜爱的最高整理速率 设定值。 按一下「确定」或「套用」来储存您所做的变更。 如果您同时激活监视器和电视,两者的重新整理速率将一致,并 受到较低重新整理速率的限制。 警告: 调整最高重新整理速率前请先参考监视器的使用者手册。套用错 误的最高重新整理速率可以导致监视器的严重损害。 3- 10... - Page 64 软件安装 3.4.2 调整监视器屏幕的位置 按一下「监视器」按钮。 按一下「调整」字标。 您一定要先激活监视器才能变更其显示器内容。 按一下「屏幕位置」区域中,四个位置方向箭其中一个来变 更您的屏幕位置。那四个方向箭会将您的显示器屏幕向左、 向右、向上、或向下移动。 按一下「确定」或「套用」来储存您所做的变更。 调整监视器屏幕大小 按一下「垂直∕水平屏幕」区域内的 (+) 和 (-) 按钮来变 更您的屏幕大小。 「垂直屏幕」下的 (+) 和 (-) 按钮会增加∕缩小监视器显示的垂直 大小。 「水平屏幕」下的 (+) 和 (-) 按钮会增加∕缩小监视器显示的水平 大小。 按一下「确定」或「套用」来储存您所做的变更。 3-11...
-
Page 65: 调整监视器的同步化
图形加速卡使用手册 3.4.3 调整监视器的同步化 按一下「监视器」按钮。 按一下「进阶」字标。 在「同步化」方块中,按一下「水平」或「垂直」按钮以调 整同步化。 按一下「确定」或「套用」来储存您所做的变更。 3- 12... -
Page 66: 增加/移除颜色修正控制点
软件安装 3.4.4 增加/移除颜色修正控制点 在 Windows 系统,按鼠标右键,选取【内容】,出现【显示 器 内容】窗口,选取【设定】卷标页,按下【进阶… 】按 钮,出现如下画面。 按一下「颜色」字标。 在「颜色曲线」范围中,按一下和喜爱的色彩组件(红、 绿、蓝)相对应的按钮。 如果要新增控制点,请在喜爱的色彩曲线点按一下鼠标光标 时,按住 SHIFT 键。会有控制点出现在选取点的色彩曲线 上。 如果要移除控制点,在欲移除的控制点上按一下鼠标光标 时,按住 CTRL 键。控制点会从色彩曲线消失。 按一下「确定」或「套用」来储存新的色彩设定值。 提示: 新增、移除或移动控制点时,您便可以平顺或加强色调的渐层。 3-13... -
Page 67: 使用 Tv-Out 功能
图形加速卡使用手册 亮度:调整桌面颜色亮度。 在「亮度」区域下,将桌面调整器往右拖曳(来增加)或往左拖 曳(来降低)显示器的亮度。 注意: 此功能仅在显示器上的重叠窗口开启并为设定为主要显示模式时 。 有效 3.5 使用 TV-Out 功能 要激活/关闭电视显示器 将电视机接线和显示卡连接上,并打开电视机电源。 激活您的计算机,并确定安装的显示卡驱动程序正常执行。 安 装 完 成 后 。 在 Windows 系 统 , 按 鼠 标 右键,选取【内 容】,出现【显示器 内容】窗口,选取【设定】卷标页,按 下【进阶… 】按钮,选取【显示】卷标页。 按一下电视选项的 来激活电视 。 如果按钮的位置是在“激活”,桌面的影像出现于电视图标中。 按一下「确定」或「套用」来储存您所做的变更。 注意: 您至少一定要啟動四個顯示器裝置中的一個。... - Page 68 软件安装 注意: 您一定要先激活电视才能变更其显示器内容。 警告: 当您要切换电视输出时,请关闭你的系统,将接线连接到电视, 确定电视输出线接妥,再开启电视电源并激活计算机。(假如在计 算机激活下,接上电视输出线,这会容易造成显示卡零件烧毁) 注意: 当您要切换电视输出时,请将您的屏幕分辨率调整为 800x600 或 640X480 模式,否则将无法成功地切换至电视输出。 依照国家选择电视的 TV 格式 按一下「电视」按钮。 (您一定要先激活电视才能变更其显示器内容) 按一下「格式」字标。 在「国家」方块中,从清单中选择一个国家。 按一下「确定」或「套用」来储存您所做的变更。 3-15...
-
Page 69: 移除驱动程序
图形加速卡使用手册 移除驱动程序 假如您想升级驱动程序,以下将告诉您如何移除显示卡驱动程 序。 Windows 98 点选 开始 设定 控制台。 点选 新增/移除程序 项目。 接着会出现如右图的窗口,请 点 选 ATI Display Driver 项 目。然后点选新增/移除按钮。 移除之后将出现一个对话窗, 请您重新激活计算机,请选择 【是】 。 以重新激活计算机 Windows 2000 点 选 开 始 设 定 控 制 台。 点选 新增/移除程序 项目。 接着会出现如右图的窗口,... -
Page 70: 技术资料
总线型态 32-bit AGP 总线 视讯连接器 15 针 VGA 连接头 S-Video 视讯端子 24 针 DVI(数字液晶显示器) 输出接头 图形加速器 使用 ATI RADEON 9200/9200 Pro 芯片 显示内存 64/128MB DDR SDRAM 分辨率与更新率频率必须搭配屏幕、电视及数字液晶显 示器本身的规格。 支持影像同时出现在屏幕和电视上。 支持影像同时出现在屏幕和数字液晶显示器上。 支 持 影 像 同 时 出 现 在 电 视 和 数 字 液 晶 显 示 器 上 。... - Page 71 图形加速卡使用手册 屏幕分辨率 分辨率 色彩 内存 256 色 高彩 全彩 640x480 32MB 64MB 256 色 高彩 全彩 800x600 32MB 64MB 256 色 高彩 全彩 1024x768 32MB 64MB 256 色 高彩 全彩 1280x1024 32MB 64MB 256 色 高彩 全彩 1600x1200 32MB 64MB 256 色...
- Page 72 Low Profile User Guide Getting Started Installing Your Card. Installing Display Driver Troubleshooting Tips. Installing YourCard Now that you have prepared your computer, you are ready to install your graphics accelerator card. To install your graphics accelerator card. 1. Power off the computer and displays, then disconnect the display cable from the back of your computer.
- Page 73 Low Profile User Guide You are now ready to install drivers. Select an enhanced driver from the following list: 1. Put your Driver CD into CD-ROM Drive, and you will see the driver will be installed automatically. 2. If there is no response on the monitor, please follow instructions as below: 3.
- Page 74 圖卡使用說明 裝設您的圖卡 以下步驟介紹如何裝設您的圖卡 1. 先關掉電腦電源, 然後拔掉在電腦後面的顯示器的連接纜線. 2. 打開電腦的機殼. 如果必須把機殼移開, 請先看一下電腦的使用 手冊. 必須記住在接觸電腦機殼的金屬部位時, 要先消除身上靜 電. 3. 取出原先的圖卡, 如果的圖卡不易取出, 先輕輕搖一搖, 使卡鬆 動. 記著, 要保有取下的螺絲釘. 如您的主機板上有圖形處理晶片 或功能, 請先中止其設定. 請查看一下電腦的手冊以確定這些事 項. 4. 現在開始裝上新圖卡, 如果必要的話, 可以從機殼後窗先取 下相關插槽的金屬檔片, 然後, 將圖卡仔細而緊密的插入槽內. 再從卡的上緣輕輕壓卡向下直到槽底為止, 不可用蠻力. 這應是 很順暢裝入的事. 5. 栓緊螺絲釘固定圖卡, 再裝回機殼. 6.
- Page 75 圖卡使用說明 除錯小常識- 如果您使用本卡遇到 一些困難, 以下幾項或可幫您解決困難. 如要知道進一步的詳情可以詢問經銷商. 1. 檢查一下卡是否插好. 2. 檢查一下連接纜線是否接好. 3. 檢查一下電腦的電源及顯示器的電源是否接好. 4. 如果必要的話, 先中止主機板內建圖形處理晶片或功能設定, 請 查看一下電腦的手冊以確定這些事項. 5. 當您在裝設此驅動程式的時候, 確定您點選了合適的顯示器及圖 卡項目.
- Page 76 显卡使用说明 安装您的显卡 以下步骤介绍如何安装您的显卡 1. 先关掉计算机电源, 然后拔掉在计算机后面的显示器的连接缆 线. 2. 打开计算机的机壳. 如果必须把机壳移开, 请先看一下计算机的 使用手册. 必须记住在接触计算机机壳的金属部位时, 要先消除 身上静电. 3. 取出原先的显卡, 如果旧的显卡不易取出, 先轻轻摇一摇, 使卡松 动. 记着, 要保留取下的螺丝. 如您的主机板上有图形处理芯片或 功能, 请先中止其设定. 请查看一下计算机的手册以确定这些事 项. 4. 现在开始安装新显卡, 如果必要的话, 可以从机壳后窗先取 下相关插槽的金属档片, 然后, 将显卡仔细而紧密的插入槽内. 再从卡的上缘轻轻压卡向下直到槽底为止, 不可用蛮力. 这应该 是很顺畅装入的事. 5. 重新锁紧螺丝固定显卡, 再装回机壳. 6.
- Page 77 显卡使用说明 除错小常识- 如果您使用本卡遇到 一些问题, 以下几项或许可帮您解决:. 1. 检查一下显卡是否插好. 2. 检查一下连接缆线是否接好. 3. 检查一下计算机的电源及显示器的电源是否接好. 4. 如果必要的话, 先中止主机板内建图形处理芯片或功能设定, 请 查看一下计算机的手册以确定这些事项. 5. 当您在装设此驱动程序的时候, 确定您选择了正确的显示器及显 卡项目. 如果您要知道进一步的详情,可以询问经销商.
- Page 78 Kurzanleitung Einleitung Installation Ihrer Karte Installation der Display-Treiber Fehlerbehebung Installation Ihrer Karte Wenn Sie Ihren Computer vorbereitet haben, können Sie mit der Installation Ihrer Grafikbeschleuniger-Karte beginnen. Zur Installation Ihrer Grafikbeschleuniger-Karte: 1. Stellen Sie Ihren Computer und Monitor aus, ziehen Sie das Monitorkabel aus der Rückseite des Computers.
- Page 79 Kurzanleitung Nun können Sie die Treiber installieren. Gehen Sie dabei wie folgt vor: 1. Legen Sie die Treiber CD in Ihr CD-ROM Laufwerk, die Treiber werden automatisch installiert. 2. Kommt es zu keiner Reaktion, gehen Sie bitte wie folgt vor: 3.
- Page 80 Guide de l'utilisateur Profile bas Mise en route Installation de votre carte. Installation du pilote de l'affichage Astuces de dépannage. Installation de votre Carte A présent que votre ordinateur est prêt, vous pouvez installer votre carte d'accélération graphique. Pour installer votre carte d'accélération graphique 1.
- Page 81 Guide de l'utilisteur Profile bas A présent vous pouvez installer les pilotes. Sélectionnez un pilote amélioré dans la liste suivante : 1. Mettez le CD du pilotez dans le lecteur de CD-ROM, et le pilote s'installe automatiquement. 2. S'il n'y a aucune réponse sur le moniteur, veuillez suivre les instructions suivantes 3.
- Page 82 Guida di basso profilo per l'utente Per iniziare Installare la scheda. Installare il driver di visualizzazione. Suggerimenti per la risoluzione dei problemi. Installare la scheda Dopo aver preparato il computer, si è pronti per l'installazione della scheda acceleratrice grafica. Per installare la scheda acceleratrice grafica: 1.
- Page 83 Guida di basso profilo per l'utente A questo punto si è pronti per l'installazione dei driver. Selezionare un driver migliorato dalla lista seguente: 1. Inserire il Driver CD nell'unità CD-ROM; il driver verrà installato automaticamente. 2. Se sul monitor non viene indicata nessuna risposta, seguire queste istruzioni: 3.
- Page 84 Guía del usuario de bajo perfil Inicio Instalación de su tarjeta. Instalación del controlador de despliegue Consejos para la solución de problemas. Instalación de su tarjeta Ahora que ya ha preparado su computador, está listo para instalar su tarjeta aceleradora de gráficos. Para instalar su tarjeta aceleradora de gráficos.
- Page 85 Guía del Usuario de Bajo Perfil Ahora está listo para instalar los controladores. Seleccione un controlador mejorado de la siguiente lista: 1. Inserte su CD del Controlador en la Unidad CD-ROM y el controlador se instalará automáticamente. 2. Si no hay respuesta en el monitor, por favor siga las instrucciones a continuación: 3.
- Page 86 ロープロフィールユーザーガイド 使用の手引き カードを取り付ける。 1. ディスプレイドライバをインストールする。 2. トラブルシューティングのヒント。 3. カードを取り付ける コンピュータを使う準備ができたら、次はグラフィックスアクセ ラセータカードを取り付けてください。 グラフィックスアクセラレータカードを取り付ける方法。 1. コンピュータとディスプレイの電源をオフにしたら、コンピ ュータの背面からディスプレイケーブルを抜きます。 2. コンピュータカバーを取り外します。必要に応じて、カバー を取り外す際にコンピュータのマニュアルを参照してくださ い。コンピュータシャーシの金属面に触れて体から静電気を 放電するのを忘れないでください。 3. コンピュータから既存のグラフィックスカードを取り外しま す。古いグラフィックスカードが動かない場合、端から端ま でゆっくり揺り動かしてください。ねじを無くさないように してください。コンピュータにオンボードグラフィックス機 能が搭載されている場合、マザーボードでそれを無効にする 必要があります。詳細については、コンピュータのマニュア ルをご覧ください。 4. 必要に応じて、空の拡張スロットからメタルカバーを取り外 し、次に、カードをAGP拡張スロットの位置に合わせ、カード が完全に固定されるまでしっかり通します。カードの上端を つかみ、適切な拡張スロットに慎重にしっかりと差し込みま す。カードに無理な力を加えないでください ‑ 拡張スロット にはスムーズに取り付けられます。 5. ねじを再び取り付けてカードを適切な位置に固定し、コンピ ュータカバーを元に戻します。 6. ディスプレイケーブルをカードに接続し、コンピュータとデ ィスプレイ装置の電源をオンにします。デジタルフラットパ ネル(DEP)コネクタが付いているカードの場合、図に示すよう に、モニタやフラットパネルディスプレイまたはその両方を...
- Page 87 ロープロフィールユーザーガイド これでドライバをインストールする準備ができました。次の一覧 から拡張ドライバを選択してください: 1. ドライバCDをCD‑ROMドライブに挿入すると、ドライバが自動 的にインストールされます。 2. モニタに何の応答もなければ、次の指示に従ってください: 3. [スタート] をクリックします。 4. [ファイル名を指定して実行] を選択します。 5. 次を入力します: D:¥ATISETUP.EXE 6. DがCD‑ROMドライブでなければ、Dを正しいドライブ文字で置 き換えてください。 トラブルシューティングのヒント 問題が発生した場合、次のトラブルシューティングが役に立つと 思われます。トラブルシューティングに関する詳細な情報につい ては、販売店にお問い合わせください。 1. カードが拡張スロットに正しく差し込まれているかチェック します。 2. ディスプレイケーブルが、カードのディスプレイコネクタに しっかり固定されているか確認します。 3. ディスプレイとコンピュータがコンセントに接続され、電機 が供給されているか確認します。 4. 必要に応じて、マザーボードで内蔵ディスプレイ機能を無効 にします。詳細については、コンピュータのマニュアルをご 覧ください。 5. 拡張ドライバをインストールするとき、適切なディスプレイ でビスとグラフィックスカードを選択しているか確認してく ださい。 サポートされるシステム 1. Windows 98, 98SE 2. Windows ME 3. Windows 2000 4. Windows XP ...
- Page 88 Εγχειρ διο χρÞστη χαìηλοý προφ λ ß ß Ξεκινþνταò Εγκατάσταση της κάρτας. Εγκατάσταση του προγράµµατος οδήγησης της οθόνης Αντιµετώπιση προβληµάτων. ΕγκατÜσταση τηò κÜρταò Εφόσον έχετε προετοιµάσει τον ηλεκτρονικό υπολογιστής σας, είστε έτοιµοι για να εγκαταστήσετε την κάρτα επιτάχυνσης γραφικών. Για να εγκαταστήσετε την κάρτα επιτάχυνσης γραφικών. 1.
- Page 89 Εγχειρßδιο χρÞστη χαìηλοý προφßλ Είστε πλέον έτοιµοι να εγκαταστήσετε τα προγράµµατα οδήγησης. Επιλέξτε ένα βελτιωµένο πρόγραµµα οδήγησης από την παρακάτω λίστα: 1. Τοποθετήστε το CD του προγράµµατος οδήγησης στη µονάδα CD- ROM και το πρόγραµµα οδήγησης θα εγκατασταθεί αυτόµατα. 2. Εάν δεν υπάρξει απόκριση από την οθόνη, ακολουθήστε τις παρακάτω...
Need help?
Do you have a question about the 9200 Series and is the answer not in the manual?
Questions and answers