Advertisement
What's in the Box
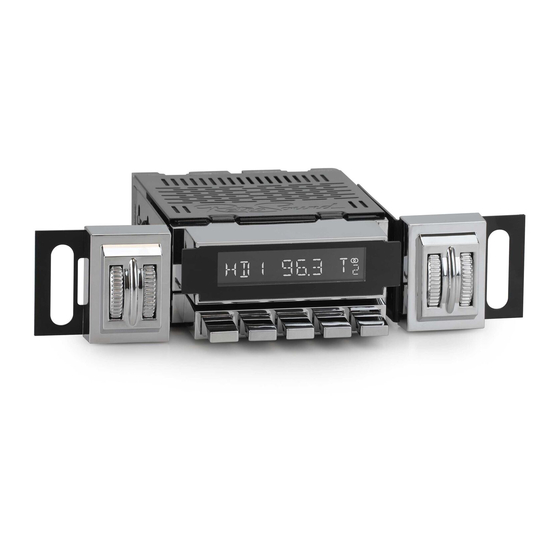
Thumb-Rollers
Hardware
B
D
E
(8)
x
Included in your
Radio Motor box
Thumb-Roller Quick Start Guide
A
C
Optional hardware
(2)
x
x(2) x(4) x(2)
Refer to the user manual included in your motor box or on our website for more comprehensive instructions.
Modern Sound For Your Classic
tech@retromanufacturing.com | help.retromanufacturing.com
Installation
D
B
C
Attach each InfiniMount
Bracket to the Radio Motor
with the eight small screws.
E
Complete the installation by plugging one end of the modular
cable into the left Thumb-Roller and the other end of the modular
cable into the left side of the Radio Motor. Then, repeat for the
right Thumb-Roller on the right side. Use the optional hardware
(if needed) to help mount the radio to the dash.
D
A
Insert the Thumb-Rollers into the InfiniMount
Brackets. Gently push to snap into place.
Advertisement
Table of Contents

Related Manuals for RetroSound Redondo RT

Summary of Contents for RetroSound Redondo RT
- Page 1 Thumb-Roller Quick Start Guide What’s in the Box Installation Thumb-Rollers Attach each InfiniMount Bracket to the Radio Motor Insert the Thumb-Rollers into the InfiniMount with the eight small screws. Brackets. Gently push to snap into place. Hardware Optional hardware Complete the installation by plugging one end of the modular cable into the left Thumb-Roller and the other end of the modular cable into the left side of the Radio Motor.
- Page 2 SEL PANEL mode. While holding the Power Button the unit will Press and hold the Right-Inside Thumb-Roller( ) to enter the System Settings sub-menu. Rotate display the following sequence: RETROSOUND>RADIO>GOODBYE>TIME DISPLAY>SEL the Right-Outside Thumb-Roller( ) to cycle through the choices until you see CLK, then press PANEL, continue holding the thumb-roller until SEL PANEL is displayed.
Need help?
Do you have a question about the Redondo RT and is the answer not in the manual?
Questions and answers