
Summary of Contents for AGK 10873
- Page 1 Manual size: 148 x 210 mm 105g copper paper CYKELHOLDER TIL BAGKLAP TIL 3 CYKLER Brugsanvisning BICYCLE CARRIER FOR THE TAILGATE TO 3 BIKES Installation Manual Model no. 10873...
- Page 2 Tak fordi du valgte dette produkt. Læs venligst denne brugsanvisning omhyggeligt og grundigt før brug, og gem det for fremtidig reference. VIGTIGT: Nummerpladen og baglygter i dit køretøj, skal altid være tydeligt synlig; – Cykelstativ kan bære op 3 cykler vejer max totalvægt 45 kg. –...
-
Page 3: Product Features
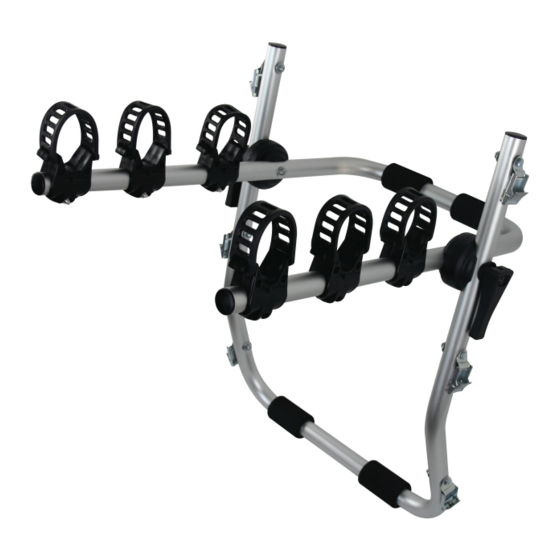
PRODUCT FEATURES: Aluminium konstruktion – Foldes fladt for nem opbevaring i bagagerummet – Passer til de fleste cykel stilarter og bil figurer – De 6 fastsættelse stropper holder sikkert cykelstativet – Max lastning 45 kg til 3 cykler – Product størrelse: 66 x 55cm –... - Page 4 Skiver Låse møtriker Strop strop Sikerheds strop Plast beskytter SAMLEVEJLEDNING: Cykelstativeter samlet i forskellige trin. Nedenfor beskrives disse trin i detaljer og i rækkefølge. – Fjern de enkelte dele af cykelholder fra emballagen og opdele dem som vist på tegningen som i del –...
- Page 5 Trin 2: Først bruges følgende dele, der kræves i dette trin. – Part No. Figure Antal Beskrivelse Beslag Skrue Skiver Låsemøtrik Strop Strop...
- Page 6 Trin 3: Følg nedenstående anvisninger, før du monterer cykelstativ på køretøjet: Før dette trin, skal du rense de dele af køretøjet, som kommer i kontakt med cykelstativ med en blød – klud og tør omhyggeligt. Rengør overfladen af den bageste rude grundigt for at undgå skader på chassiset på...
- Page 7 Alternativ i tilfælde – vedhæftes til anhængertræk. Trin 4: Placering af cykler på rack, når den er monteret på køretøjet korrekt. Fjern alt tilbehør og bevægelige dele (vandflaske, pumpe etc.) fra cyklen fjern dele fra cyklen, der – kan løsrive sig under rejsen. For bestemte typer af køretøjer, er det tilrådeligt at vende cykel cykelstyret rundt men pas på, når du –...
- Page 8 Det kan være nødvendigt at bruge ekstra stropper eller montagesystemer, afhængigt af størrelsen af – dine cykler Importør: Agk Nordic A/S www.agknordic.com Copyright 2014. Alle rettigheder forbeholdes. Trykt og udgivet af Agk Nordic A/S. 29.08.2014 AGK Nordic A/S Randersvej 88B Stevnstrup 8870 Langaa Denmark...
-
Page 9: Safety Warnings
Thank you for choosing this product. Please read this instruction manual carefully and thoroughly before use, and keep it well for the future reference. IMPORTANT: The license plate rear lights of your vehicle must be always clearly visible; – The bicycle rack can carry up 3 bikes weighting not more than 45GKs –... -
Page 10: Part Identification
PRODUCT FEATURES: Aluminum construction – Folds flat for easy storage in the boot – Fits most bike styles and car shapes – 6 fixing straps securely hold down the bike rack – Max loading 45 kg, for 3 bikes – Product size: 66 x 55cm –... -
Page 11: Assembly Instruction
Washer Self-locking nut Belt Belt Safety Belt Rubber protection ASSEMBLY INSTRUCTION: The bicycle rack is assembled in various different steps. Below describes these steps in details, and in – the succession required. Remove the individual parts of the bicycle rack from the package and divide them as shown in the –... - Page 12 Step 2: First, the following parts are required in this step. – Part No. Figure Quantity Description Buckle Screw Washer Self-locking nut Belt Belt...
- Page 13 Step 3: Follow below instructions before assembling the bicycle rack on the vehicle: Before this step, clean the parts of the vehicle that come into contact with the bicycle rack using a – soft cloth and dry carefully. Clean the surface of the rear hutch thoroughly to avoid damage to the chassis at the point of contact with the rack.
- Page 14 Alternative in the case of – eyelet for towing hitch. Step 4: Placing the bicycles on the rack once it has been fitted on the vehicle properly. Remove all accessories and movable parts ( water bottle, pump etc.) from the bicycle –...
- Page 15 It may be necessary to use additional straps or fixing systems, depending on the size of your bikes. – Importer: AGK Nordic A/S www.agknordic.com Copyright 2014. All rights reserved Printed and published by Agk Nordic A/S. 29.08.2014 AGK Nordic A/S Randersvej 88B Stevnstrup 8870 Langaa Denmark...
Need help?
Do you have a question about the 10873 and is the answer not in the manual?
Questions and answers