
Subscribe to Our Youtube Channel
Related Manuals for Sensormate GE1029-DU1D


Summary of Contents for Sensormate GE1029-DU1D
- Page 1 Operating manual GE1029-DU1D TIE-BAR STRAIN SENSOR WITH 1- CHANNEL MONITOR DU1D C.0118_v1.0 ENG...
-
Page 3: Weee Information
WEEE Information “Attuazione della direttiva 2012/19/UE “Implementation of Directive 2012/19/EU on sui rifiuti di apparecchiature elettriche ed waste electrical and electronic equipment elettroniche (RAEE)” (WEEE)” Il simbolo del cassonetto barrato ri- The symbol showing a crossed-out portato sull’apparecchiatura o sulla wheeled bin on equipment or its sua confezione indica che il pro- packaging indicates that the product... -
Page 4: Main Features
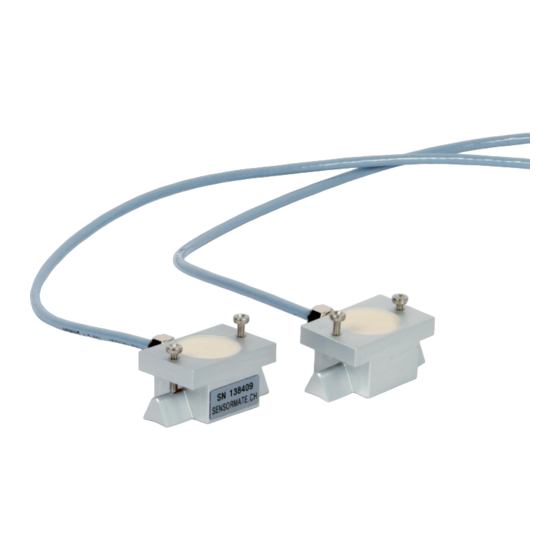
The strain gauge sensor GE1029 measure the surface-strain directly at the mounting loca- tion in the same quality as bonded strain gages. The press-on technology, developed by Sensormate AG, presses the strain gauges under the stainless protective film so strongly against the surface to be measured that frictional contact occurs. -
Page 5: Technical Data
Technical Data Strain gauge type Foil (GF = 2.0) Bridge resistance 350Ω Measuring range ± 1000 με Sensitivity tolerance ± 0.2% Transverse sensitivity 0.9 ± 0.2 % Accuracy <± 0,5% FS Linearity <± 0,5% FS Hysteresis <± 0,2% FS Repeatability <... -
Page 6: Installation Requirements
GE1029 Dimensions Installation requirements 2.0 Nm Press-on torque (M4 screws) Surface installation spot Stainless steel belt: 10 x 0.4mm Application: Self-made load-cell Dimensions in mm 6 / 24... -
Page 7: Electrical Connection
Electrical Connection 2/4 Bridge Strain gauge 1 Strain gauge 2 Strain gauge 1 Strain gauge 2 Option C: cable with connector Option C Option O Connector Function open leads Strain gauge1 Strain gauge1 n.a. yellow Strain gauge 2 yellow Strain gauge 2 n.a. - Page 8 GE1029 Electrical Connection 4/4 Bridge Excitation + Signal + Signal - Excitation - Option C: cable with connector Option C Connector Function Excitation + Excitation + Excitation - Signal + Signal - Excitation - 8 / 24...
-
Page 9: Assembly Procedure
Assembly These sensors are precision instruments. The devices must be handled with the appropriate care. These instructions must be read and understood by every user. Preparation • Oil and other surface impurities as well as paint must be removed from the place of installation. - Page 10 GE1029 Place the sensor around the object to be measured and screw it on carefully. Do not tighten with final torque yet! Cables must not be jammed. Slightly loosen the fixing so that the individual measuring modules can rest perfectly on the circumference of the measuring object.
-
Page 11: Maintenance
To prevent damage to the film, it should always be checked before using the sensor. Remove any impurities immediately. Maintenance The sensor GE1029 should be checked every 12 months. For maintenance the sensor must be sent to Sensormate AG. 11 / 24... - Page 12 The handling is very user-friendly. Application: The device DU1D is used in conjunction with tie bar strain-sensors of the Sensormate AG for the control of the clamping force on presses, injection-moulding and die-casting machines. The ALARM relay allows to stop the machine in case of overload. Ideal to retrofit on existing machines.
- Page 13 Technical Data Input bridge resistance 350...1000Ω Signal input range (FS) 0,1...1mV/V Resolution ADC 16-Bit Sampling rate 500Hz Output rate 40Hz Display refresh 100Hz Output signal Display (± 9999 digit, 1 channel) Noise ≤ 1 digit Accuracy <± 0,05% FS Accuracy of zero point ≤...
- Page 14 DU1D Dimensions Option: Installation-Housing Dimensions in mm Option: Box-Housing Dimensions in mm 14 / 24...
-
Page 15: Mounting And Installation
Mounting and installation Electrical connection Option: Option: Installation Housing Box-Housing Function Connection pin Connection M16 x 6-pin Power supply 12VDC alternative connection alternative connection Reset + Reset - Alarm switch Alarm switch open Alarm switch closed Strain gauge 1 Strain gauge 1 Shield Strain gauge 2 Strain gauge 2... -
Page 16: Operation And Control
DU1D Operation and control Faceplate description Decrease chosen value Increase chosen value ALARM Set alarm threshold DIAM Set tie-bar diameter UNIT Select unit (με, kN or tons) RESET Set measurement to zero LED‘s Indicate actual unit and/or mode ALARM LED LED on = alarm out active 16 / 24... - Page 17 Calibration cycle: The DU1D monitor should be calibrated every 12 months. For calibration, the DU1D monitor must be sent to Sensormate AG. With the optionally available strain simulator, the calibration can be carried out at the customer level. Functions Unit με...
- Page 18 DU1D Alarm setting • Press and hold the „ALARM“ button and simultaneously set the alarm value with the „UP/DOWN“ buttons. Then release the „Alarm“ button. -> the alarm is activated. An alarm value = „0“ causes the alarm to be deactivated. •...
-
Page 19: Automatic Reset
Automatic reset The DU1D monitor is set to the maximum value of 1000µε at the factory. From a strain signal of 30με (cycle start value), the monitor displays values. As soon as the current value falls below 5% of the maximum value measured in the current cycle, the DU1D monitor carries out a reset (minimum 500ms). - Page 20 DU1D Custom calibration Set customer-specific maximum value 1. Select on the display “Custom-kN” or “Custom-t”. 2. Press the UP and DOWN buttons simultaneously for 5 seconds. -> Display: “SErO”: The machine must be open, i. e. without load, -> then press the „RESET“ button. ->...
-
Page 21: Troubleshooting
Servicing The DU1D monitor should be calibrated every 12 months. For calibration, the DU1D monitor must be sent to Sensormate AG. With the optionally available strain simulator, the calibration can be carried out at the customer level. 21 / 24... - Page 22 DU1D Notes 22 / 24...
- Page 23 23 / 24...
- Page 24 SENSORMATE AG Steigweg 8 Tel. +41 (0)52 523 25 00 info@sensormate.ch CH-8355 Aadorf TG Fax +41 (0)52 364 32 72 www.sensormate.ch Schweiz...
Need help?
Do you have a question about the GE1029-DU1D and is the answer not in the manual?
Questions and answers