Advertisement
Quick Links
Getting Started with reServer
reServer, as a milestone product of reThings family, is extremely compact and
powerful. This smart tiny server is able to work easily and efficiently from the
edge to the cloud.
reServer is based on an ODYSSEY X86 v2 board and powered by the latest Intel®
Core™ 11
Gen. processor and Intel® UHD Graphics or Intel® Iris Xe Graphics,
th
which delivers high CPU and AI performance for various applications. It has two
high-speed 2.5-Gigabit Ethernet ports and supports hybrid connectivity including
5G, LoRa, BLE and WiFi. Meanwhile, reServer is of compact design to work
efficiently in almost any scenario. The neat structure of reServer also makes it
simple to access to the hard drives, memory and PCIe slots which allows easy
installation, upgrades and maintenance.
Advertisement

Related Manuals for SeeedStudio reServer


Summary of Contents for SeeedStudio reServer
- Page 1 This smart tiny server is able to work easily and efficiently from the edge to the cloud. reServer is based on an ODYSSEY X86 v2 board and powered by the latest Intel® Core™ 11 Gen. processor and Intel® UHD Graphics or Intel® Iris Xe Graphics, which delivers high CPU and AI performance for various applications.
-
Page 2: Specifications
Having dual SATA III 6.0Gbps data connectors, reServer is able to equip up to two 3.5"/2.5" SATA internal hard disk drives to acquire more storage. It also has M.2 connectors to connect to various SSDs for faster read and write speeds. - Page 3 Versions Basic Versions High Performance Versions Co-processor Microchip® ATSAMD21G18 32- Raspberry Pi® RP2040 32-Bit Dual ARM Bit ARM® Cortex-M0+ @ 48MHz Cortex-M0+ @ 133MHz Memory Technology Dual Channels DDR4-3200 Capacity 8GB; 16GB (Support up to 64GB) Support up to 64GB ECC Memory Supported Graphics...
- Page 4 Versions Basic Versions High Performance Versions USB Type-C USB PD / USB 4.0 / Thunderbolt 4 USB Type-A USB2.0 Type A x1 ; USB3.2 Type USB2.0 Type A x2 ; USB3.2 Type A x1 A x1 Power Status Power Supply 1x5.5x2.5mm DC Jack / Wafer 2.0mm 8pin Micro Sim Card Slot Internal I/O SATA...
- Page 5 Versions Basic Versions High Performance Versions RTC Battery Lithium 3V/210mAH Certification EMC CE,FCC,TELEC Mechanical Dimension 132mm*124mm*233mm Thermal Heat Pipe Assemblies/Heat Spreading Vapor Chamber Assemblies Solution Weight 1800g Comparison Version Basic Versions High Performance Versions Appearance Processor Intel® Core™ Intel® Core™ Intel®...
-
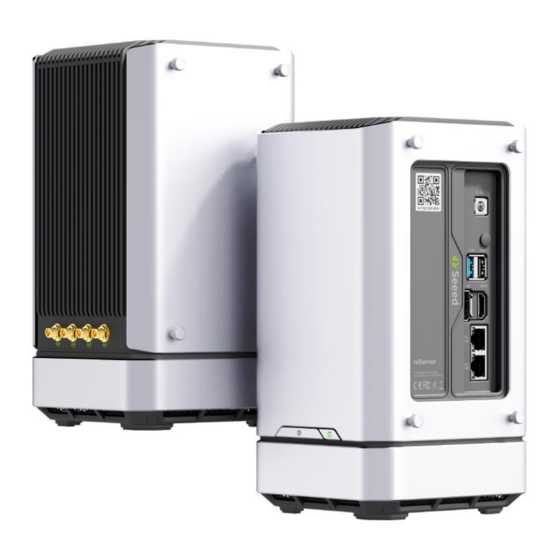
Page 6: Hardware Overview
USB3.2 Type-A x1); HDMI;DP; 2.5GbE LAN ports x2; Audio Jack; DC Jack(12V-19V); WirelessConnectivi WIFI, BLE and Support LTE/4G/5G/LoRaWAN Hardware Overview There are two different versions of reServer, Basic version and High performance version, which have different hardware configurations. Basic version... - Page 7 High performance version...
- Page 8 Dimensions Both versions have the same dimensions. Quick Start with reServer If you want to get started with reServer in the fastest and easiest way, you can follow the guide below. Hardware Required You need to prepare the following hardware before getting started with reServer。...
- Page 9 For this part, we will introduce how to install or replace some hardware inside reServer. If there are no needs for you, please skip it. You might follow the Assembly Guide Manual attached at the end of this page to access to the main board of reServer before reading this part.
- Page 10 SSD Installation A NVMe SSD has been pre-installed for all versions of reServer, while, still, the M.2 M-Key 2242/2280(PCIe 3.0 x4) allows you to replace it with the SSD you desire. WiFi Module Installation All versions of reServer have installed 2230 Dual Band WiFi 6 AX201(CNVio) Module at M.2 E-Key 2242/2280(PCIe 3.0x4).
- Page 11 Step 3. Install the new WiFi Module and connect the WiFi antenna • cable back to it. Step 4. Install the SSD back to M.2 M-Key. •...
- Page 12 Note: reServer is shipped with two 2.⅘GHz WiFi Antennas, you can attach the antenna to the adapter which connects with the antenna cable of the WiFi module inside the reServer to achieve better WiFi connectivity. 4G/5G/LoRaWAN Module Installation reServer supports installing 4G/5G/LoRaWAN Module at M.2 B-Key 2242/2252/2280(PCIe 3.0 x2;...
- Page 13 HDD Installation reServer supports installing two 3.5"/2.5" internal hard disk drives to acquire more storage. (The HDDs are not included in reServer) Please follow the steps to install the HDDs. - Step 1. Remove the screws and pull out the brackets Step 2.
- Page 14 For this part, we will introduce the interface connection of reServer. There are two versions of reServer. Please note that different versions might have different interfaces. Display Connection There are three methods for reServer to connect to a display while the third method is only for High-performing versions. Method 1. HDMI Port、...
- Page 15 Method 2. DP Port Method 3. USB Type-C(Available with High-performing versions only) Basic version High performance version...
- Page 16 Keyboard and Mouse Connection Connect keyboard and mouse through USB ports. There are one USB 3.2 port and one USB 2.0 port for Basic versions while there are one USB 3.2 port and two USB 2.0 ports for High-performing versions. Basic version High performance version...
- Page 17 Audio Connection For Basic versions, the Audio Jack is on the left side I/O panel, while, for High- performing versions, it's on the right side I/O panel for High-performing versions Basic version High performance version...
- Page 18 Power Connection There are two methods to power up reServer, and the second one is only for High-performing versions. Method 1. Simply connect AC-DC power adapter(included in the product box) with AC power cord(Out of the product box but still in the package), then connect it to 12V DC Jack of reServer.
- Page 19 Operation System Installation For all versions of reServer, Windows 10 Enterprise(Unactivated) has been pre- installed, you can simply boot it up and activate the OS. However, reServer still supports other Windows OS and, also, Linux OS, so you can cover the pre- installed OS with the one you want.
Need help?
Do you have a question about the reServer and is the answer not in the manual?
Questions and answers