Table of Contents
Advertisement
Quick Links
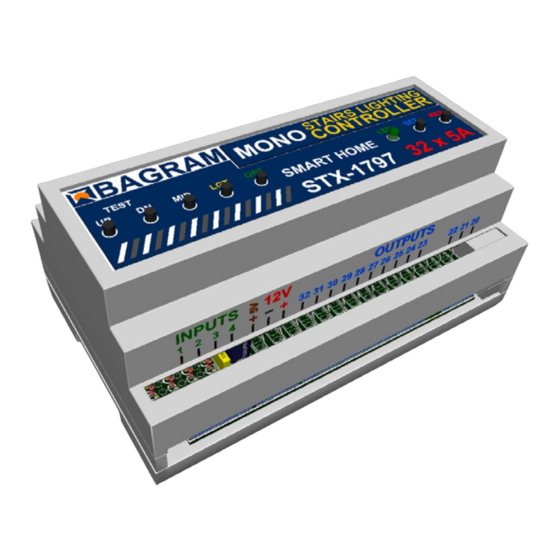
Stairs lighting
controller
STX-1797
The STX-1797 controller serves for a
dynamic control of the lighting of stairs. The
lighting is switched on for consecutive steps,
upwards or downwards, depending on the
desired direction. The controller can control
up to 32 stairs.
The controller has 3 different modes of light
animation programs (upwards): WAVE – stairs
light up one after another, CASCADE – the light
„jumps" fast from top to bottom, lighting up the
steps, ELEVATOR – three steps are lighted slowly, towards the top of the staircase. Downwards,
the direction of the animation is changed suitably. You can permanently select one of the programs
or set the options to cyclically change programs.
The controller has four inputs which permits it to react to two or three detectors. This for instance
makes it possible to serve a mezzanine with an entrance to the staircase. Input No. 4 allows you to
turn the staircase lighting permanently on.
Depending on the way the parameters of the controller are set, the lighting of the stairs can fade
out totally or to a predetermined minimum value (making it possible to faintly light up the stairs, or to
walk them easily in the dark — without turning on a full light — especially important for children!). When
you press the top button, the stairs are lighted from top to bottom or turned off in the same direction.
If another person steps on the stairs, the controller switches on a full illumination of stairs and
after some time fades them out smoothly.
The controller is adapted to control MONO LED strips mounted in stair steps or LED points
(spots) built into the wall above the steps. The LED strip controller can light up each step smoothly,
which gives a nice visual effect.
Lights can be turned on by directly pressing a button on the wall, which is connected to the
controller, or by using an additional sensor (infrared, motion, pressure, etc.), which detects when a
person steps on the stairs.
The controller can be used for up to 32 steps. It can also control lighting of one or two handrails.
If there is no handrail, the controller can serve to turn on ceiling lights (12V).
The controller also can be used for a staircase with an entrance to a mezzanine. In such a case
an additional sensor or button is necessary. You can choose in this case, brightening the whole
staircase or animation (WAVE) from the mezzanine down and up.
All the parameters of the controller can be set by the user. In the original (factory) settings, the
controller is ready for lighting up 20 steps, without lighting up the railing. It can be set up for a different
number of steps, from 5 to 32. It is also possible to light up one or two rails. Other parameters can
also be changed. These include: turning the lighting of the stairs on or off in the dark, the time steps
are lit up, the time interval between the lightening up of successive steps (this influences the speed of
lightening of the whole staircase), or the time after which the steps will be faded out. If motion detectors
are used, "dead" time can be set after receiving a signal from a sensor, or if there is no response to
www.stairslight.com
1
Advertisement
Table of Contents

Related Manuals for BAGRAM STX-1797

Summary of Contents for BAGRAM STX-1797
- Page 1 Stairs lighting controller STX-1797 The STX-1797 controller serves for a dynamic control of the lighting of stairs. The lighting is switched on for consecutive steps, upwards or downwards, depending on the desired direction. The controller can control up to 32 stairs.
-
Page 2: Specifications
one or both of the sensors, until the end of the animation program, to prevent re-lighting the stairs while going down. It is also possible to preset a longer time to start up the controller, so that it does not react to transient states after power is turned on. At any time, factory settings can be restored. Specifications Maximum number of illuminated stairs —... -
Page 3: Installation
Installation The controller should be installed by someone with skills in the field of electrical engineering, preferably a certified specialist. The controller must be installed with the power off! Power supply for controller and LEDs should be stabilized with an adequate current capacity depending on the amount and length of the used LED strips or 12V LED light. -
Page 4: Led Lighting
LED Lighting STX-1795 can control the backlight done by LED strips and 12V LED lights (not 230V!). Strips are usually mounted under the steps, and the LED lights by the side of the steps. Connections between lighting elements are shown on the following illustrations. LED strips A popular way for backlighting stairs is to use LED strips. - Page 5 LED strips connected to the controller The diagram above shows the connection of the controller to the staircase consisting of 30 steps and two handrails. Output 1 is connected to the first ( lowest) level, output 2 to the second higher, etc. The output 32 is connected, looking from the bottom of the stairs, to the right handrail (running up), and the output 31 to the left handrail (running down) .
- Page 6 LED lights (spots) Another way to backlight the stairs is to place a small LED light (spot) on the wall above each step, Lights must be adjusted to a voltage of 12V. We recommend the use of dimmable lights — then you will be able to backlight the stairs, and smoothly to illuminate each step.
- Page 7 Ceiling lighting When designing the connections between the controller and LED points, the appropriate type of wiring should be selected, according to the current flowing in the circuit. The (+) supply line for 12V LED strips or LED lights should have a much larger cross-section than the cables between the controller and individual LED strips.
- Page 8 Control Controller inputs function on a short to ground basis.. Any mechanical button (not a switch) will activate the controller after a short press. One end of the button should be connected to the controller input, and the other should be grounded ((-) of 12V). All the above diagrams show this solution. You can also run the controller with other elements or devices, including motion sensors.
- Page 9 Installation diagram: 110-230V motion sensors connected to the controller The relays used to separate 230V circuit from the controller may be of any type. We recommend the relays to be mounted on T-35 bus, the same as the controller. Their use helps with the installation. Photo to the left shows our product STP-4811 —...
- Page 10 Assembly diagram of motion sensors CRN-5891 connected to the controller by a set of relays STP-4811 NOTE: The knob „Time” in the sensors must be set to the minimum position! Installation of motion sen- sors in order to work properly is extremely difficult.
- Page 11 Motion sensors for 5-12V voltage Low voltage sensors differ in dimensions, capabilities and working principle. We will briefly discuss all of them. For detailed information, please refer to the instructions for each type of sensor. Subminiature motion sensor 5V CRN-5480 The SRN-5480 sensor has the smallest dimensions of all sensors.
- Page 12 Czujnik ultradźwiękowy 5V CRN-5462 The CRN-5462 ultrasonic motion detector has a precisely adjustable field of view range from 1 cm to 250 cm. The field of view can have a selected depth and distance from the sensor in the range of 1 cm to 250 cm. Dimensions: 46x20x20 mm. The sensor fits freely into a 60 mm mounting box.
- Page 13 Installation diagram: 12V motion sensors connected to the controller www.stairslight.com...
- Page 14 The controller can handle additional input located on the mezzanine. In such a case, an additional motion sensor (or an additional push button) should be placed so as to detect the entrance a person to the staircase mezzanine, but so it does not react to people walking up the stairs. After detecting a person entering the stairs to the mezzanine, the controller will immediately start the lighting of the whole staircase and turn it off after approx.
-
Page 15: Adjusting The Controller
Adjusting the controller Setting the parameters should be performed only when strictly necessary, after reading the following description carefully. To start the parameter setting mode, press and hold the SET button until the green LED fades out. Release the button to go on to the controller parameter setting mode. A few seconds flickering of the LED (and first step) corresponds to each parameter. -
Page 16: Description Of Parameters
Description of parameters Flickering 1 – Count of stairs. The controller is factory-set for 15 steps. This can be changed with this parameter. The range is from 5 to 23 steps. To change the number of steps, press and hold the SET button during the first flickering. - Page 17 Marker – Fixed light – 2 sec. Flickering 6 – Lighting of the steps. You can set the time of a slow lighting of the steps. This gives an effect which is more than pleasing than turning on a sharp light at full power. The factory setting is 10, which corresponds to 0.5 second time of single step illumination (a total of 10 seconds for 20 steps).
- Page 18 Flickering 11 – Sensors lock. This is an important parameter when installing motion sensors. In some cases, motion sensors cannot be placed in an ideal direction. This happens when a person starts going down the stairs, and turns on all the lights, as if another person walked the stairs. This can be prevented by blocking the sensors in two ways.
Need help?
Do you have a question about the STX-1797 and is the answer not in the manual?
Questions and answers