
Subscribe to Our Youtube Channel
Summary of Contents for TQC Sheen CurveX4
- Page 1 CurveX4 CX4005, CX4010 IMPORTANT! Before taking this instrument in use we Operating Instructions (V1.0 0522) strongly advise you to read this manual carefully.
-
Page 3: Warranty
WARRANTY Industrial Physics will grant a warranty for a period of 12 months for CurveX 4 and 12 months for all related equipment from the date of delivery in respect of any evidence of faulty workmanship and materials. Should a delivered consignment prove to be contrary to contract upon inspection, the customer shall grant Industrial Physics the opportunity hereunder of removing the fault, or... - Page 4 Meaning of Symbols CurveX 4 package (CX4005) Availability of Safety Information CurveX 4 kit (CX4010) Dangers from Electrical Energy Accessories Modifications to the Equipment CurveX4 Logger operation measurement Transport and Storage Disclaimer Packing User: Check on Receipt Reporting Transport Damage and Documentation...
- Page 5 Other applications manual prior to first operation of the Automatic Film constitute improper use. TQC Sheen will not be held Applicator Compact. liable for damage resulting from improper use.
-
Page 6: Safety Instructions
2 SAFETY INSTRUCTIONS 2.1 Meaning of Symbols The following symbols for dangers are used in this instruction manual. Possible immediate If this guideline is not noted danger to the life or it can lead to severe danger health of personnel. to health, up to fatal injury. -
Page 7: Transport And Storage
3 TRANSPORT AND STORAGE 3.1 Packing • Please take note of pictorial symbols on the packing. 3.2 User: Check on Receipt • Check packing for damage • After unpacking check complete supply. 3.3 Reporting Transport Damage and Documentation • Any damage should be documented as accurately as possible (possibly photographed) and reported to the relevant insurers or, in the case of sales “delivered to customers works”, to the supplier. - Page 8 4 GETTING STARTED WITH THE TQC SHEEN CURVEX 4 The CurveX 4 is an intelligent temperature data Step 5. Start the recording process by pressing the START logging system that was specially designed to control curing processes in the coating industry. This button (position 2).
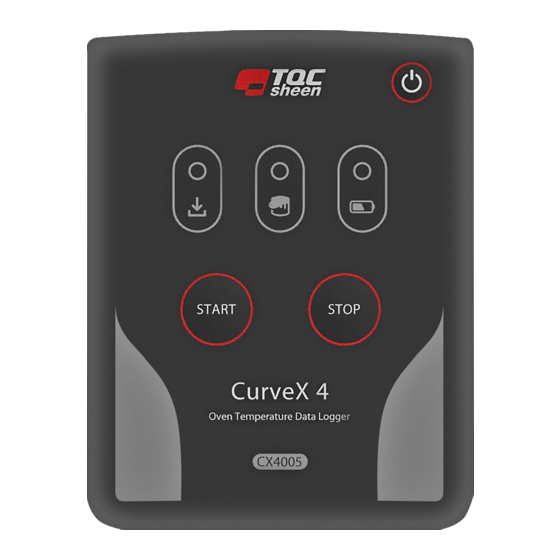
- Page 9 Figure 1 Front View and Top View of CurveX 4 1. POWER button Press one second to power on 2. START button Press to start logging 3. STOP button Press to stop logging 4. Logging LED LED indicates CurveX 4 is logging 5.
- Page 10 4.2 Memory - batches 4.3 CurveX 4 tasks This table below describes the most frequently The memory of the CurveX 4 can store a total of 1.000.000 readings. The memory is divided into 20 performed tasks: memory blocks of 50.000 readings each. For each new batch, the CurveX 4 will always start at the beginning of the next memory block, even if the previous block was only partly used.
- Page 11 4.5 Logger menu — download all data to PC… 4.9 Logger menu — Configure & Test… In order for the data logger to communicate with After selecting this menu option a wizard appears where you can: a computer, use the USB cable to connect it to an available port on the computer.
- Page 12 5 THE CURVEX 4 THERMOCOUPLE CONNECTORS The CurveX 4 is equipped with eight thermocouple Options: When there is too much cable length you can (K-type) connectors. The connectors are numbered 1 to 8. See the front of the data logger. connect the extended cable length to the gray loop on the side of the insulation box next to the grip.
- Page 13 The magnet surface probe This probe can be placed on any ferrous steel object. The sensor element is located exactly in the middle of the probe. • Take the probe between your thumb and forefinger at the metal cable support just above the magnet and place the probe at the preferred location on the object.
- Page 14 6 CURVEX 4 PROTECTION - USING THE INSULATION BOX The data logger itself may not exceed a temperature The system is now ready to be sent through the of 60°C (140°F). Since the logger is used inside oven. Use the grip to hang the box, if necessary. high-temperature curing ovens, the CurveX 4 thermal The isolation box has a ferrous steel plate on top, barrier system is used to protect it.
- Page 15 6.2 Handling precautions 6.3 Precautions - Batteries in carry-on baggage Since the heating process inside the box is not (aircraft cabin) stopped instantly after the box has left the oven, we The battery employed in our CurveX 4 is a standard strongly advise you to take the following set of 2 AA batteries.
- Page 16 7 SPECIFICATIONS CURVEX 4 CurveX 4 logger Measuring range -100°C to 1200°C operating temperature: 0 °C to 60 °C Operational temperature: 0°C to 60°C Accuracy ±1 °C / 1.8 °F Channels Sample interval time 1 s to 60 min Memory 20 batches with 50.000 readings Display Three multi-colour LED’s...
- Page 17 7.4 CurveX4 Logger operation measurement ºC -10 - | +65ºC 25 ± 5ºC -10 - | +65ºC -200ºC 1200ºC The above-stated graphic depicts the total maximum difference between loggers in the total population of the loggers. This graphic is thus an absolute worst-case scenario.
- Page 18 6 DISCLAIMER The right of technical modifications is reserved. The information given in this manual is not intended to be exhaustive and any person using the product for any purpose other than that specifically recommended in this manual without first obtaining written confirmation from us as to the suitability of the product for the intended purpose does so at his own risk.
- Page 19 19 |...
- Page 20 www.industrialphysics.com | 20...
Need help?
Do you have a question about the CurveX4 and is the answer not in the manual?
Questions and answers