
Summary of Contents for Vaunn Medical vB100A
- Page 1 Digital Upper Arm Blood Pressure Monitor Model vB100A User Manual (Ver1.2) Distributed by: Einstein Associates LLC 10101 Stafford Centre Drive Suite B Stafford, TX 77477 http://www.beyondmedshop.com...
- Page 2 Copyright © Einstein Associates LLC All rights reserved. Einstein Associates LLC owns and reserves all of the rights in the copyright of this document. No part of this document may be changed, excerpted, copied, reproduced, or imitated in any form or by any means without prior written consent of Einstein Associates LLC.
-
Page 3: Table Of Contents
Letter to Users ......................1 Standard Packing List ....................2 Chapter 1 About this product ................2 1.1 Features of the Vaunn® Medical vB100A ..........2 1.2 Important information about self-measurement ........3 Chapter 2 Important information about blood pressure and its measurement ..3 2.1 How does high blood pressure arise? .............3 2.2 Blood pressure values classification ............4... - Page 4 4.5 Reading date and time ................12 4.6 Specifying user ..................12 Chapter 5 Operating the blood pressure monitor ..........13 5.1 Before taking measurement ..............13 5.2 Common sources of error ..............13 5.3 Fitting the arm cuff ................14 5.4 Measurement mode selection ..............15 5.5 Measuring procedure ................15 5.6 Discontinuing a measurement ..............17 5.7 Switching device off ................17...
-
Page 5: Letter To Users
Letter to Users Thank you for choosing Vaunn® Medical Digital Upper Arm Blood Pressure Monitor vB100A. Designed for convenient and easy operation, this device provides fast and reliable measurement of systolic and diastolic blood pressure as well as heart rate using the oscillometric measurement method. It has also been proven in clinical studies to provide excellent accuracy when used in accordance with the operating instructions. -
Page 6: Standard Packing List
Storage Case……………………………………….….1 PC User Manual…………………..……………………...1 PC About this product Chapter 1 Features of the Vaunn® Medical vB100A Fully automatic, digital upper arm blood pressure measuring device. Dual user mode with memory storage that records up to 99 sets of readings per user. -
Page 7: Important Information About Self-Measurement
Automatic switch off. Extended range arm cuff that fits a wide range of arm sizes from 8.7-16.5” (22-42cm). Important information about self-measurement The blood pressure monitor is intended to measure and monitor your blood pressure levels. It is not intended to diagnose and/or treat any medical condition or disease. -
Page 8: Blood Pressure Values Classification
of the heart’s rest period (Diastole), the value is minimal (diastolic blood pressure value). For a healthy adult, the blood pressure values should lie within certain range (see below). Blood pressure values classification According to American Heart Association (AHA) guidelines in 2017, blood pressure values are classified into 4 levels, as shown in the table below. -
Page 9: Smartcheck™ Technology
provider if you suspect this to be the case. Correctly measured diastolic blood pressure values of above 110mmHg will require immediate medical treatment. There are measures you can take to prevent and/or reduce medically established high blood pressure. Eating habits ... -
Page 10: Irregular Heartbeat Detection (Ihd)
Measurement specification: The total measurement time for a full measurement cycle is less than 3 minutes, as opposed to a single measurement time of about 1.5 minutes. Single results are not displayed. Based on data analysis result, a 4 measurement may be applied. -
Page 12: Chapter 3 Elements Of The Blood Pressure Monitor
Chapter 3 Elements of the blood pressure monitor Measuring unit Item Function Display measurement readings, time LCD screen and date. Start/Stop button Press to start or stop measurement. Memory button Press to view recorded data. Press to set/view current date and time Time/User button or to switch user. -
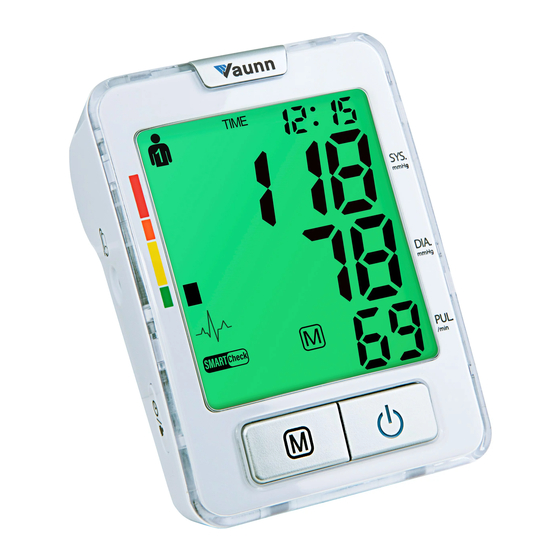
Page 13: 3.2 Lcd Screen Display And Symbol Designation
3.2 LCD screen display and symbol designation 3.3 Cuff Extended range upper arm cuff made of soft nylon material with Velcro closure. For arm circumference 8.7-16.5 inches (22-42 cm). -
Page 14: Chapter 4 Setting Up The Blood Pressure Monitor
Chapter 4 Setting up the blood pressure monitor Battery installation Open the battery compartment cover in the direction shown. Insert four AA batteries according to the indicated polarity. Mount the battery cover horizontally until it snaps back in place. Attention! ... -
Page 15: Setting Date And Time
Setting date and time The blood pressure monitor includes date and time function. For each measurement taken, results are recorded with the date and time of the measurement. After battery installation, set the date and time. The year YYYY should be blinking. Set year by pressing the Memory button . -
Page 16: Reading Date And Time
Note: Date (year, month, day) and time will need to be re-confirmed by pressing the Time/User button You can reset the date and time by pressing the Memory button , then press the Time/User button to confirm. Reading date and time The display shows the time by default. -
Page 17: Chapter 5 Operating The Blood Pressure Monitor
Chapter 5 Operating the blood pressure monitor Before taking measurement Avoid eating, smoking and any strenuous activity such as exercise before measurement. These factors can influence the measurement result. It is recommended that you relax for about ten minutes before measurement. Example: sitting in an armchair in a quiet environment. -
Page 18: Fitting The Arm Cuff
Fitting the arm cuff a. Pass the end of the cuff (with sewn-in rubber stopper) through the metal D-ring to form a loop. The Velcro closure should be facing outward. If assembled correctly, the metal D-ring should not touch the skin when the cuff is looped around the arm. -
Page 19: Measurement Mode Selection
Note: If it is not possible to fit the cuff on the left arm, it can also be placed on the right arm. However, for consistency, measurements should only be taken from the same arm. Measurement mode selection You can choose between single or SmartCheck™ measurement mode. Single mode: ... - Page 20 the decreasing cuff pressure during deflation. When the device detects the pulse, the heart symbol begins to blink on the display and a beep tone will register with every pulse beat. When measurement is complete, a long beep tone will register. The measured systolic and diastolic blood pressure values as well as the pulse rate are displayed.
-
Page 21: Discontinuing A Measurement
pressure values. There will be 15 seconds resting time between measurements. During this resting period, the symbol will blink on the display and time will count down. You will hear a beeping sound during the last 5 seconds. Note: If measured data from each cycle differs too much, a 4 measurement will be performed before final results are displayed. -
Page 22: Clearing Recorded Data
To see the recorded results for the second user, first switch to the second user (see section 4.6). Then press the Memory button as described above. When the memory storage reaches 99 sets of recorded data, any new measurement will be recorded as and the oldest data will be overwritten/erased. -
Page 23: Setting Alarm Clock As Reminder
5.10 Setting alarm clock as reminder The blood pressure monitor has an alarm clock function that allows you to set two alarm times. This can be a useful aid, for instance, as a reminder to take medication or perform blood pressure measurement at the same time each day. To set the alarm, first switch off the device. -
Page 24: Chapter 6 Error Messages And Troubleshooting
Chapter 6 Error messages and troubleshooting If an error occurs during a measurement, the measurement is discontinued and a corresponding error code is displayed (Example: Error No. 1). Error Icon shown Description Possible cause and solution on display The pulse signals detected on Signal too the cuff are too weak. - Page 25 on operating the blood pressure monitor and repeat measurement accordingly. Multiple errors detected during measurement in SmartCheck™ mode, SmartCheck™ preventing a reliable final Err 6 mode error result. Refer to chapter 5 on operating the blood pressure monitor and repeat measurement accordingly.
-
Page 26: Chapter 7 Care And Maintenance
measurement. Every measurement results differ Blood pressure is dynamic and can and you are sure the device fluctuate. It is important to note that functions properly. comparable blood pressure measurements require and/or are dependent on the same conditions. These include relaxed and quiet conditions, and performing measurements at approximately the same time of the day. -
Page 27: Chapter 8 Reference To Standards
so may disrupt factory calibration and void manufacturer warranty. Chapter 8 Reference to standards Device standard: This device is manufactured to meet the European and United States standards for non-invasive blood pressure monitors: IEC 60601-1 • IEC 60601-1-2 (EMC) • IEC 60601-1-11 • AAMI/ANSI/ISO 81060-2:2013 •... -
Page 28: Chapter 10 Guarantee
Accessories: Extended range arm cuff – for arm circumference 8.7-16.5 inches (22-42 cm), storage bag, 4x AA batteries and instruction manual IP20: Protected against solid foreign particles with a diameter of more than 12.5 mm, no protection against water Expected service life: 5 years Cuff life: 2 years Follow Instructions for Use.
Need help?
Do you have a question about the vB100A and is the answer not in the manual?
Questions and answers
I do not understand how to print manual for vB100A Blood pressure monitor - **** sr. citizen - can you help or mail manual