Table of Contents
Advertisement
Quick Links
TI01-2ENG-REV13
Copyright© 2013 by SIRCHIE
SIRCHIE
All Rights Reserved.
®
Products • Vehicles • Training
TECHNICAL INFORMATION
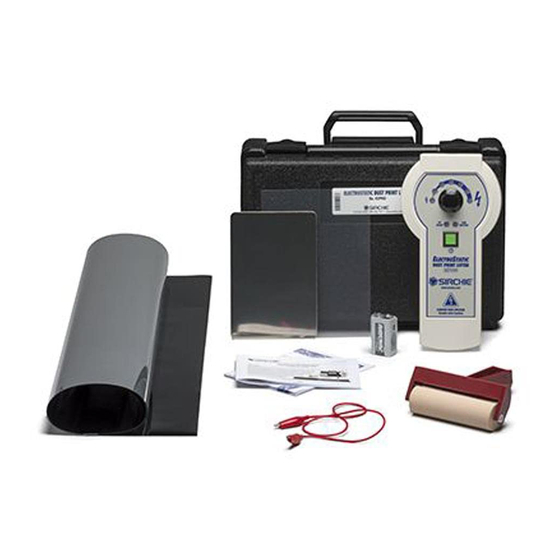
Electrostatic Dust Print Lifter
Catalog No. ESP900
Information
One of the most overlooked forms of physical evidence at the crime scene is impression evidence. Locating
and recovering obvious kinds of impression evidence like tire tracks and
footprints is not the problem. It's the not-so-obvious dust print impres-
sions that are difficult to locate, accidentally damaged or obliterated. The
Electrostatic Dust Print Lifter is designed specifically for lifting these
dust prints from almost any surface from the floor, door, wall or win-
dowsill to upholstered furniture using static electricity. High voltage is
applied to a metallized lifting mat creating a negative charge
and causing the ground plane to become positively charged.
Any dust present under the mat will take on a positive charge,
attracting it to the negatively charged mat.
The resulting dust print lifted will be a pre-
cise mirrored image of the original print.
100 HUNTER PLACE, YOUNGSVILLE, NC 27596 USA
Ph: (919) 554-2244, (800) 356-7311 • Fax: (919) 554-2266, (800) 899-8181 • Web: www.sirchie.com • Email: sirchieinfo@sirchie.com
1 of 8
Advertisement
Table of Contents

Subscribe to Our Youtube Channel
Related Manuals for SIRCHIE ESP900


Summary of Contents for SIRCHIE ESP900
- Page 1 The resulting dust print lifted will be a pre- cise mirrored image of the original print. 100 HUNTER PLACE, YOUNGSVILLE, NC 27596 USA Ph: (919) 554-2244, (800) 356-7311 • Fax: (919) 554-2266, (800) 899-8181 • Web: www.sirchie.com • Email: sirchieinfo@sirchie.com 1 of 8...
- Page 2 Caution! Always reduce charging voltage to MIN before turning unit off and discharge any residual voltage between the ground plane and pickup mat with the static discharge cable provided. ESP900 Optional 1- Electrostatic Voltage Control Unit ESP901 ..2' x 3' Lifting Mats, 5 ea.
- Page 3 TI01-2ENG-REV13 Control Panel Unit Base Indicator Lights RED: High Voltage Ready Battery Access YELLOW: Low Battery Release Latch and instruc- GREENs: Voltage LEDs tion label for operation of unit indicate the strength of the voltage output Serial Number Voltage Control For unit registration Adjusts voltage level Brass Electrodes...
- Page 4 TI01-2ENG-REV13 Battery Installation The Electrostatic Dust Print Lifter is powered by a single 9V alkaline battery. The battery storage compartment is located on the unit base. A single negatively charged brass electrode pro- trudes through the battery compartment cover. 1. Just below the brass electrode on the bottom of the unit is a release latch.
- Page 5 TI01-2ENG-REV13 Operation 1. Remove one of the pickup mats from its protec- tive tube. Carefully place the mat, black side down, over the area to be examined. 2. Position the Ground Plane 1-2 inches from one edge of the pickup mat as shown (Fig. 1A). NOTE: When working on vertical surfaces (Fig.
- Page 6 9. Lift the mat and examine the black surface for dust prints. Lifting Dust Prints from Metal Surfaces The ESP900 also lifts prints from metal surfaces such as desktops, vehicle bodies, metal cabinets, and other metal surfaces. Place the ground plane insu- lating sheet within an inch of the pickup mat (Fig.
- Page 7 Photograph lifted dust prints and be certain to include a scale. The prints may be lifted FIGURE 5 from the pickup mat using Rubber Footprint Lifter No. 647C100 or SIRCHIE’s GELifters ™ CAUTION! Attempts to add clear lacquer or similar materials to preserve the print on the lifting mat usually results in the destruction of lifted prints.
- Page 8 TI01-2ENG-REV13 sion purposes. Secure the pickup mat (black side up) inside the transportation box with tape as shown to the right (Fig. 6) and seal the box with three evidence integrity seals. Affix the evi- dence identification label to the outside (Fig. 7) and complete the information for transportation to the lab.
Need help?
Do you have a question about the ESP900 and is the answer not in the manual?
Questions and answers