Table of Contents
Advertisement
Advertisement
Table of Contents

Summary of Contents for ORVIBO OLOCK
- Page 1 ORVIBO OLOCK Wi-Fi Smart Lock User Manual...
-
Page 2: Packing List
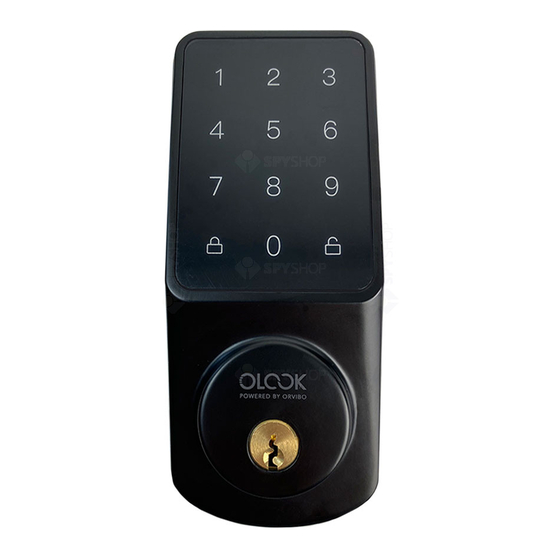
Drill Template Interior Assembly Strike Plate Deadbolt Strike Box Mounting Plate M4x35 Screw M4x30 Screw M4x25 Screw M4x20 Screw x2pcs x2pcs x1pc x5pcs ORVIBO OLOCK Wi-Fi Smart Lock User Manual M4x8 Screw AA Alkaline Battery Key x2pcs User Manual x2pcs x4pcs... - Page 3 Exterior Assembly Panel View Touch Screen Lock Button Unlock Button Cylinder Type-C USB Port Function ① Lock: Press button for 2 seconds to lock. ② Unlock: Enter a valid password and press button to unlock. ③ Setting Mode: Press the button and then button to enter setting mode.
- Page 4 Interior Assembly Panel View RESET Button Battery Cover Screw Battery Cover Thumb Knob Indoor Lock Button Screw Port Function ① Reset: Press the RESET button for more than 3 seconds to reset. ② Indoor Lock: Press the Indoor Lock button for 2 seconds to lock from inside.
-
Page 5: Installation
Installation Log in to ORVIBO Home APP to check the installation video. 1. Make sure that the following criteria are met so that the Smart Lock can be installed properly: ① Check the status of the door and make sure the doorframe is aligned with the door. - Page 6 3. Drilling holes ① The lock hole diameter is 2 [50mm]. " φ 2" [50 mm] ② The deadbolt hole diameter is 1 [25mm] , depth is 4 [100mm]. " " The deadbolt slot size is 2.3 [58mm] x 1.04 [26.5mm] x 0.16 "...
- Page 7 4. Adjust Direction ① Confirm the door opening direction according to the picture below. Left Bolt Right Bolt Notice: View from outside of the door ② Left Bolt: Set the motor steering and indoor knob to L Right Bolt: Set the motor steering and indoor knob to R a.
- Page 8 ③ Turn the thumb knob to Left/Right direction Note: the thumb knob to Left/Right direction Right Open Left Open 5. Installing The Smart Lock Step 1: Install the deadbolt. " ① Measure whether your door's backset is 2.36 [60mm] or "...
- Page 9 Use 2 pcs M4 x20 screws Step 2: Install the strike plate. If you have an existing plate installed, skip this step. ① Align the strike plate with the deadbolt hole center. ② Insert the strike box and the strike plate into the Installation slot.
- Page 10 Step 3: Install the Exterior Assembly Panel. Install the exterior assembly panel outside of the door: ① Pass the connecting wire through under the deadbolt. ② Turn the key drive lever to align with horizontal line. ③ Insert the key drive lever into the drive hole of the deadbolt. ④...
- Page 11 Interior Assembly Mounting Plate Use 2 pcs M4x30 screws (or use 2pcs M4×35 Screws as needed) ② Remove the battery cover with a screwdriver (not provided). ③ Connect the interior and exterior assembly panel cables. Plug the wire connector into the socket on the interior assembly panel.
- Page 12 ④ Secure the the interior assembly panel to the mounting plate with 2 pcs M4x8 and 1 pc M4x25 screws. Use 2 pcs M4x8 screws Use 1 pc M4x25 screw...
- Page 13 ② Install the battery cover with a screwdriver (not provided). Now you have completed the installation of the OLOCK! Please follow the instructions to set up and use the smart lock.
-
Page 14: Testing Operation
Testing Operation Note: The lock will not lock automatically before the auto lock setting on. ① Lock Testing Press the button for 1 second to lock. ② Unlock Testing Press the default password “123456”+ button to unlock. - Page 15 Setting Up The Lock The smart lock supports Touch Button Setting and APP setting. ① Touch button setting: Enter the lock setting Press the button and then the button to enter setting mode. Follow the prompts to set/verify the administrator password to enter the lock setting.
-
Page 16: App Setting
ORVIBO Home ② Add the smart lock Open the " ORVIBO Home" app and click on "Scan QR Code" to add device. Scan the QR code above or click the "+" in the upper right corner and select "Door Lock" , then select "ORVIBO OLOCK". - Page 17 Temporary password: Authorize a temporary password to the visitor. c. Automation: Customized automation to control other devices of the same brand through the status of the OLOCK. d. Settings: Auto Lock, Prompt Tone, Unlock Record Notification, Firmware Update and Other Settings.
- Page 18 App Other Function: a. Lock status: Unlocked or locked status is displayed in the app. b. Door lock records: Regular unlocking records, emergency password unlocking alarm records, illegal try to unlock alarm records.
-
Page 19: Basic Operations
c. Notification of not arriving home: Select " Unlock Record Notification " to turn on not arriving home reminder. If there is no unlocking record in the set time period, APP will send a notification to warn you. Basic Operations ① Unlock the Door You can unlock the door using a valid password, backup key or the thumb knob. - Page 20 Option 2: Use the backup key Insert and turn the backup key to unlock the door. Option 3: Use the thumb knob of the interior assembly panel Turn the thumb knob of the interior assembly panel to unlock the door. ②...
-
Page 21: Other Operations
Note: a. When locked from the inside, only the administrator can unlock the door from the outside. b. When in the unlocked state, the " Locked inside" function will not work. Other Operations ① Reset Lock to Restore Factory Default RESET button Press the RESET button for more than 3 seconds to reset the lock to factory default. -
Page 22: Troubleshooting
Smart Lock. ③ Q: How to unlock the door if the Smart Lock's locked ? (Locked due to incorrect password for many times) A: The lock will return to normal after two minutes. ④ Q: What should I do if I lose my smartphone which is connected to the OLOCK? A: Using a new phone, download and log in to the "ORVIBO Home" app, then change your account password. ⑤ Q: Is it possible to use the APP to unlock? A: The OLOCK does not support APP unlocking, but supports ... - Page 23 Ordinary user have the right to use OLOCK, and the password can only be used to unlock; The temporary user's password can be used to unlock only for the duration of the authorization. ⑦ Q: What is the maximum number of passwords that can be stored in OLOCK? A: It can store up to 50 general passwords, 50 emergency passwords and 5 temporary passwords at the same time. ⑧ Q: Does OLOCK require a Wi-Fi bridge to work? A: The OLOCK has built-in Wi-Fi, no need for the bridge. ⑨ Q: What are the network requirements for OLOCK? A: It only supports 2.4GHz Wi-Fi, not 5GHz Wi-Fi. ⑩ Q: Does the OLOCK works with Alexa or Google Assistant? A: No, not supported at this time. ⑪ Q: What is the maximum number of roles that can be stored in OLOCK? A: It can store 1 administrator, 49 regular users and 5 temporary...
-
Page 24: Specification
Specification Aluminum, ABS Material Exterior Assembly 6.02’’ [153mm] x 2.68’’ [68mm] Panel Size x 1.16’’ [29.5mm] Interior Assembly 6.81’’ [173mm] x 2.83’’ [72mm] Panel Size x 2.03’’ [51.5] mm Door Thickness 1.38’’ [35mm] - 2.16’’ [55mm] Support OS iOS 7.0 or above, Android 4.4 or above 10000 times normal unlock Battery Life (Around 12 months) - Page 25 FCC Statement This device complies with part 15 of the FCC Rules. Operation is subject to the condition that this device does not cause harmful interference. (1) this device may not cause harmful interference, and (2) this device must accept any interference received, including interference that may cause undesired operation. Any changes or modifications not expressly approved by the party responsible for compliance could void the user's authority to operate the equipment. Warning: Changes or modifications not expressly approved by the party responsible for compliance could void the user's authority to operate the equipment. Note: This equipment has been tested and found to comply with the Notice: This equipment has been tested and found to comply with the limits for a Class B digital device, pursuant to Part 15 of the FCC Rules.
- Page 26 Interference to radio or television reception, which can be determined by turning the equipment off and on, the user is encouraged to try to correct the interference by one or more of the following measures: -- Reorient or relocate the receiving antenna. -- Increase the separation between the equipment and receiver. -- Connect the equipment into an outlet on a circuit different from that to which the receiver is connected. -- Consult the dealer or an experienced radio/TV technician for help. FCC ID: 2AWF7-OLOCK...
- Page 27 Shenzhen ORVIBO Technology Co.,Ltd. ALL RIGHTS RESERVED. ORVIBO and OLOCK Logo are trademarks of Shenzhen ORVIBO Technology Co.,Ltd., registered in the United States and other countries. Iphone, Siri and App Store are trademarks of APPLE INC..Google, Google, Google Assistant and Google Play are trademarks of GOOGLE INC..All other trademarks are the property of their respective owners.
- Page 28 Shenzhen ORVIBO Technology Co., Ltd. 7F, Block A7, Nanshan i Park, No.1001 Xueyuan Road, Nanshan District,Shenzhen, 518055, PRC support.us@orvibo.com www.orvibo.com...
Need help?
Do you have a question about the OLOCK and is the answer not in the manual?
Questions and answers