
Subscribe to Our Youtube Channel
Related Manuals for cantaloupe ePort Engage Combo

Summary of Contents for cantaloupe ePort Engage Combo
- Page 1 Engage Combo Installation Guide THE COMPLETE INSTALLATION & OPERATIONS REFERENCE GUIDE...
- Page 2 Welcome to Your New Device THE EPORT ENGAGE COMBO Congratulations on your purchases of Cantaloupe’s new ePort Engage Combo Device. This installation guide has been created to help you get up and running. Please be sure to read this manual thoroughly and refer to the pre-installation information content in the Before You Get Started section for additional resources and information.
-
Page 3: Table Of Contents
EPORT ENGAGE COMBO PAGE 3 INSTALLATION GUIDE Table of Content BEFORE YOU GET STARTED ..........4 TOOLS REQUIRED FOR INSTALLATION ......... 5 INSTALLATION KIT CONTENTS ............6 PRE-INSTALLATION INFORMATION ............7 INSTALLATION OF THE EPORT ENGAGE DEVICE ..8 DRILLING INTO YOUR VENDING EQUIPMENT ........9 INSTALLING THE EPORT ENGAGE DEVICE ......... -
Page 4: Before You Get Started
PAGE 4 Section 01 Before You Get Started Before You Get Started SECTION 01 TOOLS REQUIRED FOR INSTALLATION INSTALLATION KIT CONTENTS PRE-INSTALLATION STATEMENT PROCEDURES PLEASE NOTE: The Engage Combo device may need to download and process software updates when it is first installed and powered on. -
Page 5: Tools Required For Installation
EPORT ENGAGE COMBO PAGE 5 INSTALLATION Section 01 Before You Get Started TOOLS REQUIRED FOR INSTALLATION Figure 1.1 1. Power Drill (corded or battery operated) 7. 3/4" Deep Wall Socket 2. 11/32" Nut Driver 8. Pliers 9. Step Bit* (1/2”, ¾”, 3. -
Page 6: Installation Kit Contents
7. DEX Cable (To Combo) 4. Antenna IMPORTANT: In some cases, you may need to order a regressor depending on where you choose to mount the device and if there are clearance issues, contact Cantaloupe's Customer Care at 1-800-341-7677 for more information. -
Page 7: Pre-Installation Information
Section 01 Before You Get Started INSTALLATION INFORMATION Thank you for purchasing the ePort Engage Combo. Before you start, please read the instructions thoroughly and then take a few moments to plan your installation. Pick a mounting spot that will allow for ease of access and will not interfere with any moving parts in your vending equipment. -
Page 8: Installation Of The Eport Engage Device
QR code on this page with your phone or tablet to access the ePort Engage Combo Accessories FAQ. If you still have questions about the ePort Engage Combo or it's accessories, please view the following pages on our website for more information:... -
Page 9: Drilling Into Your Vending Equipment
EPORT ENGAGE COMBO PAGE 9 INSTALLATION Section 02 ePort Engage Combo Installation Installation of the ePort Engage Combo SECTION 02 DRILLING INTO YOUR VENDING EQUIPMENT INSTALLING THE EPORT ENGAGE DEVICE SYSTEM CONNECTION TO THE DEVICE... -
Page 10: Installing The Eport Engage Device
Section 02 ePort Engage Combo Installation INSTALLING THE EPORT ENGAGE COMBO DEVICE 1. It is time to set up the antenna. It should be mounted on top of the vending equipment, so be sure not to drill into anything that is already on top of the machine or that which could cause clearance issues. -
Page 11: System Connection To The Device
PAGE 11 Section 02 ePort Engage Combo Installation SYSTEM CONNECTION TO THE DEVICE 1. Now that the Engage device is secured to the vending equipment, it is time to connect the MDB and DEX cables. 2. Connect the DEX cable to the DEX port on the vending equipment. There are several areas inside of the vending equipment that house a DEX port, making it versatile where you can connect your DEX cable. -
Page 12: Expected Start-Up Behaviors
EPORT ENGAGE COMBO PAGE 12 INSTALLATION Section 03 Expected Start-Up Behaviors Expected Start-Up Behaviors SECTION 03 START UP SEQUENCE - NO ISSUES CHIP PAYMENT ACCEPTANCE SEQUENCE TAP PAYMENT ACCEPTANCE SEQUENCE SWIPE PAYMENT ACCEPTANCE SEQUENCE... -
Page 13: Start Up Sequence - No Issues
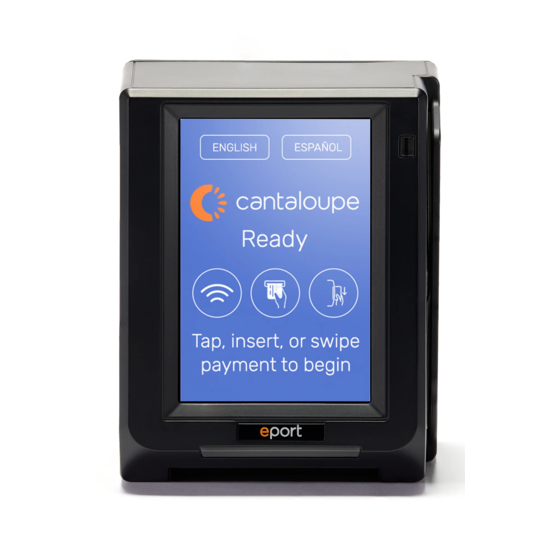
• 4 simulated LEDs will blink at the top of the screen • Under the ‘cantaloupe’ logo and wording, ‘Not ready’ may be shown until the device is ready to accept transactions. During the Start-up Sequence the words ‘Not Ready’ will appear on the screen as the device connects to our system. -
Page 14: Chip Payment Acceptance Sequence
EPORT ENGAGE COMBO PAGE 14 INSTALLATION Section 03 Expected Start-Up Behaviors CHIP PAYMENT ACCEPTANCE SEQUENCE The device will beep and show the below messages during the transaction process. The screen will display text. Upper and lower areas of text will be indicated using a forward slash (/) as a separator (see figure 3.1). -
Page 15: Tap Payment Acceptance Sequence
PAGE 15 Section 03 Expected Start-Up Behaviors TAP PAYMENT ACCEPTANCE SEQUENCE The device will beep and show the below messages during the transaction process. The LEDs on the top of the screen will display information about the card reading process. The screen will display text. -
Page 16: Swipe Payment Acceptance Sequence
EPORT ENGAGE QUICK START PAGE 16 GUIDE Section 03 Expected Start-Up Behaviors SWIPE PAYMENT ACCEPTANCE SEQUENCE The Device will beep and show the below messages during the transaction process. The screen will display text. Upper and lower areas of text will be indicated using a forward slash (/) as a separator (see figure 3.1 on page 15). - Page 17 ©2022 Cantaloupe, Inc. All Rights Reserved.
Need help?
Do you have a question about the ePort Engage Combo and is the answer not in the manual?
Questions and answers