Table of Contents
Advertisement
Quick Links
Introduction: Using the User's Manual
Note: Notes are used to indicate important user information w ith regard to the
II
CZOOM
respective section of this user guide.
Wa rning: Warnings are used to indicate important user information with regard
U
G
to the respective section of this user guide; they also point out potential setup
SER
UIDE
errors or risks of damage.
t h
as of Ja nua ry, 29
2007
czoom II, camin, etc: In this user guide all c motion components are italicized. A
list of these components is also given at the back of this user guide.
Cables
In this user guide cables are referred to as in the follow ing example: (FI 12p, LE
7p). Cables are referred to in reference to their connectors. cmotion cable
connectors are manufactured by W. W. F ischer, Lemo or Hirose, which will be
referred to as FI, LE and HI respectively. Cable identification starts with the
connector connected to the cmotion unit; separated by a comma, the connector
connected to non-cmotion units follows. With each connector, its number of pins
is specified. The cable RSM-1 (Fi 12p, LE 7p), for instance, is the cmotion Scorpio
motor cable. The FI 12p connector is connected to the camin and the LE 7p
connector is connected to the Scorpio motor.
Cables may also be referred to by their commonly used names, e.g. CBUS (FI 7p,
FI 7p) and RS (FI 3p, FI 3p) cables, or the cable for the CBUS interface and the
Technical specifications are
cable for the RS interface, respectively.
subject to change without notice!
by Martin Waitz,
Marion Chloupek
Version 07-01
Advertisement
Table of Contents

Related Manuals for cmotion CZOOM II

Summary of Contents for cmotion CZOOM II
- Page 1 Ja nua ry, 29 2007 czoom II, camin, etc: In this user guide all c motion components are italicized. A list of these components is also given at the back of this user guide. Cables In this user guide cables are referred to as in the follow ing example: (FI 12p, LE 7p).
-
Page 2: Table Of Contents
The czoom II in stand-alone operation........9 3.1.1 Attaching the czoom II via cfast-czoom ........9 3.1.2 Attaching the czoom II to the pan bar joint ......10 Gene ral Sa fety Guide lines: 3.1.3 Operating the czoom II............10 The czoom II used with the camin .......... 13 Do not put your fingers near the motors while motors are moving! 3.2.1... -
Page 3: Component Description
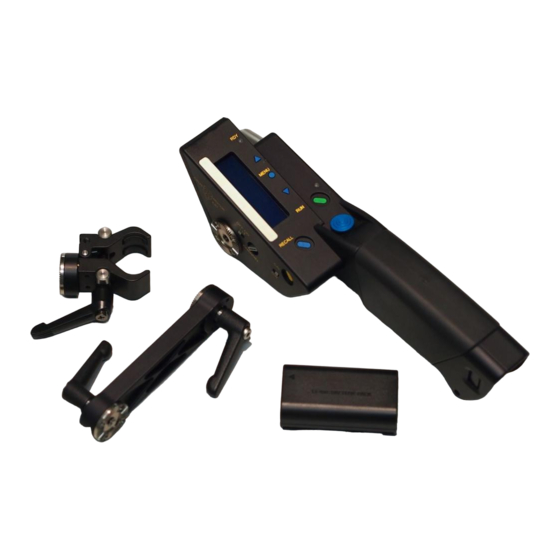
Display Shows motor position and status information [Z7] [Z10] The czoom II can be attached to the pan bar and Replaceable marker strip marking motor Marker strip offers direct control of both zoom motor and camera. - Page 4 LENS button for • single motor calibration Fig. 2. 7 Fig. 2. 6 Battery While holding the czoom II vertically, press the Release release button to enable the battery to glide out of CBUS Button its receptacle.
-
Page 5: Czoom Ii Set Up
In stand-alone operation, the czoom II has a zoom motor attached. In this mode of operation the czoom II is usually attached to the pan bar. The czoom II can be mounted to the pan bar in the follow ing ways: 3.1.3... - Page 6 Note: With the RLM-2 cable, cable lengths over 50 le nses: lenses directly metres are possible. connected to the czoom II via a 16p EXT plug. In this case, the czoom II cannot be powered by the ARRI CLM-2: connect...
-
Page 7: The Czoom Ii Used With The Camin
The czoom II used with the camin Press the release button [Z16] w ith your index f inger. Move your hand with the czoom The czoom II can be used together with the camin or slightly dow nwards, then... -
Page 8: Accessory: The Cstrap
SYSTEM OPERATION czoom II has no power Green System is ready For working with the system, the czoom II has to be Error has occurred (Check assembled as described in chapter 3 „czoom II status information on the Setup“. -
Page 9: Zooming
The zoom speed presets the maximum speed of the zoom motor in case that maximu m pressure is put on Note: If the czoom II works w ith the camin, and the the zoom control button. If the zoom speed is set to... -
Page 10: Setting Motor Limits
The position bar on the display shows the set limits. displayed. In this case, to still have some control whether the camera is running or in standby mode, the czoom II can be started in RUN toggle mode. To erase limits: 1. Press the LENS Button. -
Page 11: Memory Und Recall
Fig. 4. 6 stored motor position. If the czoom II is in the function mode RECALL GOTO, Note: A stored position w ill be lost as soon the czoom a motor position is stored as follows: II is turned off. Motor calibration w ill also delete a stored position. -
Page 12: Replacing The Marker Strip
Replacing the marker strip Brightness Fig. 4. 8 The czoom II comes with a replaceable marker strip. A magnet fixes the strip to the casing; it can be removed by a slight pulling movement. (see Fig. 4. 7) Fig. 4. 7 Chapter 4 –... -
Page 13: Motor Menu Item
With EXIT you exit the submenu DISPLAY and go Press the MENU button to go back to the main menu. back to the main menu. Note: By default, the czoom II is set to GOTO and 5.1.2 RECALL me nu item ACTUAL (speed). -
Page 14: Display Menu Item
ZAP button and LENS button simultaneously), a marker on the position bar is Note: At the time of delivery, the czoom II is set to shown. maximum contrast and maximum brightness. Position bar and position value The position bar indicates the current motor position. -
Page 15: Status Information And Warnings
No radio module is available. limits at the same time. The stored position can be The czoom II can also be delivered w ithout a radio situated beyond the set limit range. Via RECALL, the module. In this case, the casing does not show a motor can be moved to the position beyond the limit „wireless extension“... -
Page 16: Status Battery
The following warnings and error messages can be shown on the display: If the czoom II is in stand-alone mode, the battery icon informs about the charge state of the inserted battery. The icon indicates the charge state with the... -
Page 17: Aattachment
Softwa re update Pananvision Millenium XL RPI-1 (C019-KH1) Panavision Platinum RPI-1 (C019-KH1) If required, a software update for the czoom II can be Panavision Gold RPI-1 (C019-KH1) executed on every PC via the serial RS232 update Panavision Gold-II cable RPC-3. If the PC does not have a RS232 RPI-1 (C019-KH1) interface, an adapter USB to RS232 can be used. - Page 18 Notes : 35/35...
Need help?
Do you have a question about the CZOOM II and is the answer not in the manual?
Questions and answers