
Related Manuals for Candela AlexTriVantage

Summary of Contents for Candela AlexTriVantage
- Page 1 AlexTriVantage ™ Operator’s Manual PN 8501-00-1800 Revision 05 May 2007 Candela Corporation 0123...
-
Page 2: Copyright And Disclaimer
Limit of Liability The publisher has used their best efforts in preparing this manual. Candela Corporation makes no representation or warranty with respect to the accuracy or completeness of the contents of this manual and specifically disclaims any implied warranties of merchantability or fitness for any particular purpose and shall in no event be liable for any loss of profit or any other commercial damage including but not limited to special, incidental, consequential, or other damages. -
Page 3: Table Of Contents
AlexTriVantage Laser System Candela Corporation Table of Contents Copyright and Disclaimer Preface Book Conventions ......................vii Intended Audience ......................vii General Safety Statements and Guidelines ..............viii Routine Maintenance ....................viii Definitions of Symbols (Labeling on the Equipment and Location)......viii Using this Manual ...................... - Page 4 Connecting the Handpiece to the Delivery System Cable ........2-17 Connecting the Delivery System Cable ..............2-18 Touch Screen/Display Panel..................2-19 Applications Menu....................2-20 Candela Clinical Treatment Guidelines............2-22 System Status Messages..................2-22 Calibration Button ....................2-23 Standby/Ready Button and Status Area..............2-23 Standby/Ready Button ..................
- Page 5 AlexTriVantage Laser System Candela Corporation Pulse Rate Control ....................2-27 Pulse Count and Pulse Count Reset Button ............2-27 Treatment Summary Button .................. 2-28 System Configuration and Maintenance Mode Button.......... 2-28 Setting the System Configuration..............2-29 Setting Maintenance Mode ................2-31 Screen Lock Button....................
- Page 6 AlexTriVantage Laser System Candela Corporation Calibration Schedule..................... 8-2 Introduction ......................8-2 Parts List ......................... 8-2 Internal Calibration......................8-4 Starting the Circuit Calibration Procedure ............... 8-4 Laser Energy Circuit CAL ..................8-4 Final Verification of User Calibration Energy ............8-5 Appendix A: Pre-Treatment Visit General .........................
-
Page 7: Preface
AlexTriVantage Laser System Candela Corporation Preface Welcome to the Candela Corporation’s AlexTriVantage Operator’s Manual. Book Conventions This guide contains the following information highlights and cross-references: Warning: Warns the user regarding actions that may result in physical damage to the system or personal injury. -
Page 8: General Safety Statements And Guidelines
Definitions of Symbols (Labeling on the Equipment and Location) This section details the meaning, intent, and location of the labels (containing symbols) that appear on the AlexTriVantage Laser System. Label Description Label 1: Keylock Switch - OFF position. When the switch is in the OFF position, all circuits, except the Keylock Switch circuit, have been de-energized. - Page 9 The icon of a man indicates that the delivery system is equipped with a “Type B” applied part. Label 14: Waste Electrical and Electronic Equipment symbol. Indicates that the AlexTriVantage laser system and its components cannot be disposed of as regular trash. Contact Candela for disposal information.
- Page 10 Label 16: USB Software Upgrade Port. Indicates the location of the USB port on the rear of the laser system. Contact Candela Clinical Sales or Service for the latest software upgrades. Label 17: CAUTION: Risk of electrical shock if laser covers are removed or serviced by unauthorized persons.
- Page 11 AlexTriVantage Laser System Candela Corporation Front Panel Labels Ready State Symbol and Indicator Light Label 3 Label 2 Label 1 Label 22 8501-00-1800, Revision 05 Confidential...
- Page 12 AlexTriVantage Laser System Candela Corporation Rear Panel Labels Label 4 Label 5 Label 15 Label 16 Labels 6, 7, 8 Label 17 Label 20 Label 9 Label 19 Label 18 Label 10 Labels 11, 12 Label 13 Label 14 Label 21...
-
Page 13: Using This Manual
AlexTriVantage Laser System Candela Corporation Using this Manual This manual is divided into the following sections: Chapter 1: Getting Started This chapter provides warnings and cautions, adverse events descriptions, indications for use, and contraindications. Chapter 2: Understanding the Laser This chapter provides a brief description of all system components and functionality. - Page 14 AlexTriVantage Laser System Candela Corporation Confidential 8501-00-1800, Revision 05...
-
Page 15: Chapter 1: Getting Started
AlexTriVantage Laser System Candela Corporation Chapter 1: Getting Started Topics described in this chapter include: Overview page 1-2 Laser Treatment of Skin Pigmentation Abnormalities page 1-2 Indications for Use page 1-3 Contraindications and Precautions page 1-3 Patient Selection page 1-4... -
Page 16: Overview
Other chromophores in the skin, such as hemoglobin and oxyhemoglobin, have little to no absorption of light within the selected wavelength. The 755 nm nominal wavelength of the AlexTriVantage Laser has been carefully selected to utilize the difference in absorption for the treatment of dark tattoo pigments. Treatment of tattoos can therefore be performed with minimal adverse effects on normal skin structures. -
Page 17: Indications For Use
The wavelength and pulse duration considerations outlined above indicate that the AlexTriVantage Laser is appropriate for treatment of tattoos. The wavelength of the AlexTriVantage Laser is about 755 nm, in the near-infrared region. It produces pulses approximately 50 nanoseconds in duration. The pulse energies it produces allows delivery of energies up to 625 mJ. -
Page 18: Patient Selection
Note: Safety and efficacy of treating a tattoo located in the facial area with the AlexTriVantage Q-switched Alexandrite Laser has not yet been determined by FDA review. Therefore, the AlexTriVantage laser system is not to be used in treating a tattoo located in the facial area. -
Page 19: Warnings, Cautions, And Precautions
WARNING! The AlexTriVantage Laser system has been designed for the safest possible operation and maintenance. However, any laser system can cause injury if it is not properly installed, operated, moved or serviced, and the AlexTriVantage Laser is no exception. The potential hazards associated with the AlexTriVantage Laser are:... - Page 20 AlexTriVantage Laser System Candela Corporation Caution! Do not enter the Ready state without a fiber installed and without having the proper protective eyewear on. Caution! Before the laser system is turned on, a Handpiece must be installed on the end of the optical fiber.
-
Page 21: Optical Hazards
WARNING! Nominal Ocular Hazard Distance (NOHD). The laser aperture of the AlexTriVantage Laser System is at the distal end of the Handpiece. The beam enlarges as the distance from the Handpiece increases. The Nominal Ocular Hazard Distance (NOHD) is the distance at which the beam is so big it is no longer dangerous to the unprotected eye. -
Page 22: Electrical And Mechanical Hazards
It is possible for high voltage components to retain a charge after the power supply has been turned off, and even after the AlexTriVantage Laser has been disconnected from the line voltage. Therefore, no part of the exterior housing should be displaced, except by a trained and authorized technician. -
Page 23: Flash Fire Hazards
Caution! The electrical and laser radiation hazards present during servicing of the AlexTriVantage Laser System can be extremely dangerous. The system should be serviced only by those qualified technicians who have received appropriate training on the AlexTriVantage Laser System from Candela. -
Page 24: Fire Hazards
Laser Fiber Fire Hazard The AlexTriVantage Laser System fibers carry significant laser energy. If the fiber were to break during laser pulsing, a sudden flash or flame may be observed at the break point. -
Page 25: Electromagnetic Interference
To reduce the risk of shock, do not remove covers. Refer servicing to qualified service personnel. In the United States, the facility operating a Candela laser system should follow OSHA guidelines and applicable ANSI standards for the safe use of lasers. -
Page 26: Optical Precautions
Cover all windows, portholes, etc. with opaque material to prevent laser light escaping from the laser room. Restrict entry to the laser room when the AlexTriVantage Laser is in operation. Allow access to the laser room only to those personnel both essential to the procedure and well trained in laser safety procedures. -
Page 27: Gauze, Drapes, And Clothing
AlexTriVantage Laser System Candela Corporation Gauze, Drapes, and Clothing Avoid combustible materials such as gauze, drapes and clothing in the treatment area. When the use of gauze or drapes is required, all combustible materials must be kept moist with water or saline. -
Page 28: Safety Features
On/Off Keylock Switch This key-operated switch controls electrical power to the laser system. The Candela laser system can be operated only with the key provided by Candela. The key should be removed from the key-switch when the laser is not in use. -
Page 29: Delivery System Cable Indicator
READY state, the laser will return immediately to the STANDBY state where the laser beam is extinguished. For more information, on installation of a remote interlock, call Candela Technical Support. Also see “Remote Interlock” on page 2-11. 8501-00-1800, Revision 05... - Page 30 AlexTriVantage Laser System Candela Corporation 1-16 Confidential 8501-00-1800, Revision 05...
- Page 31 AlexTriVantage Laser System Candela Corporation Chapter 2: Understanding the Laser Topics described in this chapter include: Introduction page 2-3 The Laser System page 2-3 System Description page 2-3 Front Panel page 2-5 Touch Screen/Display Panel page 2-5 Controls and Connections...
- Page 32 AlexTriVantage Laser System Candela Corporation Standby/Ready Button and Status Area page 2-23 Fluence Controls and Indicators page 2-26 Pulse Duration Control page 2-26 Spot Size Identifier Bar page 2-27 Pulse Rate Control page 2-27 Pulse Count and Pulse Count Reset Button...
-
Page 33: Introduction
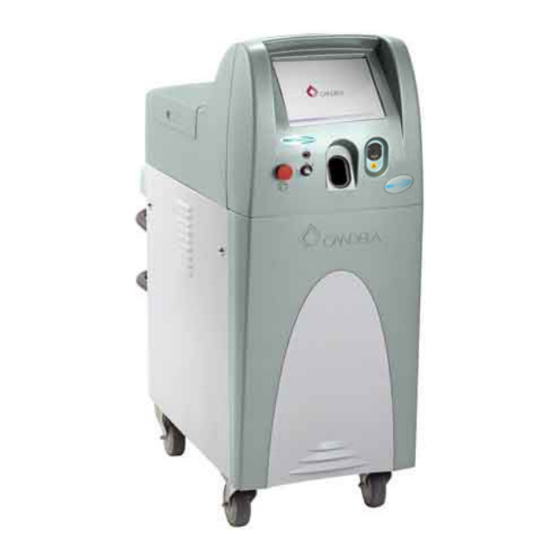
Candela Corporation Introduction This chapter provides detailed reference-based descriptions of all the panels, controls, and screens for the AlexTriVantage Laser system. It includes detailed illustrations of the unit. The Laser System Figure 2-1 shows the AlexTriVantage Laser system. Figure 2-1: Candela AlexTriVantage Laser System... - Page 34 The AlexTriVantage Laser system delivers laser energy at a wavelength of about 755 nm with a nominal pulsewidth of 50 nanoseconds. The output of this laser is delivered to the area of treatment by means of a lens coupled user replaceable optical fiber with a treatment Handpiece attached to its distal end.
-
Page 35: Front Panel
AlexTriVantage Laser System Candela Corporation Front Panel Figure 2-2 shows the front view of the AlexTriVantage Laser System. Touch Screen Display Panel Controls and Connections Locking Front Wheels Figure 2-2: Front View of Laser System The following sections provide a brief description of the front panel components. -
Page 36: Controls And Connections
AlexTriVantage Laser System Candela Corporation Controls and Connections Figure 2-3 shows a detailed view of the controls and connections and a brief description of each one. Touch Screen Display Panel Ready Indicator Delivery System Receptacle Emergency (Laser Aperture) Laser Stop... -
Page 37: Emergency Laser Stop
AlexTriVantage Laser System Candela Corporation Emergency Laser Stop An emergency stop button. When this button is pressed, the AlexTriVantage Laser is shut down immediately. See Figure 2-4 for a detailed view of the button: Position Position Start Position Emergency Laser Stop... -
Page 38: On/Off Keylock Switch
The electrical power to the laser system is controlled via a key-operated switch. The laser system can only be operated using the key provided by Candela Corporation. The Keylock Switch is spring-loaded. To turn on the system, move the switch to the Start position and release it. -
Page 39: Calibration Port
For more information on the Delivery System cable, see “Delivery System” on page 2- Locking Wheels The AlexTriVantage system is equipped with wheels. The two front wheels can swivel to allow for maneuverability. The rear wheels are fixed and do not swivel. -
Page 40: Rear Panel
AlexTriVantage Laser System Candela Corporation Rear Panel Figure 2-6 shows the rear view of the AlexTriVantage Laser System. Water Receptacle USB Port Footswitch Connector Main Power Switch Remote Interlock Main Power Cable Figure 2-6: Rear View of Laser System The following sections provide a brief description of the rear panel components. -
Page 41: Main Power Switch And Power Cord
Main Power Switch and Power Cord The main power switch (circuit breaker) and power cord for the laser system are located on the rear of the AlexTriVantage Laser system. The power switch must be in the ON position for the laser system to operate. -
Page 42: Delivery System
AlexTriVantage Laser System Candela Corporation Delivery System The Delivery System consists of a Delivery System cable, a Handpiece Assembly, a Distance Gauge, and a Fiber Pole. Figure 2-7 shows the Delivery System Cable. Figure 2-8 shows the connectors on each end of the Delivery System Cable and the Handpieces and the Distance Gauge. -
Page 43: Delivery System Cable
AlexTriVantage Laser System Candela Corporation Proximal End of Delivery System Cable (Connects to Delivery System Distance Gauge Receptacle) (used with all three Handpieces) Distal End of Delivery System Cable (Connects to Handpiece and then to Calibration Port) Handpieces (3 sizes:... -
Page 44: Handpieces
For more information on connecting the cables, see “Connecting the Delivery System Cable” on page 2-18 Handpieces The AlexTriVantage Laser System includes three color-coded Handpiece for different spot sizes (see Figure 2-8): 2mm - gold 3mm - black 4mm - red A Handpiece is connected to the Distal end of the Delivery System Cable. -
Page 45: Distance Gauge
AlexTriVantage Laser System Candela Corporation Distance Gauge The Distance Gauge is the only part of the Handpiece that comes in contact with the patient (see Figure 2-8). It is used to ensure proper focusing and spot placement on the treatment area. -
Page 46: Fiber Pole
AlexTriVantage Laser System Candela Corporation Fiber Pole The optional Fiber Pole supports the Delivery System cable as shown in Figure 2-11. This device keeps the cable suspended and out of the way. Fiber Pole Delivery System Cable Figure 2-11: Fiber Pole The adjustable Fiber Pole supports the Delivery System cable. -
Page 47: Cabling
Cabling This section describes how to properly connect cables to the front and rear panels of the AlexTriVantage Laser System. Figure 2-1 shows all cable connected to the system. Connecting the Handpiece to the Delivery System Cable Connect the Handpiece to the distal end of the Delivery System cable (see Figure 2-12). All three Handpieces connect in the same way. -
Page 48: Connecting The Delivery System Cable
AlexTriVantage Laser System Candela Corporation Connecting the Delivery System Cable Figure 2-13 shows how to connect the two ends of the Delivery System Cable to the front panel. Both connectors are keyed and have orientation marks, to ensure they are connected correctly. -
Page 49: Touch Screen/Display Panel
AlexTriVantage Laser System Candela Corporation Touch Screen/Display Panel This section provides an overview of the graphical user interface provided on the Touch Screen/Display Panel. Figure 2-14 shows the main display screen: Screen Lock Button Calibration Button System Configuration and Standby/Ready Button... -
Page 50: Applications Menu
Selecting the Applications menu displays a drop down menu with a list of Preset Treatment Parameters (see Figure 2-15). Each of these parameters are pre-programmed treatment applications based on the Candela Clinical Treatment Guidelines. Figure 2-15: Applications Drop Down Menu When you make a selection from this list, the selected application turns blue and a submenu with additional options will appear. - Page 51 To exit the Applications menu or a submenu, select the Application Menu Bar, or press X next to the Application Menu Bar. Refer to the Candela Clinical Treatment Guidelines (“Candela Clinical Treatment Guidelines” on page 2-22) for the recommended preset treatment parameters and the spot sizes for the desired treatment applications.
-
Page 52: Candela Clinical Treatment Guidelines
Discontinue use of your laser delivery system if you suspect a problem. The Candela Clinical Treatment Guidelines were developed from clinical experience for applications specific to the AlexTriVantage laser. Each treatment application has its own set of starting operating parameters. If needed, each operating parameter can be adjusted by pressing the up and down buttons to adjust the value to the desired setting. -
Page 53: Calibration Button
AlexTriVantage Laser System Candela Corporation Calibration Button The Calibration button is used to place the system into the Ready state and to begin the calibration process (see Figure 2-18). Figure 2-18: Calibration Button The Handpiece must be inserted into the Calibration Port before calibration can take place. If the Handpiece is not installed, a dialog appears prompting you to install it. - Page 54 AlexTriVantage Laser System Candela Corporation Table 2-2: Standby/Ready Button Functions Button Description Ready Caution: Do not enter the Ready state without a fiber installed and having the proper protective eyewear on. Select the Ready button (the upper left button with the dot in the center) to put the system into the Ready state.
-
Page 55: Status Area
AlexTriVantage Laser System Candela Corporation Status Area Table 2-3 describes the status of the system based on the color of the Standby/Ready button and the symbols displayed in that area. This area is also used to toggle the system between the Ready and Standby states (see “Standby/Ready Button”... -
Page 56: Fluence Controls And Indicators
AlexTriVantage Laser System Candela Corporation Fluence Controls and Indicators The Fluence parameter specifies the amount of energy (in Joules) delivered to the treatment spot size (in cm). The Fluence setting is adjustable in increments of 0.25J/cm between the lower and upper Fluence values for each spot size and duration. -
Page 57: Spot Size Identifier Bar
AlexTriVantage Laser System Candela Corporation Spot Size Identifier Bar A bar on the bottom left side of the main screen identifies the spot size selected, based on the Handpiece that has been connected to the Deliver System cable. The selected Spot Size... -
Page 58: Treatment Summary Button
AlexTriVantage Laser System Candela Corporation Treatment Summary Button The Treatment Summary table displays the number of laser pulses and the operating parameters used for the last six parameter changes. Select the Treatment Summary button (see Figure 2-24) to display the Treatment Summary Table (see Figure 2-25). -
Page 59: Setting The System Configuration
AlexTriVantage Laser System Candela Corporation The button has two functions: Set System Configuration - quickly tap the Wrench button Set Main ten ace Mode - hold the Wrench button for at least 5 seconds Setting the System Configuration If you quickly tap the wrench button, the system allows you to set the system configuration. - Page 60 This screen displays the Laser Variable Mode Screen Figure 2-28 (see ) which contains information about the laser including system parameters. This mode is used by Candela Field Service and users to monitor system performance. Figure 2-28: Laser Variable Mode Screen 2-30 Confidential...
-
Page 61: Setting Maintenance Mode
Maintenance mode is only used by Candela Service Personnel. Screen Lock Button The AlexTriVantage Laser system has a password protected software lock to prevent unauthorized use of the laser. The laser remains in warm up mode when the software lock is engaged. - Page 62 AlexTriVantage Laser System Candela Corporation A Candela logo screen with a padlock and a key button displays indicating the display is locked (see Figure 2-31). Unlock Button Figure 2-31: Candela Screen Lock Screen To unlock the screen, press the Unlock button on the Lock screen. A keypad displays on which you can enter a 4-digit code (see Figure 2-32).
-
Page 63: Dialog Boxes
AlexTriVantage Laser System Candela Corporation Dialog Boxes During operation of the laser, there are several situations in which a message appears on the Touch Screen/Display Panel to provide information. Figure 2-33 shows an example of a dialog box: Figure 2-33: An Example of a Dialog Box Many dialog boxes provide a message and required that you either confirm the message or cancel the action. - Page 64 AlexTriVantage Laser System Candela Corporation 2-34 Confidential 8501-00-1800, Revision 05...
- Page 65 AlexTriVantage Laser System Candela Corporation Chapter 3: Using the Laser Topics described in this chapter include: Introduction page 3-2 Performing a Laser Treatment page 3-2 Before You Begin page 3-2 Treatment Procedure page 3-3 8501-00-1800, Revision 05 Confidential...
-
Page 66: Introduction
Candela Corporation Introduction This chapter describes how to use the AlexTriVantage Laser system to treat patients. Caution: Before starting up the laser system for any reason, the operator must ensure that all personnel in the area are familiar with the safety concerns outlined in “Warnings, Cautions, and Precautions”... -
Page 67: Treatment Procedure
AlexTriVantage Laser System Candela Corporation Treatment Procedure Turn the Keylock Switch from Off to the Start position. The key will automatically spring back to the On position. The system will enter a brief warm up state during which the water begins circulating and warms up. - Page 68 AlexTriVantage Laser System Candela Corporation Insert the Handpiece into the Calibration Port. The connectors are keyed and have orientation marks to help you align the connectors correctly (see Figure 3-3). Delivery System Proximal end of Receptacle Delivery System Calibration Cable (connected to...
- Page 69 AlexTriVantage Laser System Candela Corporation The system prompts you to use the latest version of the Treatment Guidelines for information on treating the patient (see Figure 3-5). See for the www.MyCandela.com latest version of the guidelines. Figure 3-5: Treatment Guidelines Dialog Select the checkmark when you have completed this task.
- Page 70 AlexTriVantage Laser System Candela Corporation Table 3-1: Treatment Settings Setting Description Applications Select the application from the drop down menu. The choices are: Epidural Lesions Lentigines Age Spots Freckles Cafe-au-lait Birthmarks Dermal Lesions Nevus of Ota Tattoos Blue Black Green Fluence Select the amount of energy delivered based on the spot size.
- Page 71 AlexTriVantage Laser System Candela Corporation Put on safety eyewear. Select the Calibration button (see Figure 3-7). Figure 3-7: Calibration Button The system enters the Ready state. The Standby/Ready button turns green (see Figure 3-8). Figure 3-8: System is in the Ready State The Confirm Calibration Parameters dialog appears asking you to confirm the parameters you have specified (see Figure 3-9).
- Page 72 AlexTriVantage Laser System Candela Corporation Figure 3-10: Press and Hold Footswitch Dialog 11. Press and hold the footswitch to begin a system calibration. When the calibration is complete, the Calibration Complete dialog displays. 12. Release the Footswitch. A dialog prompts you to remove the Handpiece from the Calibration Port.
- Page 73 AlexTriVantage Laser System Candela Corporation Figure 3-12: Connect Distance Gauge 15. Select the Ready button. The Standby/Ready button turns green (see Figure 3-13). Figure 3-13: Ready Button The laser is now armed and ready to use. The Ready Indicator on the front panel and the Indicator on the Delivery System Cable are illuminated (see Figure 3-14), but no energy is being delivered yet.
- Page 74 AlexTriVantage Laser System Candela Corporation Figure 3-15: The Laser is Being Used for Treatment When the Footswitch is released, the Lasing symbol is replaced with the Ready state in the Status Area. Note: If the laser remains idle (unused) for more than 2 minutes while in Ready state, the system automatically reverts to the Standby state.
-
Page 75: Chapter 4: Maintaining The Laser
AlexTriVantage Laser System Candela Corporation Chapter 4: Maintaining the Laser Topics described in this chapter include: General Information page 4-2 Cleaning and Disinfecting page 4-3 Cleaning the Exterior of the Laser System page 4-3 Cleaning the Handpieces, Distance Gauge, and Lens... -
Page 76: General Information
AlexTriVantage Laser System Candela Corporation General Information In general, the laser system requires no special maintenance by the user. Routine care of the Handpieces, cleaning and disinfecting of the exterior of the system are covered in “Cleaning and Disinfecting” on page 4-3. During normal operation, the user is required to calibrate the energy output of the laser system, as discussed in “Calibration Procedure”... -
Page 77: Cleaning And Disinfecting
AlexTriVantage Laser System Candela Corporation Cleaning and Disinfecting This section describes how to clean and disinfect the components of the laser system. Cleaning the Exterior of the Laser System The exterior of the laser system may be cleaned using a soft cloth moistened with a solution of mild soap and water. -
Page 78: Cleaning The Touch Screen/Display Panel
AlexTriVantage Laser System Candela Corporation To disinfect the Handpieces or Distance Gauges: Wipe them with a gauze pad moistened with isopropyl alcohol. Care should be taken to avoid contamination of the internal optical surfaces of the Handpieces. Autoclaving of Distance Gauges is acceptable. -
Page 79: Maintaining The Fiber Optic Delivery System
Delivery System, the Handpiece or the Distance Gauge. The AlexTriVantage laser delivery system utilizes fiber optics that can be damaged if subjected to excessive bending. To avoid damage to the optical fiber, limit bends to a radius of 6 inches (15 cm) or greater. -
Page 80: Calibration Procedure
AlexTriVantage Laser System Candela Corporation Calibration Procedure Energy calibration is the automatically controlled procedure by which the laser calibrates the energy output to deliver pulses at the energy density selected on the control panel. During the calibration procedure, the Handpiece is inserted in the Calibration Port, the system is pulsed, and the energy output of the delivery system is read by an internal laser energy meter. - Page 81 AlexTriVantage Laser System Candela Corporation Warning: Ensure that the spot size on the Handpiece matches the Handpiece size displayed in the Handpiece field on the control panel. Failure to do so can result in the delivery of improper energy to the patient.
- Page 82 AlexTriVantage Laser System Candela Corporation Confidential 8501-00-1800, Revision 05...
-
Page 83: Chapter 5: Troubleshooting The Laser
AlexTriVantage Laser System Candela Corporation Chapter 5: Troubleshooting the Laser Topics described in this chapter include: Introduction page 5-2 Troubleshooting page 5-2 Fault Messages page 5-3 8501-00-1800, Revision 05 Confidential... -
Page 84: Introduction
AlexTriVantage Laser System Candela Corporation Introduction This chapter provides troubleshooting and diagnostic information for the AlexTriVantage Laser System. Troubleshooting These troubleshooting procedures do not replace the instructions or procedures provided in this guide. Review all instructions and procedures in this guide before performing the following troubleshooting procedures. -
Page 85: Fault Messages
A fault message typically occurs due to a system malfunction. Sometimes clearing the fault and retrying the previous operation can be successfully accomplished without further faults occurring. If a fault message persists, call Candela Technical Support and report the Fault Number. Fault processing automatically places the system into the Standby state. - Page 86 AlexTriVantage Laser System Candela Corporation Table 5-2: Fault Message and Solutions for the AlexTriVantage Laser System Situation/Symptom Fault # Reason Solution Fault 3 - Shutter Fault Shutter isn’t in the correct Go to Standby, and then try state when checked. Does not to calibrate the laser.
- Page 87 AlexTriVantage Laser System Candela Corporation Table 5-2: Fault Message and Solutions for the AlexTriVantage Laser System Situation/Symptom Fault # Reason Solution Fault 6 - Calibration Laser failed to Calibration to Recalibrate laser after each Fault desired Fluence. step in the order listed below...
- Page 88 AlexTriVantage Laser System Candela Corporation Table 5-2: Fault Message and Solutions for the AlexTriVantage Laser System Situation/Symptom Fault # Reason Solution Fault 7 - DI System DI pressure switch does not Turn laser off. Fault (Water) change when power turned...
- Page 89 AlexTriVantage Laser System Candela Corporation Table 5-2: Fault Message and Solutions for the AlexTriVantage Laser System Situation/Symptom Fault # Reason Solution Fault 10 - Delivery 10.2 No Handpiece detected while Remove the Delivery System Fault in Ready. System Handpiece. Reinstall the Delivery System Handpiece and calibrate the laser.
- Page 90 AlexTriVantage Laser System Candela Corporation Table 5-2: Fault Message and Solutions for the AlexTriVantage Laser System Situation/Symptom Fault # Reason Solution Fault 15 - Transmission 15.1 Transmission (Tx) is >110%. Recalibrate laser after each Fault step in the order listed below...
-
Page 91: Chapter 6: Specifications
AlexTriVantage Laser System Candela Corporation Chapter 6: Specifications Topics described in this chapter include: System Specifications page 6-2 Electrical Requirements page 6-4 Environmental Requirements page 6-5 Internal Cooling Water Requirements page 6-6 8501-00-1800, Revision 05 Confidential... -
Page 92: System Specifications
AlexTriVantage Laser System Candela Corporation System Specifications Table 6-1 lists the system specifications of the AlexTriVantage Laser System. Table 6-1: AlexTriVantage System Specifications Specification Description Laser Type: Flashlamp-excited, Q-switched alexandrite laser Wavelength (nominal): 755 nm Q-Switch: Electro-optical switch (Pockels cell) - Page 93 AlexTriVantage Laser System Candela Corporation Table 6-1: AlexTriVantage System Specifications Specification Description Dimension 43” H x 16” W x 30” D Weight 290 lbs Voltage and Power 220-230 V~, 50/60 Hz, single phase, 4000 VA or 16 A at 230 V~ (26 A peak)
-
Page 94: Electrical Requirements
The input power line should be free of transients (spikes, sags and/or surges). A dedicated branch circuit is recommended. Operation of the AlexTriVantage Laser on a power line that is not consistently within the specification may cause damage to the system and may void the warranty. -
Page 95: Ground Continuity Tests
Important Note: Installation of the laser must be performed by a Candela Service Representative. Following installation, a Candela Clinical Consultant must instruct designated personnel on the basic operation and care of the laser. -
Page 96: Ambient Temperature
The AlexTriVantage Laser System is not designed for mobile use. Transport and Storage For transport and storage of the AlexTriVantage Laser system, the temperature must be kept between 40° and 110° F (5° and 43°C) and humidity between 20% to 80% (non-condensing). -
Page 97: Chapter 7: Laser System Packing Lists, Accessories, And Replacement Parts
AlexTriVantage Laser System Candela Corporation Chapter 7: Laser System Packing Lists, Accessories, and Replacement Parts Topics described in this chapter include: Laser Parts and Accessory Kit page 7-2 8501-00-1800, Revision 05 Confidential... -
Page 98: Laser Parts And Accessory Kit
AlexTriVantage Laser System Candela Corporation Laser Parts and Accessory Kit The following items are included in the shipping package for all AlexTriVantage laser systems. Each can also be ordered individually as replacement or spare parts. Table 7-1: Laser Parts and Accessory Kit... - Page 99 AlexTriVantage Laser System Candela Corporation Chapter 8: Service Internal Calibration Procedure Topics described in this chapter include: Calibration Schedule page 8-2 Introduction page 8-2 Parts List page 8-2 Internal Calibration page 8-4 Starting the Circuit Calibration Procedure page 8-4 Laser Energy Circuit CAL...
-
Page 100: Calibration Schedule
The measurement circuits should be calibrated annually to insure accurate delivery of treatment energy. Measurement circuit calibration should be performed by a qualified Candela Service person as part of a "preventive maintenance" visit. During the visit, other subsystems of the laser system will be inspected, adjusted (if necessary) and/or repaired as required. - Page 101 This procedure must be followed precisely for proper results. If the "Final verification of User Calibration Energy" section fails, contact Candela Technical Support for further information. Once the Laser Energy Circuit CAL procedure has been started, the...
-
Page 102: Internal Calibration
The Laser Energy Circuit CAL basically pulses the laser into an external meter and then into the system's Calport at low and high energies to calculate slope and offset calibration values. 1. Put on AlexTriVantage laser safety eyewear. Warning: The laser will enter the READY mode for the entire calibration procedure. -
Page 103: Final Verification Of User Calibration Energy
AlexTriVantage Laser System Candela Corporation 3. Carefully follow the prompts at the bottom of the screen. There are two typical prompts displayed. Pulse HP in OPHIR (expect ~ .500). Pulse Laser and Enter Ophir Data. This means to aim the handpiece (HP) to pulse the laser into the external Ophir meter head and then enter the Ophir energy (in this case the expected OPHIR reading should be within .500 Joules) using the keypad that will pop-up... - Page 104 Candela Corporation 5. Verify the percentage difference of each table is within ± 14%. If this verification fails, the Circuit CAL needs to be repeated. If it fails more than once, then contact Candela Technical Support for service. Table 8-1: Calibration Tables 3mm, 5.0 J/cm...
-
Page 105: Appendix A: Pre-Treatment Visit
7-10 days. (It may be helpful to use an anti-bacterial ointment on the treated area and to cover it with a dressing for a few days after AlexTriVantage laser therapy. This will protect the skin from being abraded and the site infected, a potential source of scar formation.) The treated area may not clear with the first treatment. -
Page 106: Photographs
AlexTriVantage Laser System Candela Corporation Photographs Before and after treatment photographs should be used to document progress of treatment. Because many patients are not able to objectively assess their own progress, photographs provide documented evidence on the course of treatment. At each session, before and after treatment photographs should be taken under standardized conditions. -
Page 107: Appendix B: Treating The Patient
Appendix B: Treating the Patient Training Requirements The Candela AlexTriVantage Laser is intended for use only by trained and qualified physicians. This portion of the manual describes clinical techniques developed by experts in the field, and is presented as a reference. -
Page 108: Treatment
AlexTriVantage Laser System Candela Corporation The appearance of a raised, white spot is the usual marker of a laser pulse delivered using an energy density (fluence) at or above the therapeutic threshold. If a raised, white spot fails to appear at an irradiated site, the energy density is most likely subtherapeutic. -
Page 109: Pigmented Lesions
AlexTriVantage Laser System Candela Corporation Pigmented Lesions The laser exposure dosage applied to treat pigmented lesions may be in the range of 5.0 to 6.0 J/cm2. The laser exposure dosage will vary depending upon whether the melanin in the lesion is epidermal or dermal in depth. - Page 110 AlexTriVantage Laser System Candela Corporation Confidential 8501-00-1800, Revision 05...
-
Page 111: Appendix C: Post-Treatment Care
AlexTriVantage Laser System Candela Corporation Appendix C: Post-Treatment Care General The treated area should be cared for delicately until healing is complete. Care should be taken to prevent trauma to the treated area for the first 4 to 7 days following treatment. - Page 112 AlexTriVantage Laser System Candela Corporation Confidential 8501-00-1800, Revision 05...
-
Page 113: Appendix D: Electromagnetic Compatibility
AlexTriVantage Laser should be observed to verify normal operation in the configuration in which it will be used. The AlexTriVantage Laser complies with IEC 60601-1-2 (Group 1, Class A) "Electromagnetic Compatibility Requirements and Tests". Class A equipment is intended for use in commercial and industrial locations. -
Page 114: Regulatory Classifications
AlexTriVantage Laser System Candela Corporation If interference from the AlexTriVantage Laser is suspected, ensure that the unit is plugged into an AC Mains that is not shared by the affected equipment. If the interference still exists, move the AlexTriVantage Laser or the affected equipment into another room. - Page 115 AlexTriVantage Laser System Candela Corporation Index keylock switch 2-8 Laser Aperture i-x 2-17 laser system cleaning the distance gauge 4-3 Accessories 7-2 cleaning the exterior 4-3 cleaning the handpieces 4-3 cleaning the lens 4-3 benign cutaneous pigmented lesions connections 2-6...
- Page 116 AlexTriVantage Laser System Candela Corporation tattoos treatment of 1-4 treating lesions 1-4 tattoos 1-4 the patient B-1 treatment guidelines B-1 performing laser 3-2 post-treatment care C-1 pre-treatment visit A-1 troubleshooting the laser system 5-2 troubleshooting table 5-2 indications for 1-3...
Need help?
Do you have a question about the AlexTriVantage and is the answer not in the manual?
Questions and answers