Table of Contents
Advertisement
Quick Links
Advertisement
Table of Contents

Summary of Contents for HuneTec ReFLEX H200
- Page 1 Aug. 09. 2004...
-
Page 2: Table Of Contents
1. SAFETY INFORMATION 2. BEFORE YOU START 2.1 WHAT'S IN THE BOX 2.2 HOW TO CHARGE BATTERY 2.3 USING THE HOLSTER 3. ABOUT YOUR DEVICE 3.1 DESCRIPTION OF YOUR DEVICE 3.2 STATUS ICONS IN THE MAIN MENU SCREEN 3.3 ICONS FOR MESSAGE LIST 3.4 KEY DESCRIPTION 3.5 DISPLAY IN THE INITIAL SCREEN 3.6 DISPLAY IN THE MAIN MENU SCREEN... - Page 3 TASK NEW TASK EDIT TASK 10. MEMO 10.1 NEW MEMO 10.2 EDIT MEMO 10.3 SEND MEMO 11. PREFERENCE (SETTING UP YOUR DEVICE) 11.1 ALERT SETTINGS 11.1.1 VOLUME 11.1.2 INBOX, INFO, SCH & ALM 11.1.3 REMINDER 11.1.4 R INTERVAL (REMINDER INTERVAL) 11.1.5 R REPEAT (REMINDER REPEAT) 11.2 QUICK TEXT...
-
Page 4: Safety Information
Safety Information ReFLEX 2 Way Personal Communicator H200 User's Manual For the efficient and safe operation of your device, read this information before using H200 ReFlex Two Way Messenger. Pager Transmitter Safety The FAA has regulations concerning the use of electric devices aboard aircraft. When boarding on an aircraft, turn your device off to avoid potential interference with aircraft radio communica- tion or navigation equipment. -
Page 5: Before You Start
Before You Start ReFLEX 2 Way Personal Communicator H200 User's Manual 2.1 What’s in the Box? When you unpack the box, it contains H200 with the following accessories as shown below. Program CD & Manual H200 Holster Travel Charger Data Cable (Option Item) *Note : When you unpack H200 box, you are requested to push reset switch to the left using pointed tool after uncover the... -
Page 6: How To Charge Battery
Before You Start ReFLEX 2 Way Personal Communicator H200 User's Manual 2.2 How to charge battery Battery is not charged when you first purchase the device. You must charge the battery full before using the device as below instruction. H200 Pager Travel Charger Electric outlet <Charging the device>... -
Page 7: Using The Holster
Before You Start ReFLEX 2 Way Personal Communicator H200 User's Manual 2.3 Using the Holster 1. Please attach the Holster to your Belt. 2. Insert the H200 into the Holster with LCD display facing inward as shown in below Figure. 3. -
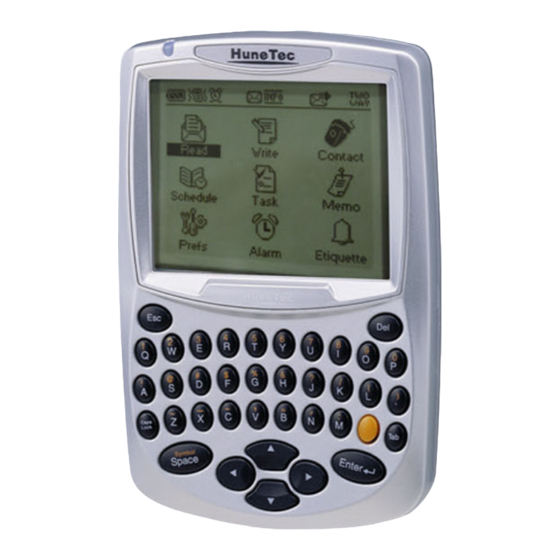
Page 8: About Your Device
About Your Device ReFLEX 2 Way Personal Communicator H200 User's Manual Your new H200 ReFlex Two Way Messenger provides you with the proven reliability that has made us one of the leading Wireless Messenger providers. You can get clear and uninterrupted messenger communication with H200. -
Page 9: Status Icons In The Main Menu Screen
About Your Device ReFLEX 2 Way Personal Communicator H200 User's Manual 3.2 Status Icons in the Main menu display You can see the status of the device with the Top line icons in Main menu. Following shows you the description of each status Icons. -
Page 10: Icons For Message List
About Your Device ReFLEX 2 Way Personal Communicator H200 User's Manual 3.3 Icons for message List Icon Description Shows unread message. Shows read message. Shows duplicated read message. Shows duplicated unread message. Shows sending failed message. Shows the message on sending process. Shows the message on queuing process for sending. - Page 11 About Your Device ReFLEX 2 Way Personal Communicator H200 User's Manual Control Button Description Enter Press to select the highlighted option or to save settings. Press left, right, up, down buttons to move within a field (Text field, List field, Button Navigation field).
-
Page 12: Display In The Initial Screen
About Your Device ReFLEX 2 Way Personal Communicator H200 User's Manual 3.5 Display in the Initial screen Initial Screen shows you the status of device as well as initial message and current Time. Status Icon Area Initial Message Area Time & Date Area Function Key Area <Initial Screen>... -
Page 13: Led Indicator
About Your Device ReFLEX 2 Way Personal Communicator H200 User's Manual < Main menu icons > Icon Description Icon Description Read Message Etiquette Write Message Lock Contacts World Clock Scheduler Entertainment Task Tx Set Memo Calculator Preference Mymail (option) Alarm 3.7 LED INDICATOR Your device LED radiates 3 Color light * When new message arrived - Yellow Green Color... -
Page 14: Getting Started
Getting Started ReFLEX 2 Way Personal Communicator H200 User's Manual 4.1 How to switch device on and off Press and hold Button on the left side over 3 sec to switch device on. Press and hold Button on the left side over 4 sec to switch device off. * Note : When you unpack H200 box, you are requested to push reset switch to the left using pointed tool after uncover the Rubber cap in the bottom of Device and then H200 will be turned on. -
Page 15: Read Messages
Read Messages ReFLEX 2 Way Personal Communicator H200 User's Manual You can read and respond to incoming messages & Info, forward and delete messages. It also allows you to manage Inbox, Info, Draft, Personal / Business / Misc folders, Outbox, Sentbox and Delete menu. -
Page 16: Inbox
Read Messages ReFLEX 2 Way Personal Communicator H200 User's Manual 5.1 Inbox All received messages are saved in Inbox folder. <Figure Inbox-1> appears when you select Inbox in the Read menu screen. Upper box shows the message list with an Icon indicating its status and lower box shows the contents of message. direction key is used to move the message you want to read in the list. - Page 17 Read Messages ReFLEX 2 Way Personal Communicator H200 User's Manual After selection of Custom Reply , write the relevant message in <Figure Reply-2> and select in the bottom menu to send the message. If you select Q-text in the bottom menu, the list of text you stored in Pref. menu will be opened as shown in the screen of <Figure Qtext-1>.
- Page 18 Read Messages ReFLEX 2 Way Personal Communicator H200 User's Manual (3) Move If you select Move in the bottom menu, the screen of <Figure Move-1> appears and you can move the message you select to the other folder. After selecting the folder you want among three folders (Personal, Business, Misc) with keys, press to move the message to the selected folder.
-
Page 19: Info
Read Messages ReFLEX 2 Way Personal Communicator H200 User's Manual 5.2 Information Info folder saves all Info messages from your service provider and display information data if you are subscribed to news/information services. Select Info icon to display <Figure Info-1>. Regular information comes in this folder. You can save up to 16 kinds of information. -
Page 20: Draft
Read Messages ReFLEX 2 Way Personal Communicator H200 User's Manual 5.3 Draft You can record and save the message temporarily in this folder. If you select Save function in the bottom menu during writing a message, the message is saved in this folder. And if there is a new arrived message during your composition and you open the new arrived message, the com- posed message shall be saved to Draft Folder automatically. -
Page 21: Personal / Business / Misc
Read Messages ReFLEX 2 Way Personal Communicator H200 User's Manual 5.4 Personal / Business / Misc These folders allow you to classify Received messages and/or Sent messages according to kinds of messages. You can select the message in these folders and then send the message using Forward in the bottom menu. -
Page 22: Sent
Read Messages ReFLEX 2 Way Personal Communicator H200 User's Manual 5.6 Sent This folder is to show the messages successfully sent. Screen of <Figure Sent-1> will appear when you select Sent menu. You can Resend Forward Move Delete the highlighted and/or selected message using the bottom menu in <Figure Sent-1>... - Page 23 Read Messages ReFLEX 2 Way Personal Communicator H200 User's Manual <Figure Delete- 3> <Figure Delete- 4> Page...
-
Page 24: Write Messages
Write Message ReFLEX 2 Way Personal Communicator H200 User's Manual You can compose a message using the QWERTY keyboard, and insert Quick text and other fea- tures in this menu and can send messages to wireless and email addresses. 6.1 How to select the addresses Select Write in the Main menu screen using key and press key. -
Page 25: How To Compose Message
Write Message ReFLEX 2 Way Personal Communicator H200 User's Manual Feature of Bottom Menu (1) Compose If all addresses are selected with “ ”mark, select Compose in the bottom menu to compose a message. Press key to move to bottom menu and key when Compose is highlighted. - Page 26 Write Message ReFLEX 2 Way Personal Communicator H200 User's Manual Feature of Bottom Menu (1) Send Edit and/or modify the message as you want in <Figure Write-5> screen and select Send in the bottom menu to send a message to the contact you selected. (2) Mysend (option item for Service provider) Edit and/or modify the message as you want in <Figure Write-5>...
-
Page 27: Contacts
Contacts ReFLEX 2 Way Personal Communicator H200 User's Manual You can store the address information of each person or group you might want to contact. You can include name, email address, work & home phone number and even address for each contact entry. 7.1 Contact List (Screen showing the list of stored address) Contact List shows contacts which are already saved. -
Page 28: New Contact
Contacts ReFLEX 2 Way Personal Communicator H200 User's Manual (3) Categ’s This bottom menu lets you select the Contacts List for each category. When the Pop-up box asks the Category you want, please select the category using key and press Key. -
Page 29: Contact View
Contacts ReFLEX 2 Way Personal Communicator H200 User's Manual Please add the Contact information you want. You can use key or Key to move to the item you want and enter the information using the Alphabet character and number Key. For Telephone/Fax number, you can enter number, #, (, ), x, - only. -
Page 30: Edit Contact
Contacts ReFLEX 2 Way Personal Communicator H200 User's Manual Feature of Bottom Menu (1) Edit : Move to the Contact Edit screen <Figure Contact-4.1> where you can edit the existing address (2) Snd MSG : Move to Select Contact screen <Figure Write-1> to send a message to the selected address. 7.4 Edit Contact (Screen for Editing Address) You can edit the highlighted contact if you select the Edit... -
Page 31: Name Type
Contacts ReFLEX 2 Way Personal Communicator H200 User's Manual 7.6 Name Type You can select the Name type from the Contact List Screen <Figure Contact-1>. Select the Show as in the bot- tom menu from the Contact List Screen. Then Name Type Screen will be displayed as <Figure Contact-6>. Move the cursor to the item you want as shown in Figure Contact -6, and press key to select and press again to save. -
Page 32: Scheduler
Scheduler ReFLEX 2 Way Personal Communicator H200 User's Manual You can manage and record your schedule, view calendar and alarm function for each saved sched- ule event. 8.1 Calendar (Screen for showing Schedule and Task) If you select the Schedule from the main menu screen, the current Calendar shall be displayed. Use key to select the specific date. -
Page 33: New Schedule
Scheduler ReFLEX 2 Way Personal Communicator H200 User's Manual 8.2 New Schedule (Screen for Entering New Schedule) If you select SchEvt in the bottom menu to input new schedule event, <Figure Scheduler-2> screen will be dis- played. * Note : You also can press key when the cursor is on the date you want to input the new schedule event. -
Page 34: View Day
Scheduler ReFLEX 2 Way Personal Communicator H200 User's Manual 8.3 View Day (Screen for Listing and Previewing Schedule and Task at the Selected Date) If you press the key when the cursor is located in the date underlined, View Day Screen shall be opened as <Figure Scheduler-4>. -
Page 35: Edit Schedule
Scheduler ReFLEX 2 Way Personal Communicator H200 User's Manual 8.4 Edit Schedule (Screen for Modifying selected Schedule) You can edit or modify the selected Event when you select the Edit in the bottom menu from the View Day Screen. After modifying the contents, please save it or cancel it using the bottom menu. <Figure Scheduler-5>... -
Page 36: Task
Task ReFLEX 2 Way Personal Communicator H200 User's Manual You can manage and record To do list with this menu. If there is already stored Task, <Figure Task-1> will be displayed with Preview Box including Due date, Status and Priority of each Task. Task List Task Preview Bottom Menu... -
Page 37: New Task
Task ReFLEX 2 Way Personal Communicator H200 User's Manual 9.1 New Task (Screen for Entering New Task) You can input the New Task by selecting the Add New in the bottom menu from the Task Screen. Input Task title on subject area and then set the Due date, Status, Priority of task using the key. - Page 38 Task ReFLEX 2 Way Personal Communicator H200 User's Manual Edit or modify Task title on Subject area, Due date, Status, Priority of task and Description using Keyboard and Key. Status has 2 options (Open / Close) and Priority has 3 options (Low / Medium / High). key to move to the specific item.
-
Page 39: Memo
Memo ReFLEX 2 Way Personal Communicator H200 User's Manual You can record your memo and also send the saved memo as message to other addresses. If there is already stored Memo, <Figure Memo-1> will be displayed with Preview Box including Notes. -
Page 40: New Memo
Memo ReFLEX 2 Way Personal Communicator H200 User's Manual 10.1 New Memo (Screen for Entering New Memo) You can input the New Memo by selecting the Add New in the bottom menu from the Memo Screen. Input Subject and Notes in each area and save it using the bottom menu. Use key to move the Text field. -
Page 41: Send Memo
Memo ReFLEX 2 Way Personal Communicator H200 User's Manual Edit or modify Subject and Notes on event area. You can enter characters, numbers and symbols in Text field. key to move to the specific item. Press key to move to the bottom menu. Feature of Bottom Menu (1) Update : Save the modified contents. -
Page 42: Preference (Setting Up Your Device)
Preference ReFLEX 2 Way Personal Communicator H200 User's Manual This application provides various features that allow you to select various options and to execute several functions such as Alert Setting, Quick Text and Setup, etc. Select Prefs from the Main menu screen and <Figure Prefs-1> shall be displayed. You can move to the item you want using key and press key to open the highlighted... -
Page 43: Volume
Preference ReFLEX 2 Way Personal Communicator H200 User's Manual 11.1.1. Volume Select Volume you want using the key in volume field. There are three options for volume control such as Low/Medium/High. 11.1. 2. Inbox, Info, Sch & Alm You can select the preferable alert type using key for Inbox, Info., Sch &... -
Page 44: Private Time
Preference ReFLEX 2 Way Personal Communicator H200 User's Manual * Add a New Quick Text Please press the key when [New Text] is highlighted then the Figure Prefs-4 will be displayed. Enter the text you want and press key to save the contents. key can be used to return to the previous screen without saving. -
Page 45: Setup
Preference ReFLEX 2 Way Personal Communicator H200 User's Manual 11.4 Setup In order to set up the various items for H200, select 4. Setup menu in Preference Screen. Then, the <Figure Prefs-7> will be displayed. <Figure Prefs-7> 11.4.1 Set Date & Time In order to set the current time of Device, select 1. -
Page 46: Display Settings
Preference ReFLEX 2 Way Personal Communicator H200 User's Manual 11.4.2 Display Settings You can set the Display condition in this menu. Please select 2. Display Settings from the Setup Screen and press key. Then, Display Settings Screen will be displayed as <Figure Prefs-9>. <Figure Prefs-9>... -
Page 47: Signature
Preference ReFLEX 2 Way Personal Communicator H200 User's Manual 11.4.4 Signature You can set the automatic Signature in this menu. Please select 4. Signature from the Setup Screen and press key. Then, Signature Screen will be displayed as <Figure Prefs-11>. * Display : In order to attach your signature automatically in the end of each messages you send, select the Enable with key. -
Page 48: About
Preference ReFLEX 2 Way Personal Communicator H200 User's Manual *Lock : In order to set key lock function on, select “Enable” with key. If you don’t want key lock function, select “Disable”. You can change this without password input. *Password : In order to change the password, you need to enter the cur- rent 4 digits password. -
Page 49: Mymail Setup
Preference ReFLEX 2 Way Personal Communicator H200 User's Manual 11.6 Mymail Setup You can set the Mymail Setup in this menu. Please select 6. MyMail Setup from the Preferences Screen and press key. Then, <Figure Prefs-16> will be displayed. * Note : This is Carrier option menu. -
Page 50: Alarm
Alarm ReFLEX 2 Way Personal Communicator H200 User's Manual You can set the alarm on your device. Please select Alarm from the Main Menu Screen and press key. Then, <Figure Alarm-1> shall be displayed. <Figure Alarm-1> 12.1 Alarm Clock If you want to set the normal Alarm clock, please select Alarm Clock and press key. -
Page 51: Timer Alert
Alarm ReFLEX 2 Way Personal Communicator H200 User's Manual 12.2 Timer Alert If you want to set the Timer Alert, please select Timer Alert and press key. Then, <Figure Timer Alert -1> will be displayed. <Timer Alert-1> * Set : If you want to set the Timer Alert On, select the ON with key. -
Page 52: Etiquette
Etiquette ReFLEX 2 Way Personal Communicator H200 User's Manual You can use this menu when you need to be in etiquette mode. Please select the Etiquette from the Main Menu Screen. If you press key, Alert type will be changed from Sound to Vibrator, from Vibrator to Mute and from Mute to Sound. -
Page 53: Lock
Lock ReFLEX 2 Way Personal Communicator H200 User's Manual You can lock the keys in this menu. Please select Lock from the Main Menu Screen and press key to lock the key operation. Then, all keys will be locked except Alt key, Caps key, Hold key and Power key. And <Figure Lock-1>... -
Page 54: World Clock
World Clock ReFLEX 2 Way Personal Communicator H200 User's Manual You can easily check the current time for other cities and countries with world map in the menu. Please select World Clock from the Main Menu Screen and press key. Then, <Figure W/Clock-1> will be displayed. <Figure W/Clock-1>... -
Page 55: Entertainment
Entertain ReFLEX 2 Way Personal Communicator H200 User's Manual You can enjoy the games and other menu in the menu, which the carriers supply. The Black Jack game is supplied as a standard game. If you want to use other entertainment such as E book, please contact the Service Provider for detailed information. - Page 56 Entertain ReFLEX 2 Way Personal Communicator H200 User's Manual <Figure Game- 3> * Refill the money : You can start the game with 1000 point in total. If you need to refill the money, press key in <Figure Game-1> screen. Page...
-
Page 57: Tx Set
Tx Set ReFLEX 2 Way Personal Communicator H200 User's Manual You can set TX to On and/or Off in this menu. Please select the Tx Set from the Main menu Screen and press key. Then <Figure TxSet-1> will be displayed. <Figure TxSet-1>... -
Page 58: Calculator
Calculator ReFLEX 2 Way Personal Communicator H200 User's Manual You can use the device as a calculator in this menu. Please select Calculator from the Main Menu Screen. Then, <Figure Calc-1> will be displayed. <Figure Calc-1> 1. Direction ( ) key, number key (1~0) are used. -
Page 59: Mymail
Mymail ReFLEX 2 Way Personal Communicator H200 User's Manual This is the Option menu for each Carrier, please contact the Service provider for detailed informa- tion. <Figure Mymail-1> Page... -
Page 60: Device And Battery Care
Device and Battery Care ReFLEX 2 Way Personal Communicator H200 User's Manual 1) Use only approved battery and power charger. Charging battery by any other method or unauthorized product may cause damage to the device. 2) Keep in mind that a new battery’s full performance is achieved only after two or three times of completed charging. -
Page 61: Trouble Shooting
Trouble Shooting ReFLEX 2 Way Personal Communicator H200 User's Manual Screen cannot be turned on at all. It is because the battery is completely exhausted. Use it after charging. 2. Key is not pressed. It is because Key is put on a hold. Release Hold Key. 3. - Page 62 Trouble Shooting ReFLEX 2 Way Personal Communicator H200 User's Manual 11. I cannot add the space and symbol is added. It is in Alt Lock mode. Press Alt key to release Alt mode. 12. Periodically, the date and time are incorrect. Please go to Preference menu from the main screen and then select “4.
-
Page 63: Fcc Compliance Statement
FCC Compliance Statement ReFLEX 2 Way Personal Communicator H200 User's Manual This equipment has been tested and found to comply with the limits for a Class B Digital Device, pursuant to Part 15 of the FCC Rules. These limits are designed to provide reasonable protection against harmful interference in a residential installation. This equipment generates, uses and can radiate radio frequency energy and, if not installed and used in accordance with the instruction, may cause harmful interference to radio communication. -
Page 64: Ul Compliance Statement
UL Compliance Statement ReFLEX 2 Way Personal Communicator H200 User's Manual This equipment is suitable for use in Class I, Division 2, Groups A, B, C and D. ; or Nonhazardous locations only. Warning - Explosion Hazard - substitution of components may impair suitability for Class I, Division 2 ; Hazardous Locations.
Need help?
Do you have a question about the ReFLEX H200 and is the answer not in the manual?
Questions and answers